Carving pumpkins is fun, but it’s also messy. You have to scoop out the guts, use sharp tools, and deal with a rotting pumpkin within days.
Pumpkin painting ideas solve that problem. You skip the mess, keep your fingers safe, and create something that lasts the whole season. Plus, anyone can do it.
You don’t need special skills or expensive supplies. Just grab some paint and brushes, and you’re ready to go.
In this post, you’ll find plenty of pumpkin painting ideas you can try at home. We’ll cover simple designs for beginners, creative options for kids, and stylish looks for your front porch.
You’ll also get tips on choosing paint, sealing your work, and making your pumpkins last through Halloween and beyond.
Pumpkin Painting Ideas You Can Try at Home
These pumpkin painting ideas range from super simple to more detailed. Pick what matches your skill level and the time you have.
Some designs work great for kids, while others suit adults who want something more polished. All of them skip the carving mess and give you decor that lasts.
Let’s start with the easiest options and work our way up.
1. Polka Dot Pumpkin
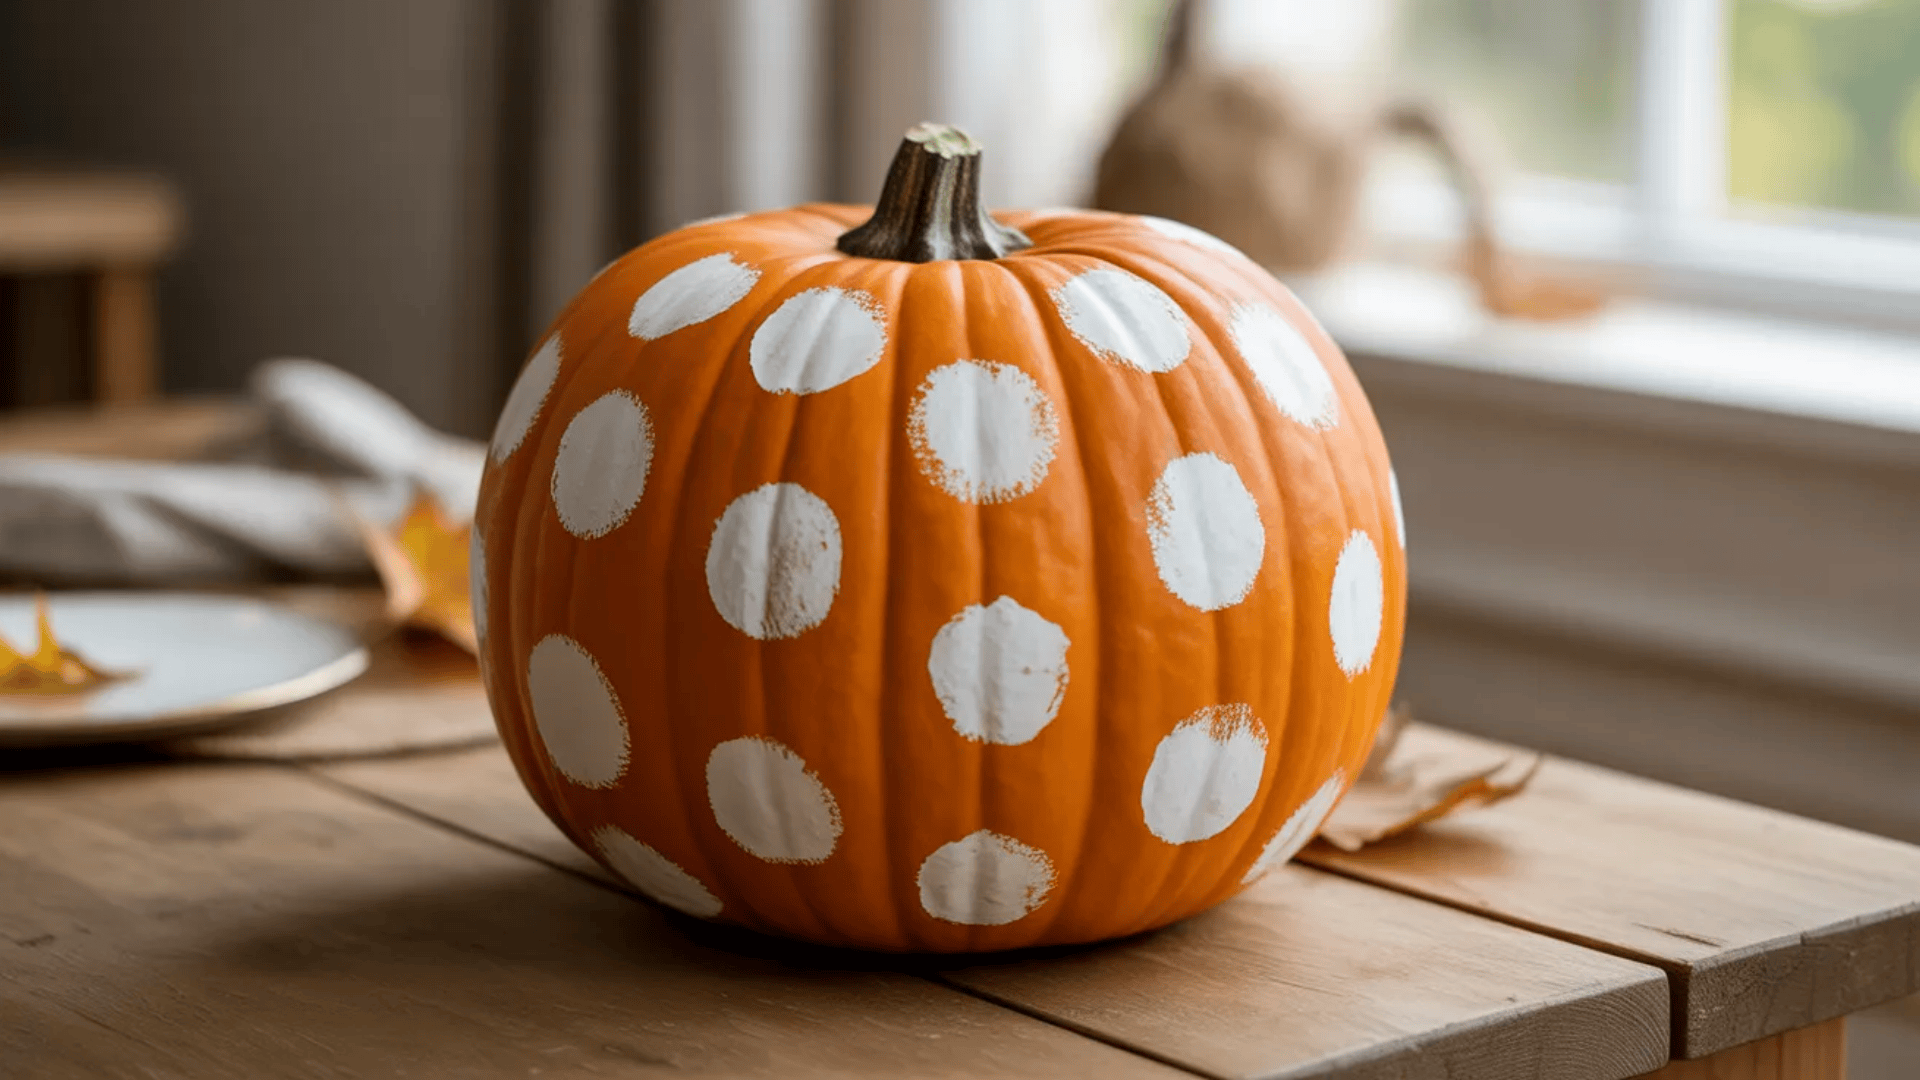
Polka dots are one of the easiest pumpkin painting ideas to pull off. You don’t need steady hands or artistic skills.
Use the back end of a paintbrush to create perfect circles. Dip it in paint and stamp it onto your pumpkin. This works better than trying to paint circles freehand.
Popular color combinations:
- White dots on orange pumpkins
- Gold dots on white pumpkins
- Black dots on pastel backgrounds
- Rainbow dots on cream pumpkins
Space your dots evenly for a neat pattern, or place them randomly for a casual vibe. Kids love this technique because it’s simple and forgiving.
For extra style, vary your dot sizes using different brush handles or even pencil erasers.
2. Color-Dipped Pumpkin
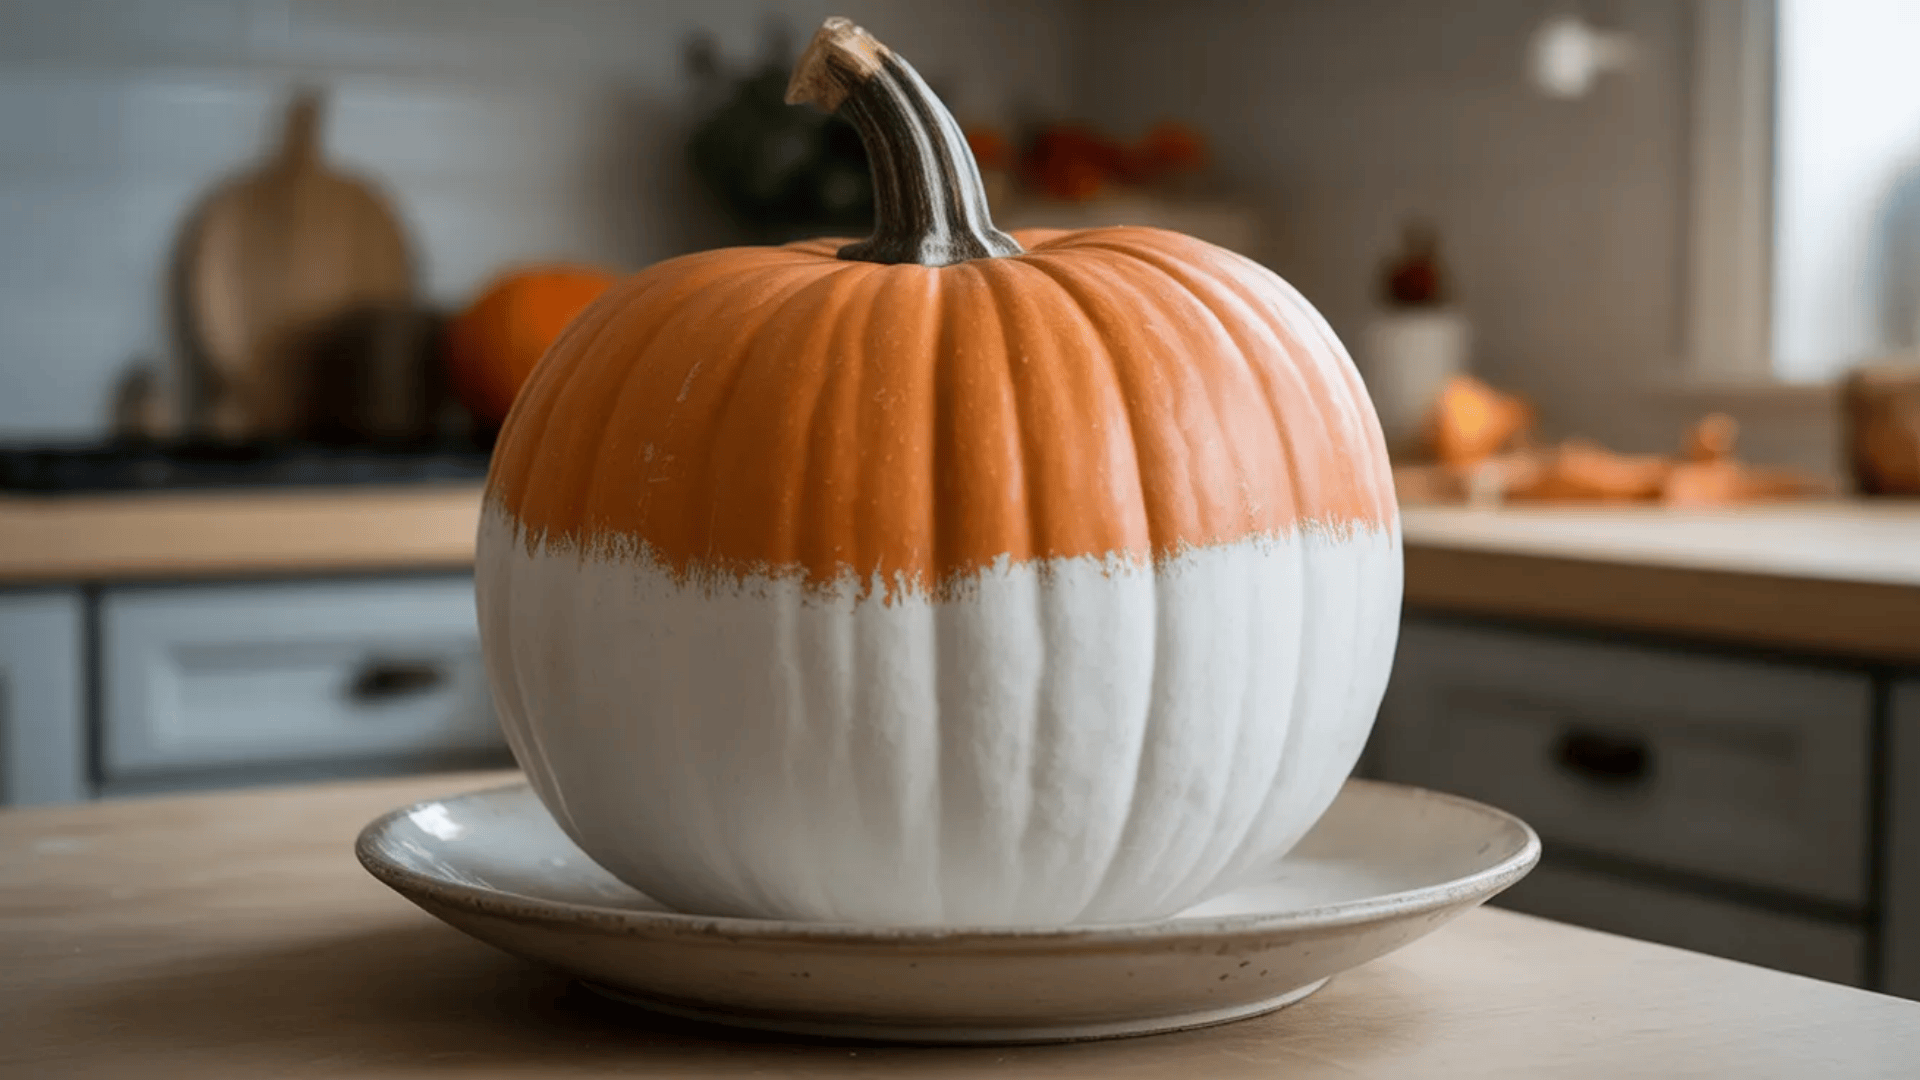
Color-dipped pumpkins give you a modern, clean look with minimal effort. You only paint part of the pumpkin and leave the rest natural.
Use painter’s tape for a straight edge, or go freehand for a relaxed vibe. Paint just the bottom half or the top third of your pumpkin.
Try these colors:
- White for a minimalist look
- Metallic gold or copper for glam
- Soft pink or mint for a pastel vibe
- Black for modern contrast
Set your pumpkin on a cup to dry so the wet paint doesn’t touch anything. Mix dipped pumpkins with plain ones in your display for added visual interest.
3. Striped Pumpkin
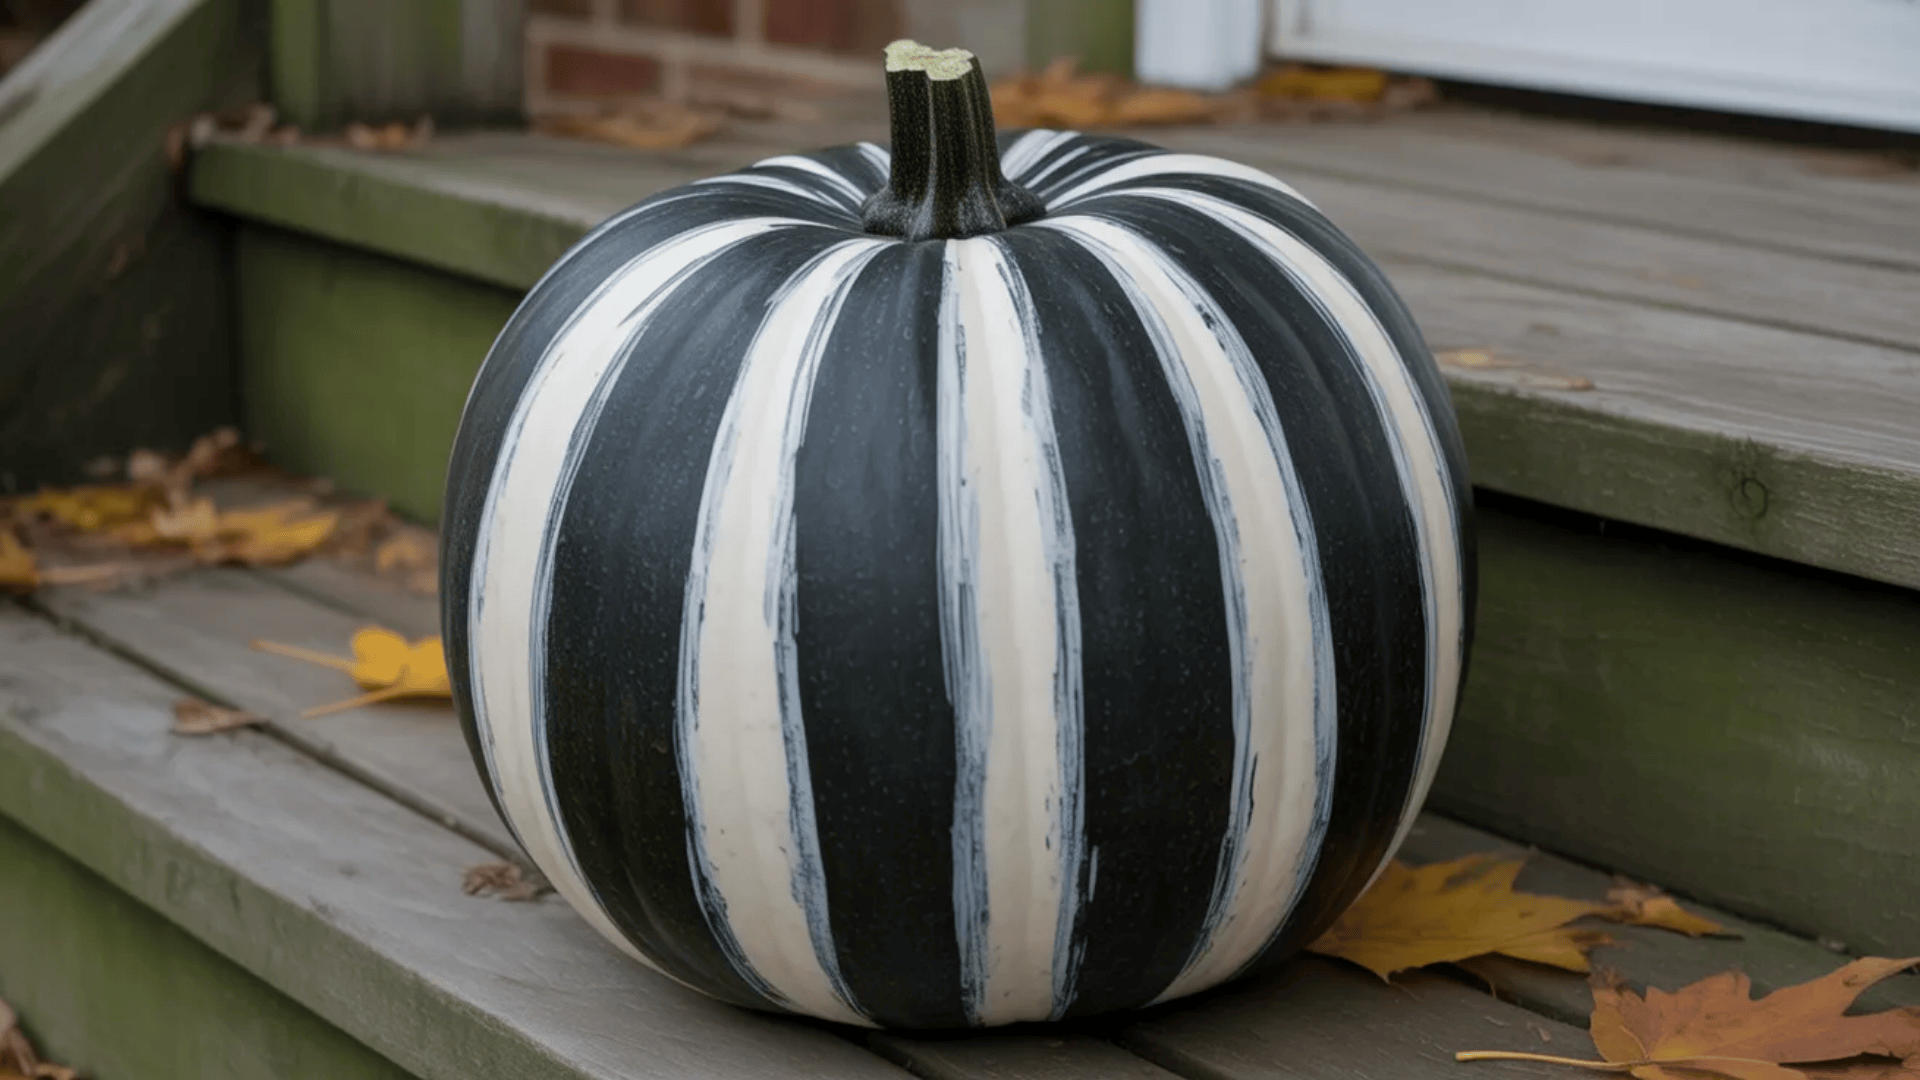
Striped pumpkins work with any color scheme and fit both modern and traditional decor. The vertical ridges on pumpkins make natural guides for your stripes.
Paint alternating sections in different colors. Follow the natural lines of the pumpkin, or use painter’s tape to create horizontal stripes instead.
Try these stripe styles:
- Black and white for classic contrast
- Orange and white for a fresh fall look
- Gold and cream for something fancy
- Rainbow stripes for a playful touch
Let each stripe dry before painting the next stripe. This keeps colors from bleeding into one another and gives you crisp, clean lines.
Vary your stripe width for more interest. Mix thick and thin stripes, or keep them all the same size for a uniform pattern.
4. Abstract Brush Stroke Pumpkin
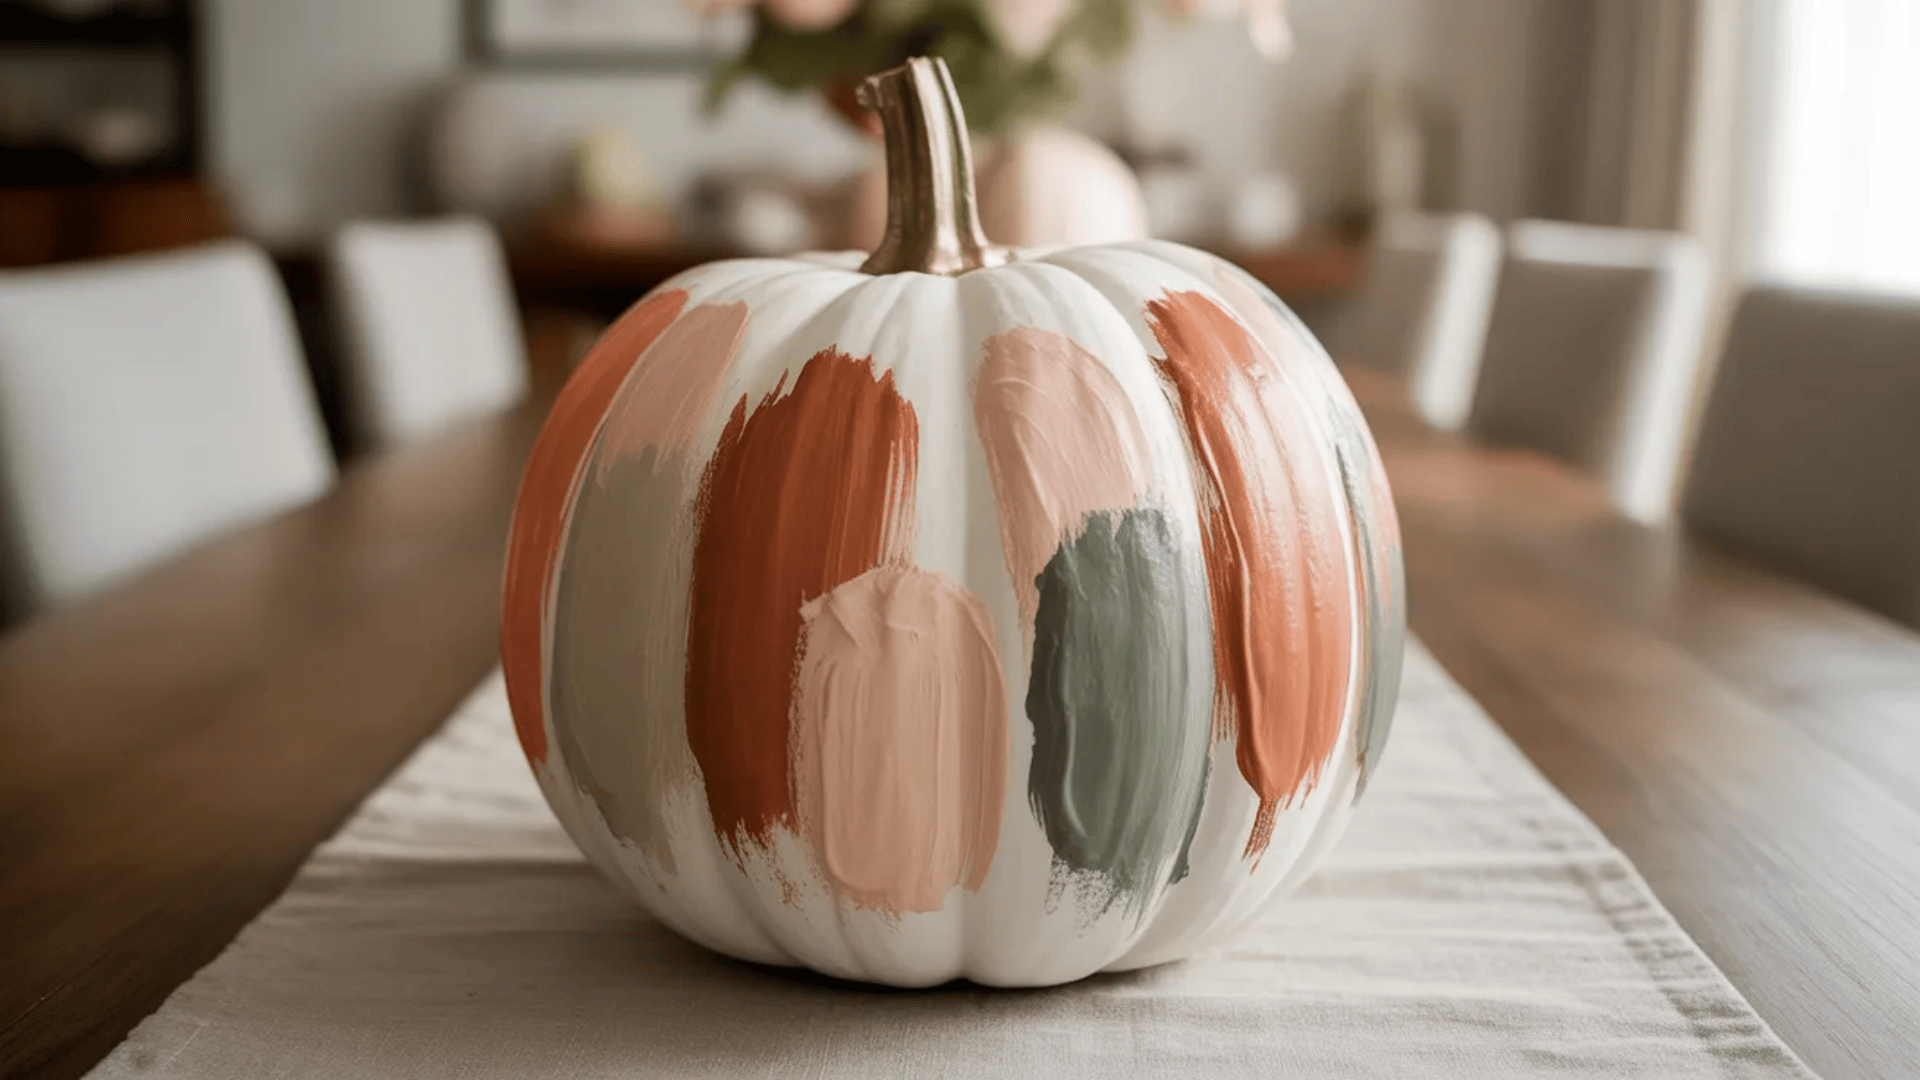
Abstract brush strokes let you get creative without following any rules. This style looks artistic even if you’re not an artist.
Use bold, sweeping motions with your paintbrush. Make swirls, curves, or random strokes across your pumpkin. Don’t worry about making it perfect.
Try these approaches:
- Single color strokes on a white base
- Multiple colors that blend together
- Thick brush strokes for drama
- Thin, delicate lines for subtlety
Let your first layer dry before adding more strokes on top. This creates depth and keeps colors from getting muddy.
Mix different brush sizes for variety. Wide brushes make bold statements, while thin brushes add fine details.
5. Solid Pastel Pumpkin
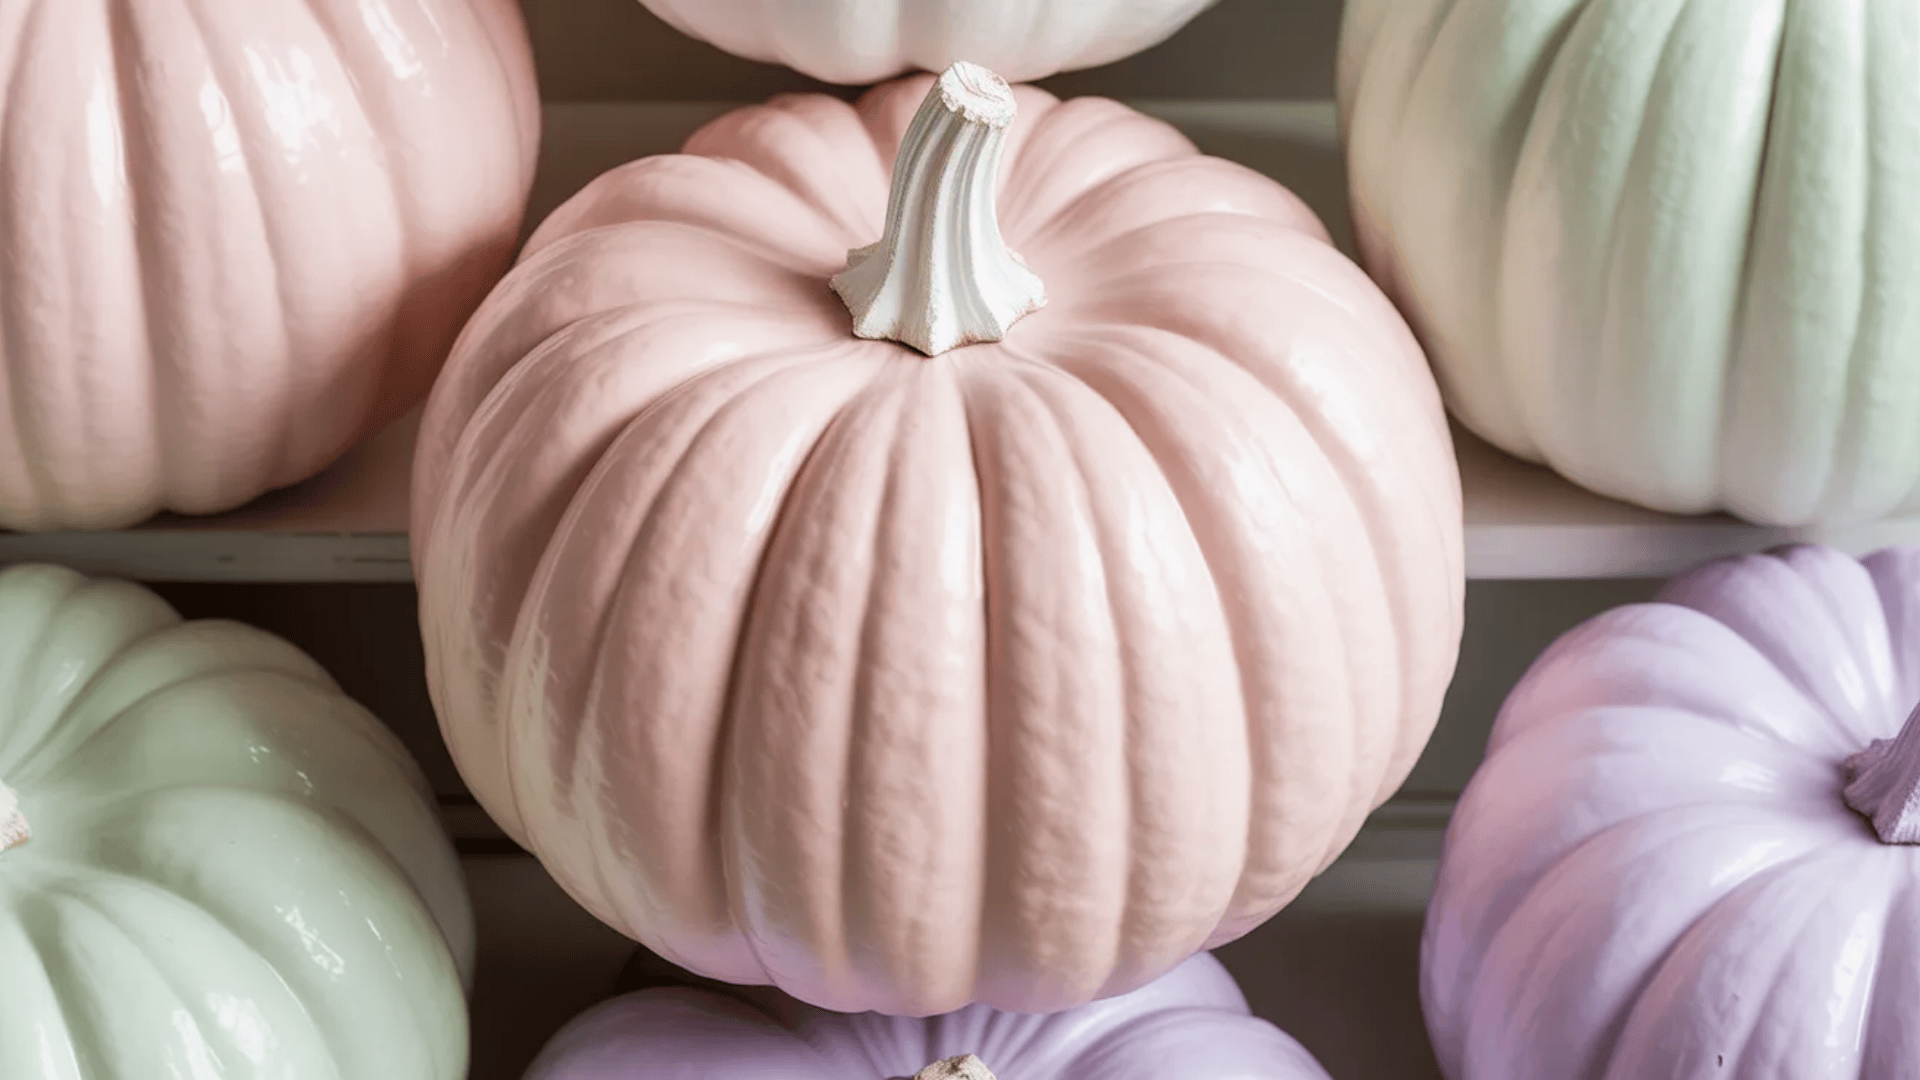
Solid pastel pumpkins bring a soft, modern feel to your fall decor. They work great if you want something less traditional than orange.
Pick your favorite pastel shade and paint the entire pumpkin. Use spray paint for quick, even coverage, or brush on acrylic paint in thin layers.
Try these pastel colors:
- Blush pink for a feminine touch
- Mint green for fresh vibes
- Lavender for something unexpected
- Peach for a warm glow
Apply two to three coats for full coverage. Let each coat dry completely before adding the next one.
Leave the stem natural, or paint it gold or white for extra polish. Group pastel pumpkins in different sizes and shades for a cohesive display.
6. Smiley Face Pumpkin

Smiley face pumpkins are perfect for kids and add a cheerful vibe to your Halloween decor. They’re easy to paint and always turn out cute.
Paint a simple smile and two eyes using black paint. You can make them big and goofy or small and sweet.
Try these variations:
- Classic round eyes and curved smile
- Winking face with one eye closed
- Big toothy grin with teeth showing
- Sleepy eyes with a small smile
Use white pumpkins as your base for better contrast. Paint the whole pumpkin yellow first if you want a true emoji look.
Add rosy cheeks with pink paint for extra charm. Kids can help with this project since the shapes are simple and forgiving.
7. Emoji Pumpkin
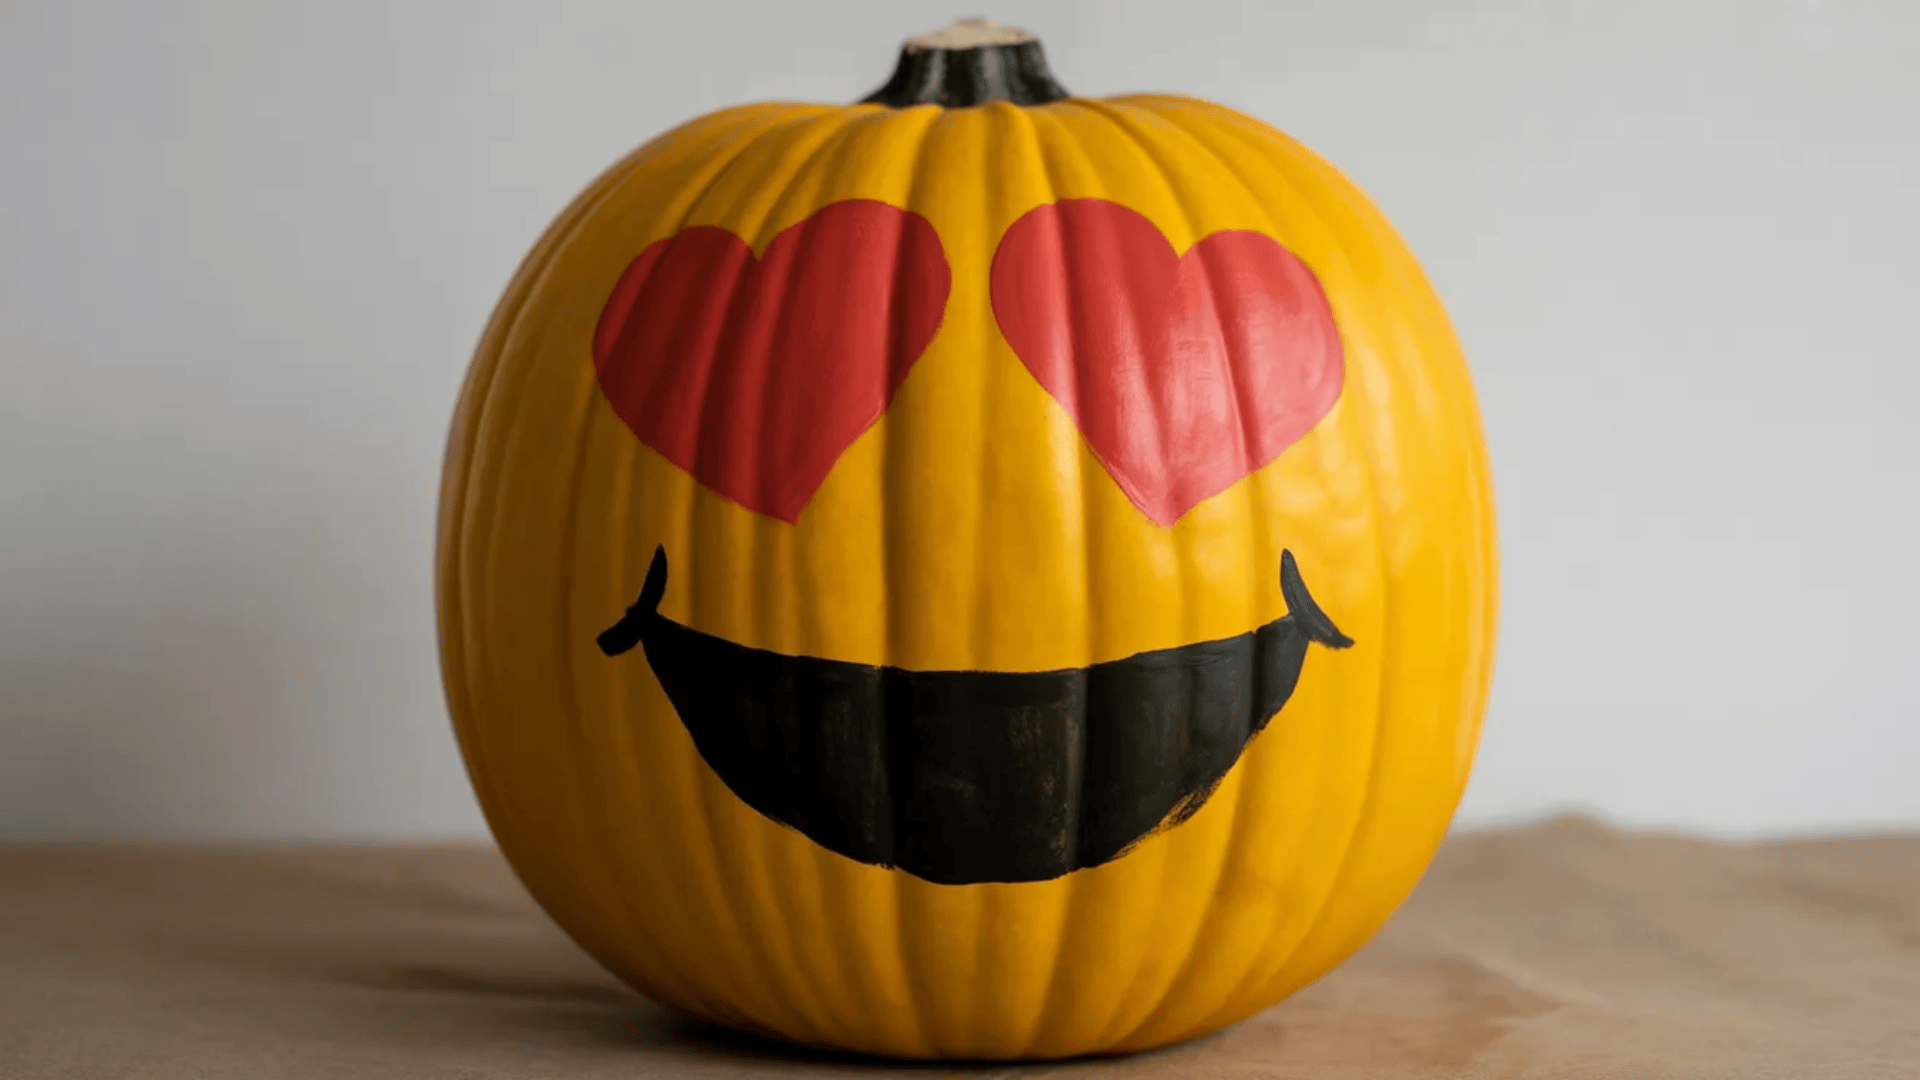
Emoji pumpkins bring popular phone icons to life. Pick your favorite emoji and recreate it on a pumpkin.
Start with a yellow base coat to mimic the classic emoji look. Then add facial features using black, white, and other accent colors.
Try these popular emojis:
- Heart eyes with red or pink hearts
- Laughing face with tears of joy
- Sunglasses emoji for a cool look
- Kiss face with puckered lips
Paint the features large enough to see from a distance. Simple shapes work better than tiny details on round surfaces.
Group different emoji pumpkins together for a fun collection that guests will recognize instantly.
8. Animal Face Pumpkin
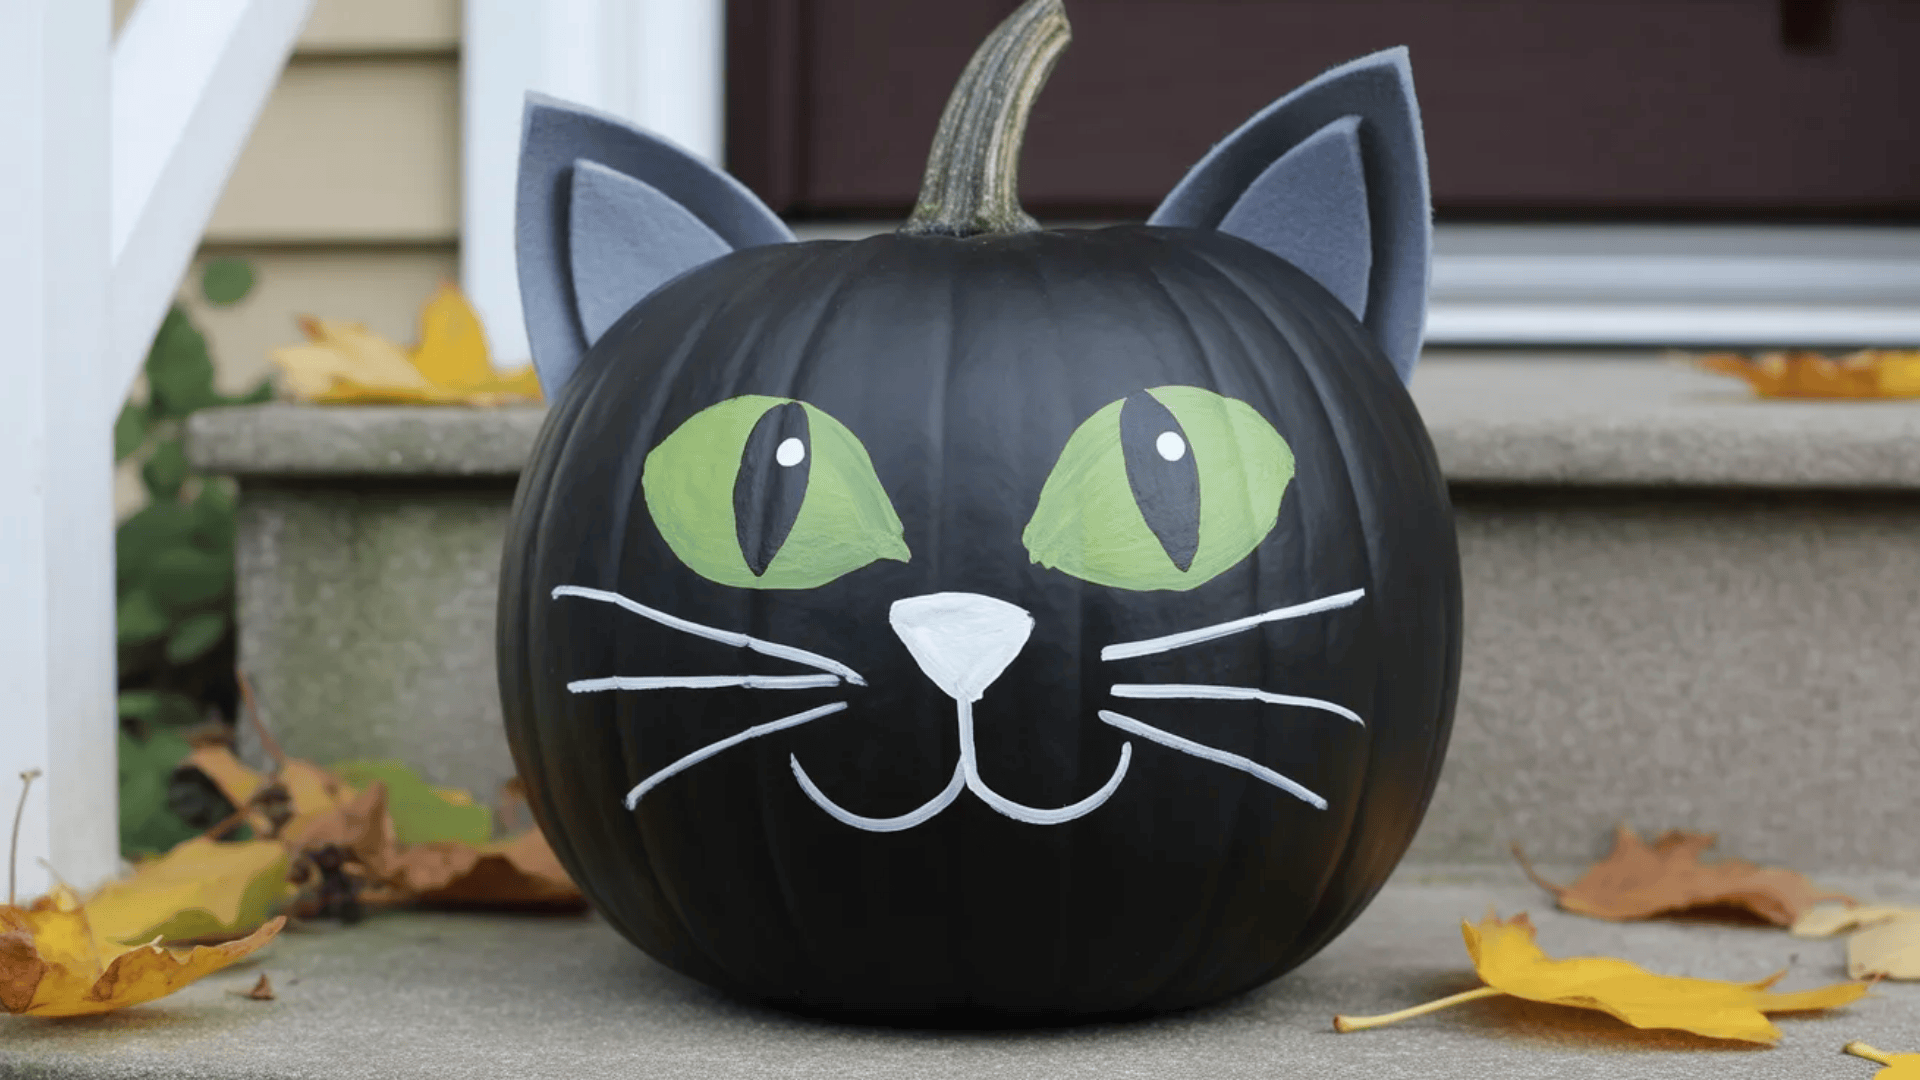
Animal face pumpkins turn your gourds into cute creatures. This design works for any age and skill level.
Paint the whole pumpkin in your animal’s main color. Then add facial features like eyes, nose, and ears using paint or craft materials.
Try these animal ideas:
- Black cat with green eyes and whiskers
- Owl with big round eyes
- Fox with orange and white coloring
- Bear with brown fur and round ears
Use felt or foam sheets for ears and attach them with glue. Add pipe cleaners for whiskers or googly eyes for instant personality.
Keep facial features simple and oversized so they’re easy to see. This makes the animals look friendly and approachable.
9. Rainbow Pumpkin
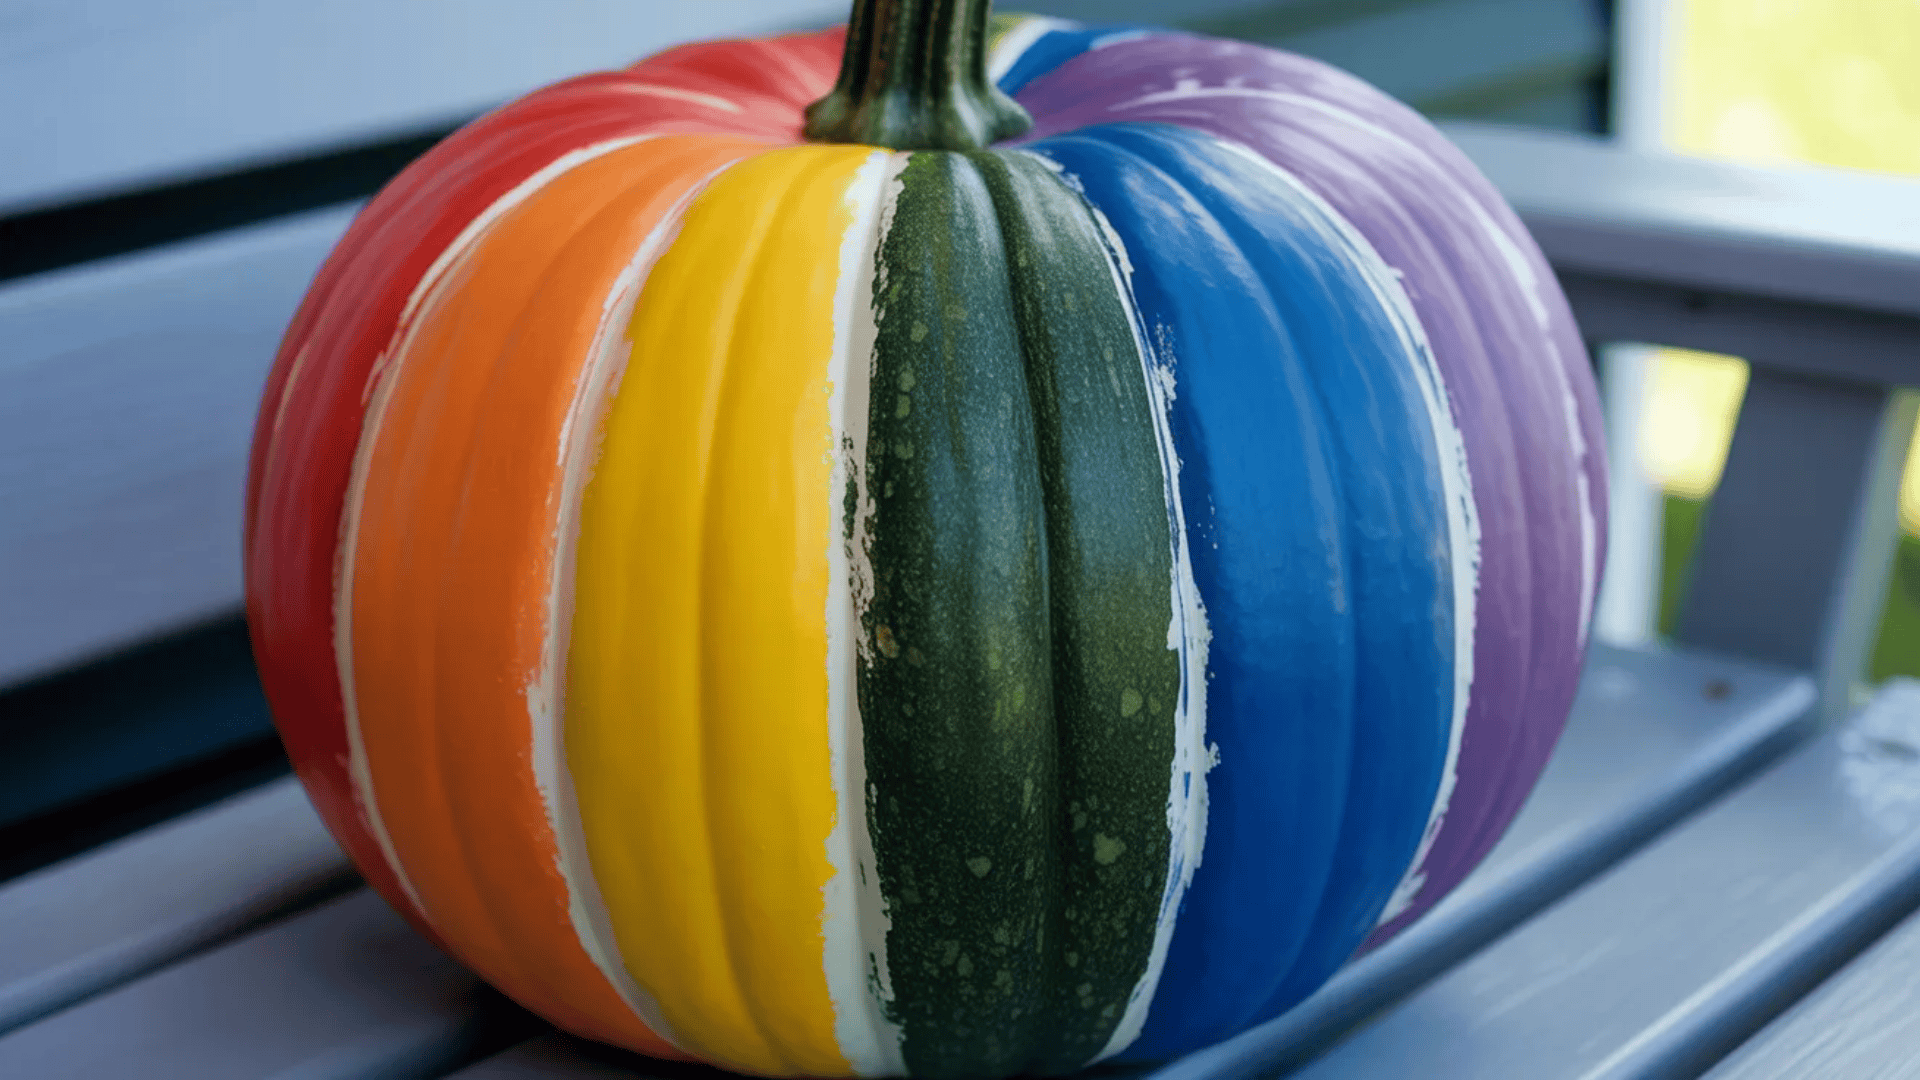
Rainbow pumpkins bring bright, happy colors to your fall display. They work great for kids’ rooms or adding a pop of color to your porch.
Paint vertical stripes in rainbow order across your pumpkin. Start with red at the top and work through orange, yellow, green, blue, and purple.
Try these rainbow styles:
- Classic rainbow with all colors
- Pastel rainbow for softer tones
- Neon rainbow for bold impact
- Watercolor rainbow with blended edges
Use painter’s tape between colors if you want crisp lines. Or blend where colors meet for an ombre effect.
Paint on a white base first so your colors look brighter and more vibrant. This helps especially with lighter shades like yellow.
10. Cartoon Eyes Pumpkin

Cartoon eyes pumpkins add instant personality with just paint and maybe some googly eyes. These work great for a fun, family-friendly Halloween look.
Paint oversized eyes with big pupils that look in different directions. Add thick black outlines to make them pop like cartoon characters.
Try these eye styles:
- Wide-eyed and surprised look
- Sleepy half-closed eyes
- Cross-eyed for silly vibes
- One big eye and one small eye
Use white paint for the eye base and black for pupils. You can also glue on large googly eyes instead of painting them.
Add eyebrows, eyelashes, or even glasses drawn on with paint markers. Keep features exaggerated and bold for maximum cartoon effect.
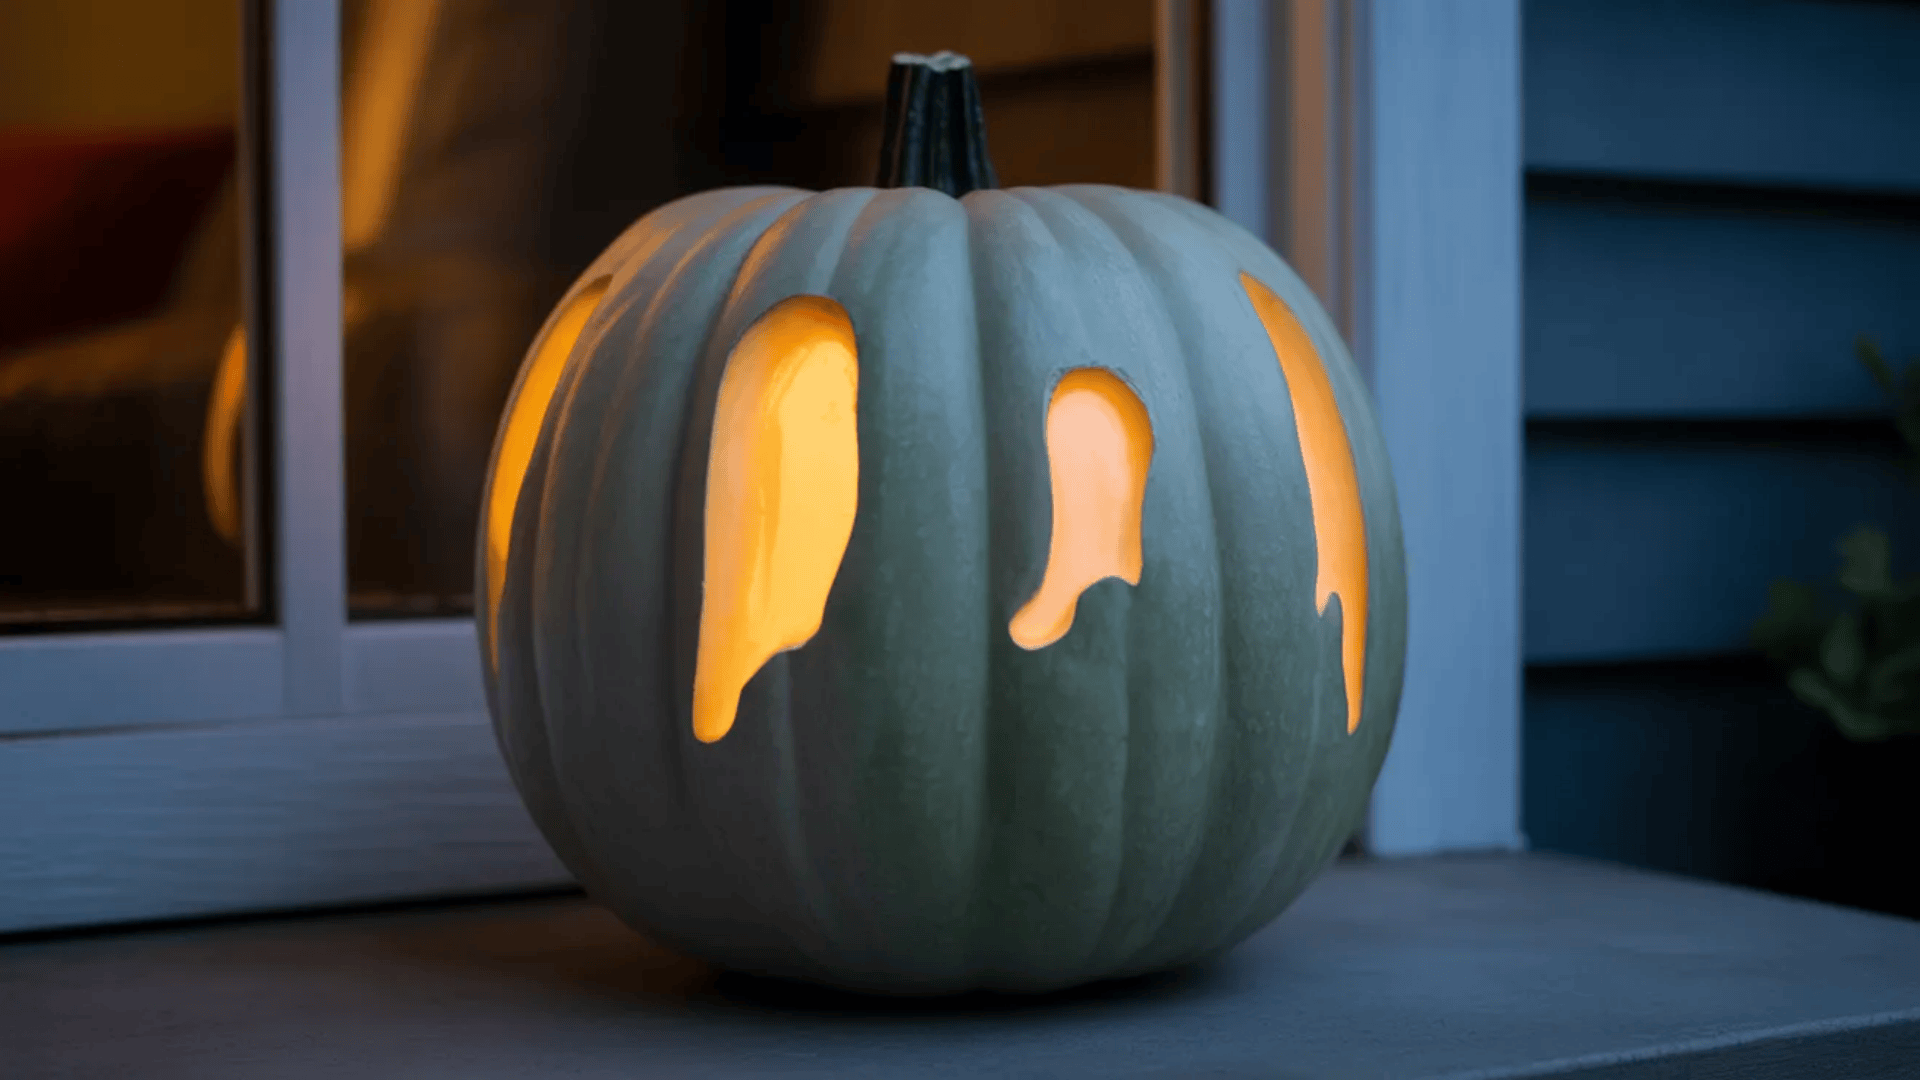
11. Ghost Pumpkin
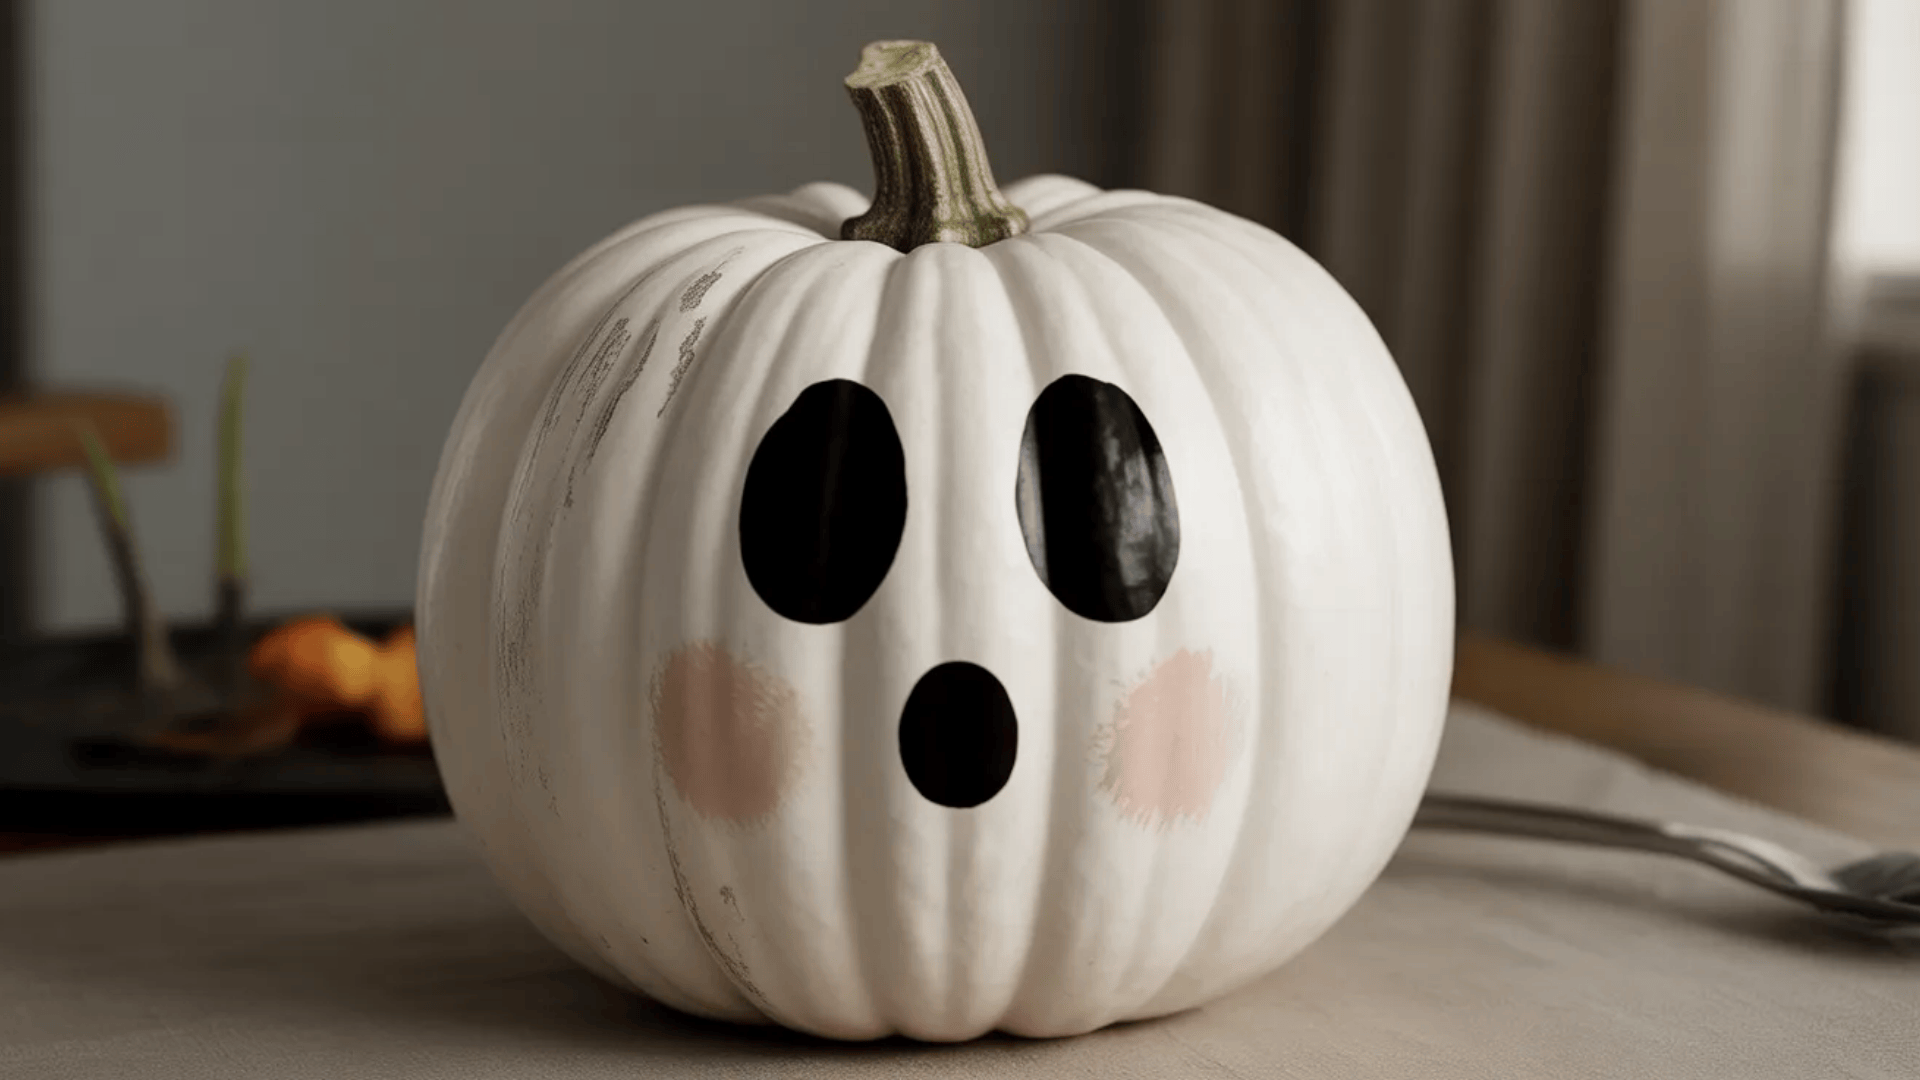
Ghost pumpkins are a Halloween classic that anyone can paint. They’re spooky but not too scary, making them perfect for all ages.
Paint your pumpkin white first for the ghost base. Let it dry completely before adding the face.
Try these ghost faces:
- Simple oval eyes and a round mouth
- Wavy mouth for a friendly ghost
- Triangle eyes for a spookier look
- Just two dots for a minimalist ghost
Use black paint or a paint marker for facial features. Keep the design simple with just eyes and a mouth.
Leave the stem unpainted or paint it black. Add pink dots for rosy cheeks if you want a cute ghost instead of a scary one.
12. Bat Silhouette Pumpkin
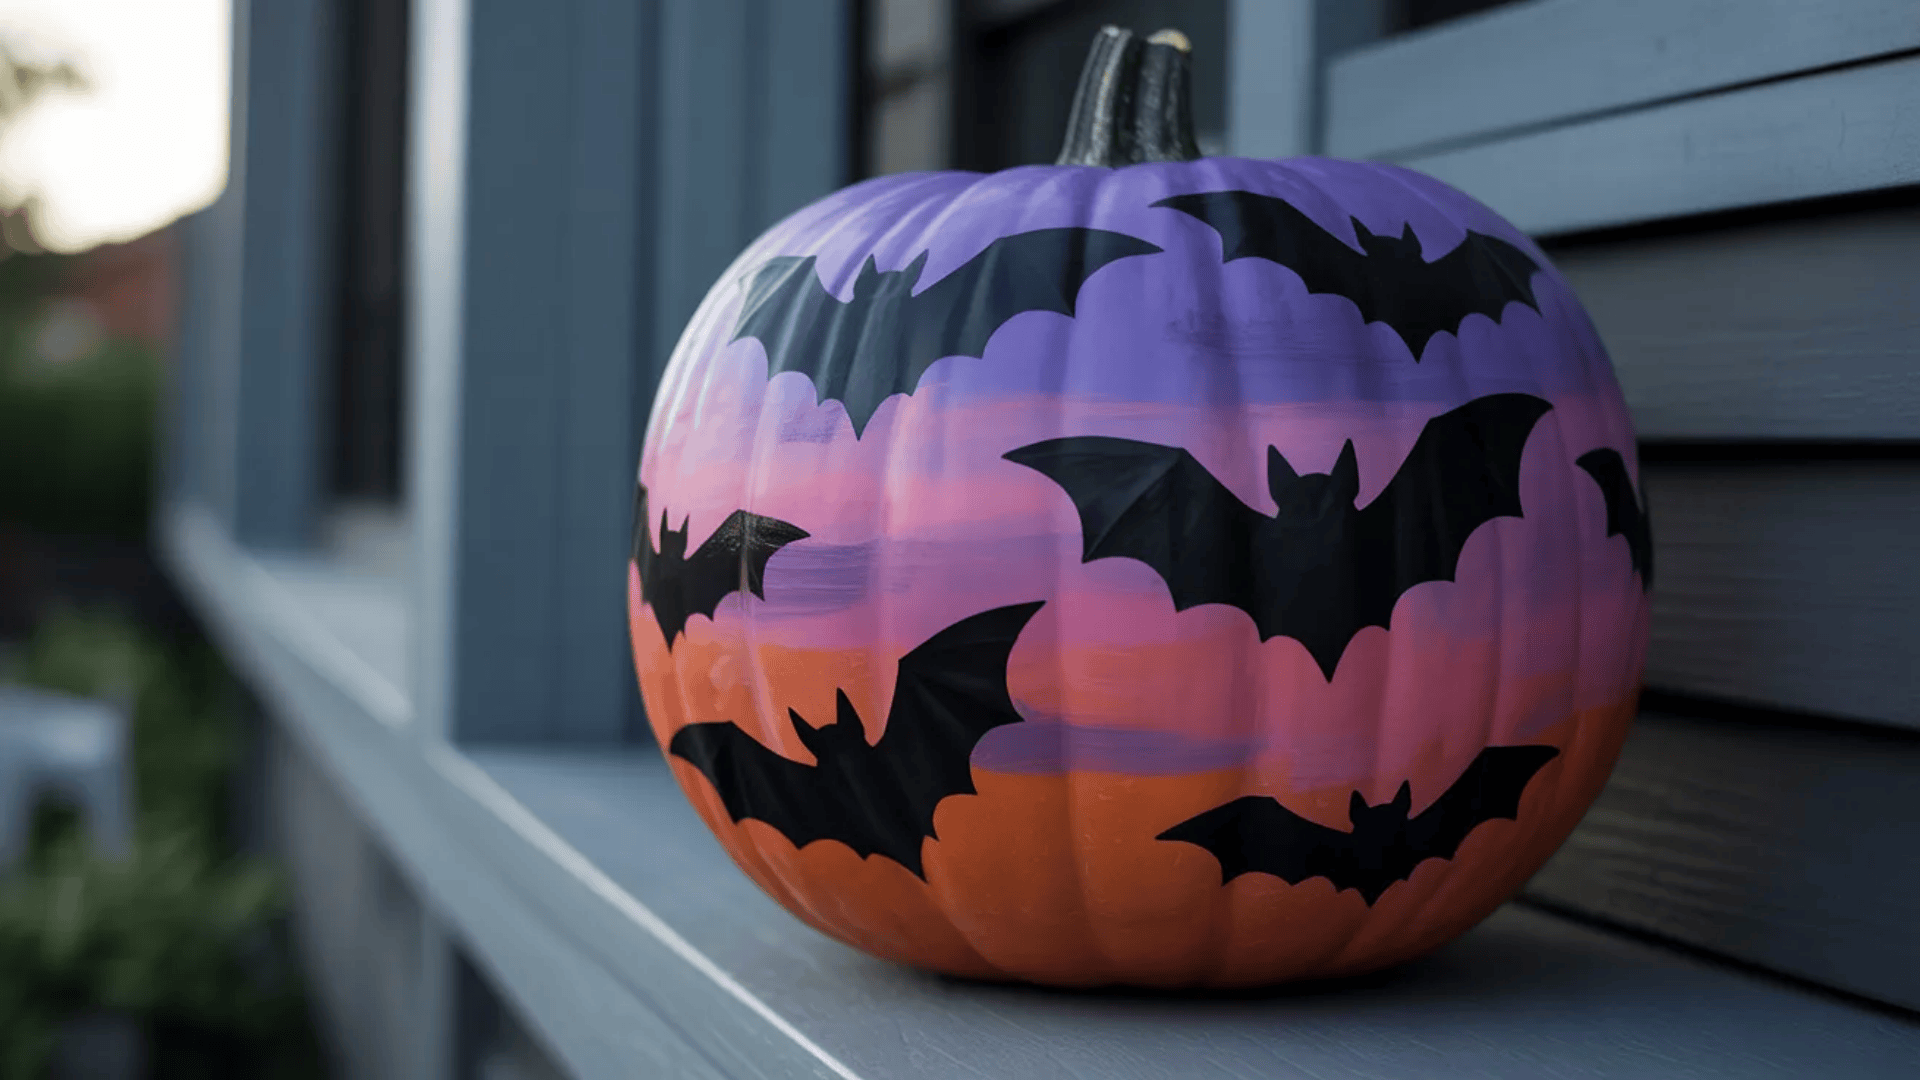
Bat silhouette pumpkins create a spooky scene perfect for Halloween night. Paint flying bats against a colorful background for dramatic effect.
Start with a base color like orange, purple, or even a sunset gradient. Let it dry before adding your bats.
Try these background options:
- Bright orange for classic Halloween
- Purple and pink sunset gradient
- Dark blue night sky
- White for high contrast
Paint simple bat shapes using black paint. Make them different sizes and angles like they’re flying across the pumpkin.
Use a small brush or cut out bat stencils from paper. Tape the stencil on and dab paint over it for perfect shapes every time.
13. Spider Web Pumpkin

Spider web pumpkins look intricate but are actually easy to create. The web pattern adds instant Halloween vibes to any pumpkin.
Use painter’s tape to create the web pattern. Start from the stem and work outward in a spiral, then add connecting lines.
Try these web styles:
- White web on black pumpkin
- Black web on orange pumpkin
- Silver or gold web for sparkle
- Glow-in-the-dark web for night display
Spray paint over the tape, then carefully peel it off once dry. This gives you crisp, clean lines without needing steady hands.
Add a plastic spider with hot glue for the finishing touch. Place it on the web or let it dangle from the stem.
14. Witch Hat Pumpkin
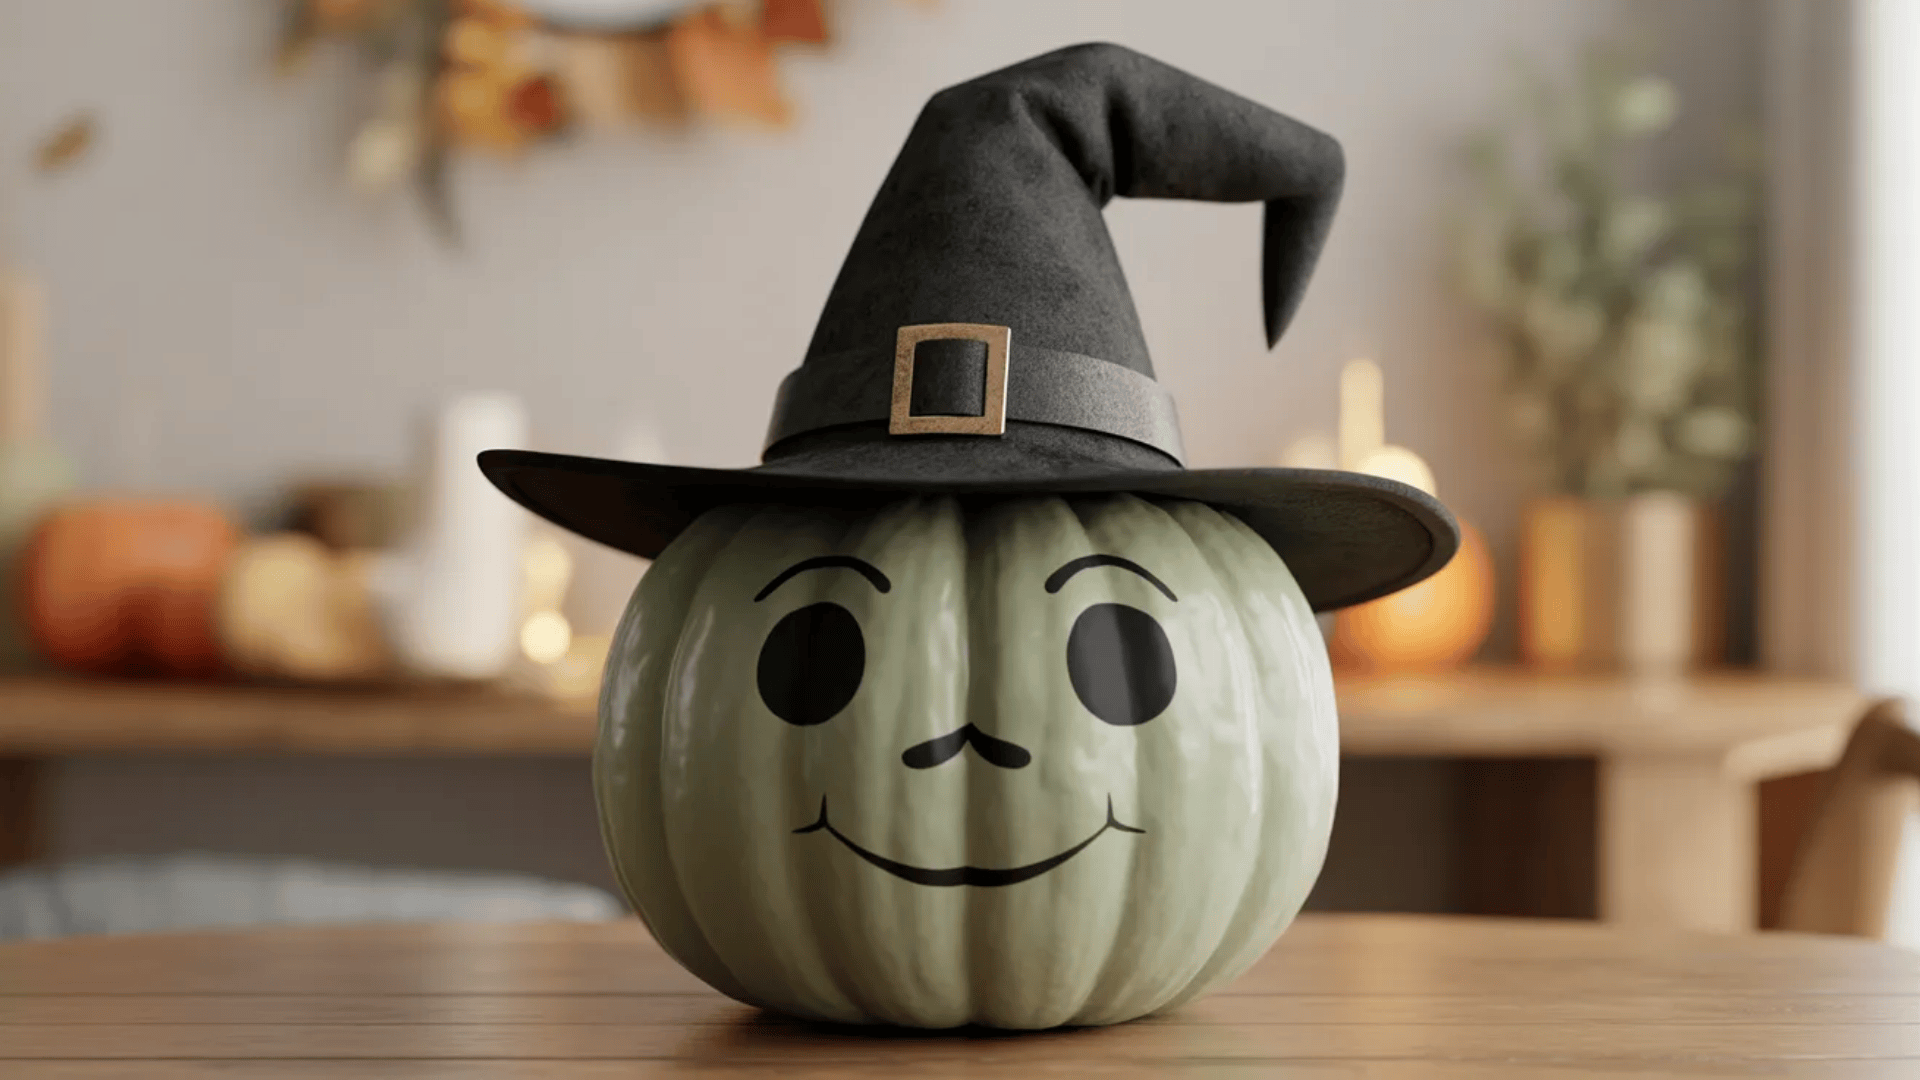
Witch hat pumpkins are a cute way to celebrate Halloween without going too spooky. They’re especially fun when you add a real hat on top.
Paint your pumpkin in witch-themed colors like purple, black, or green. Add a simple witch face with a pointy nose and wicked smile.
Try these witch details:
- Green skin with warts
- Purple hair made from yarn
- Black cat companion painted on
- Stars and moons around the face
Cut a small cone from black felt and glue it on top as a hat. Or use a mini witch hat from a craft store.
Add details like buckles on the hat using gold or silver paint. Keep the face simple so the hat becomes the main feature.
15. Candy Corn Pumpkin
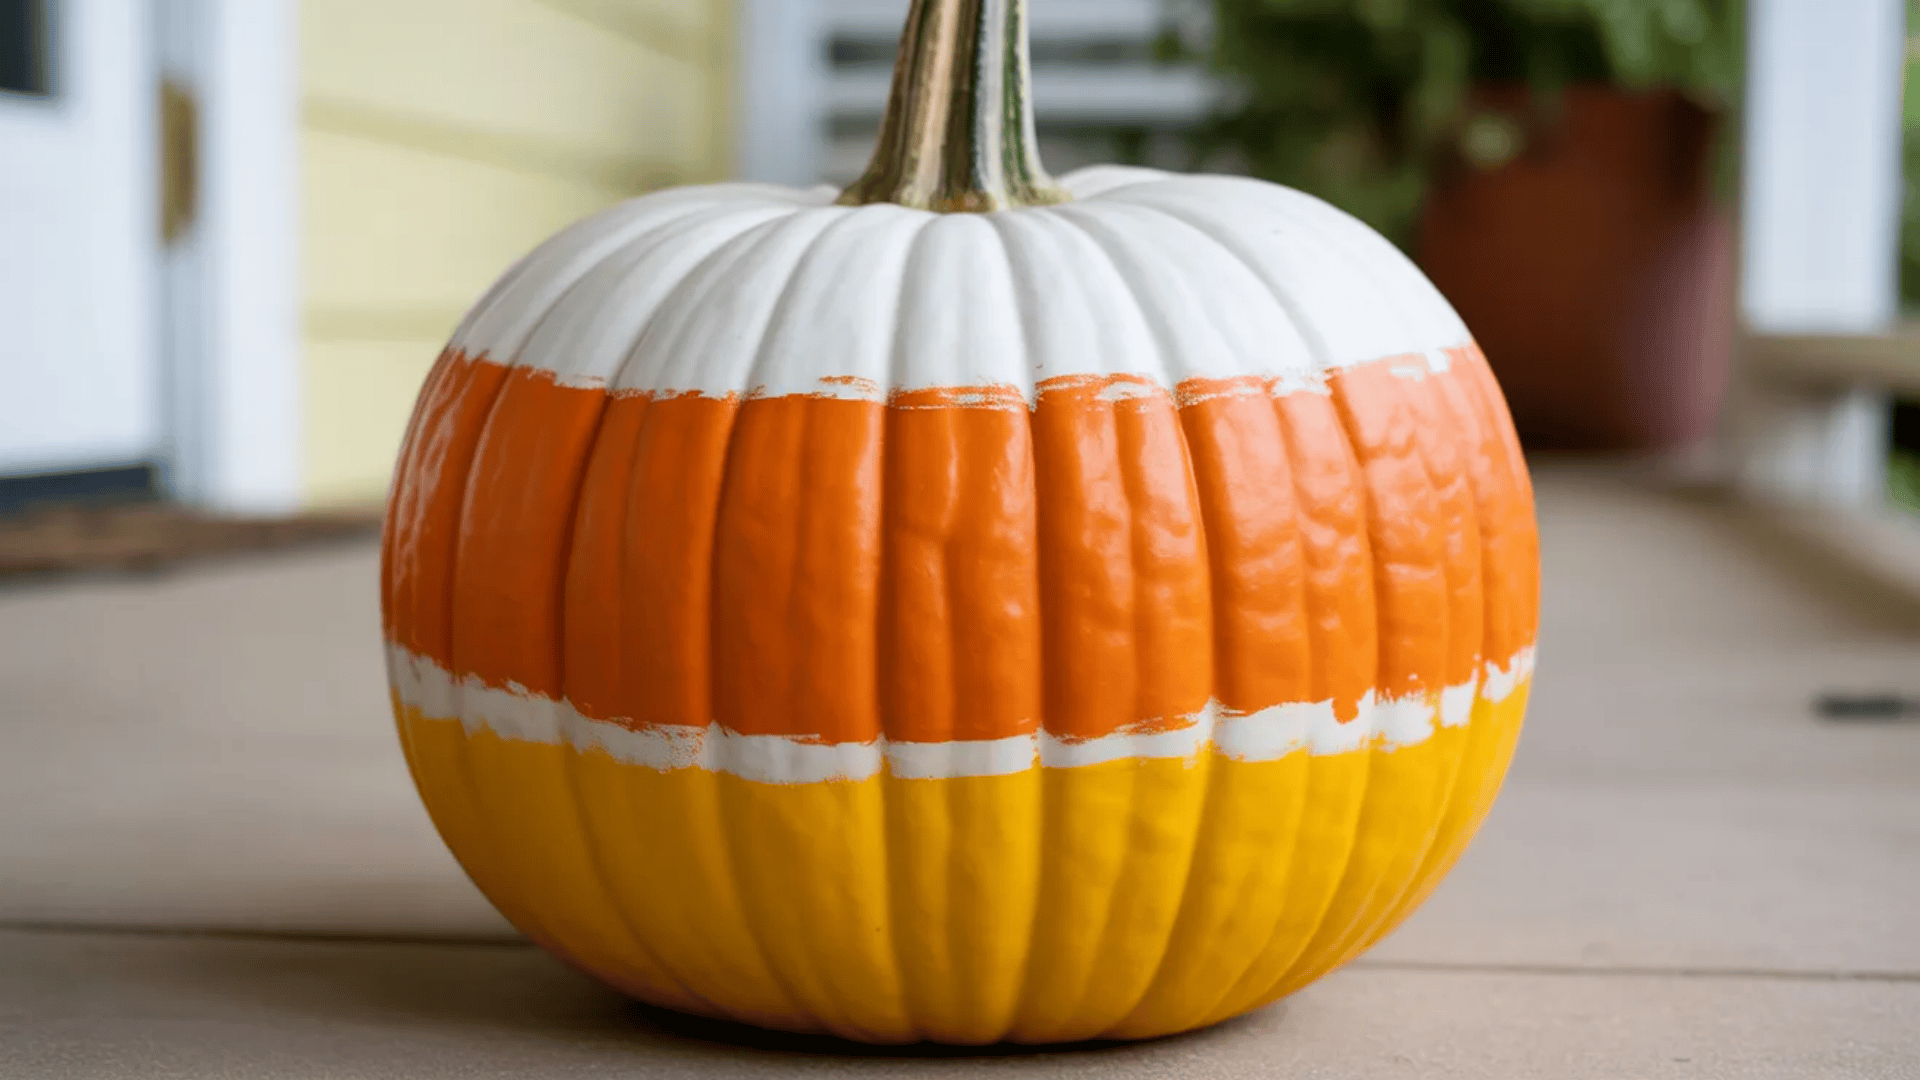
Candy corn pumpkins celebrate a classic Halloween treat with bright, cheerful colors. This design is simple and instantly recognizable.
Paint your pumpkin in three horizontal sections to match candy corn colors. Start with white at the top, orange in the middle, and yellow at the bottom.
Try these variations:
- Traditional candy corn colors
- Reverse the order for a twist
- Add glitter to each section
- Use pastel versions of the colors
Use painter’s tape between sections for clean, straight lines. Let each color dry before painting the next section to avoid mixing.
Spray paint works great for smooth, even coverage. Or use acrylic paint with a sponge for a slightly textured look that adds character.
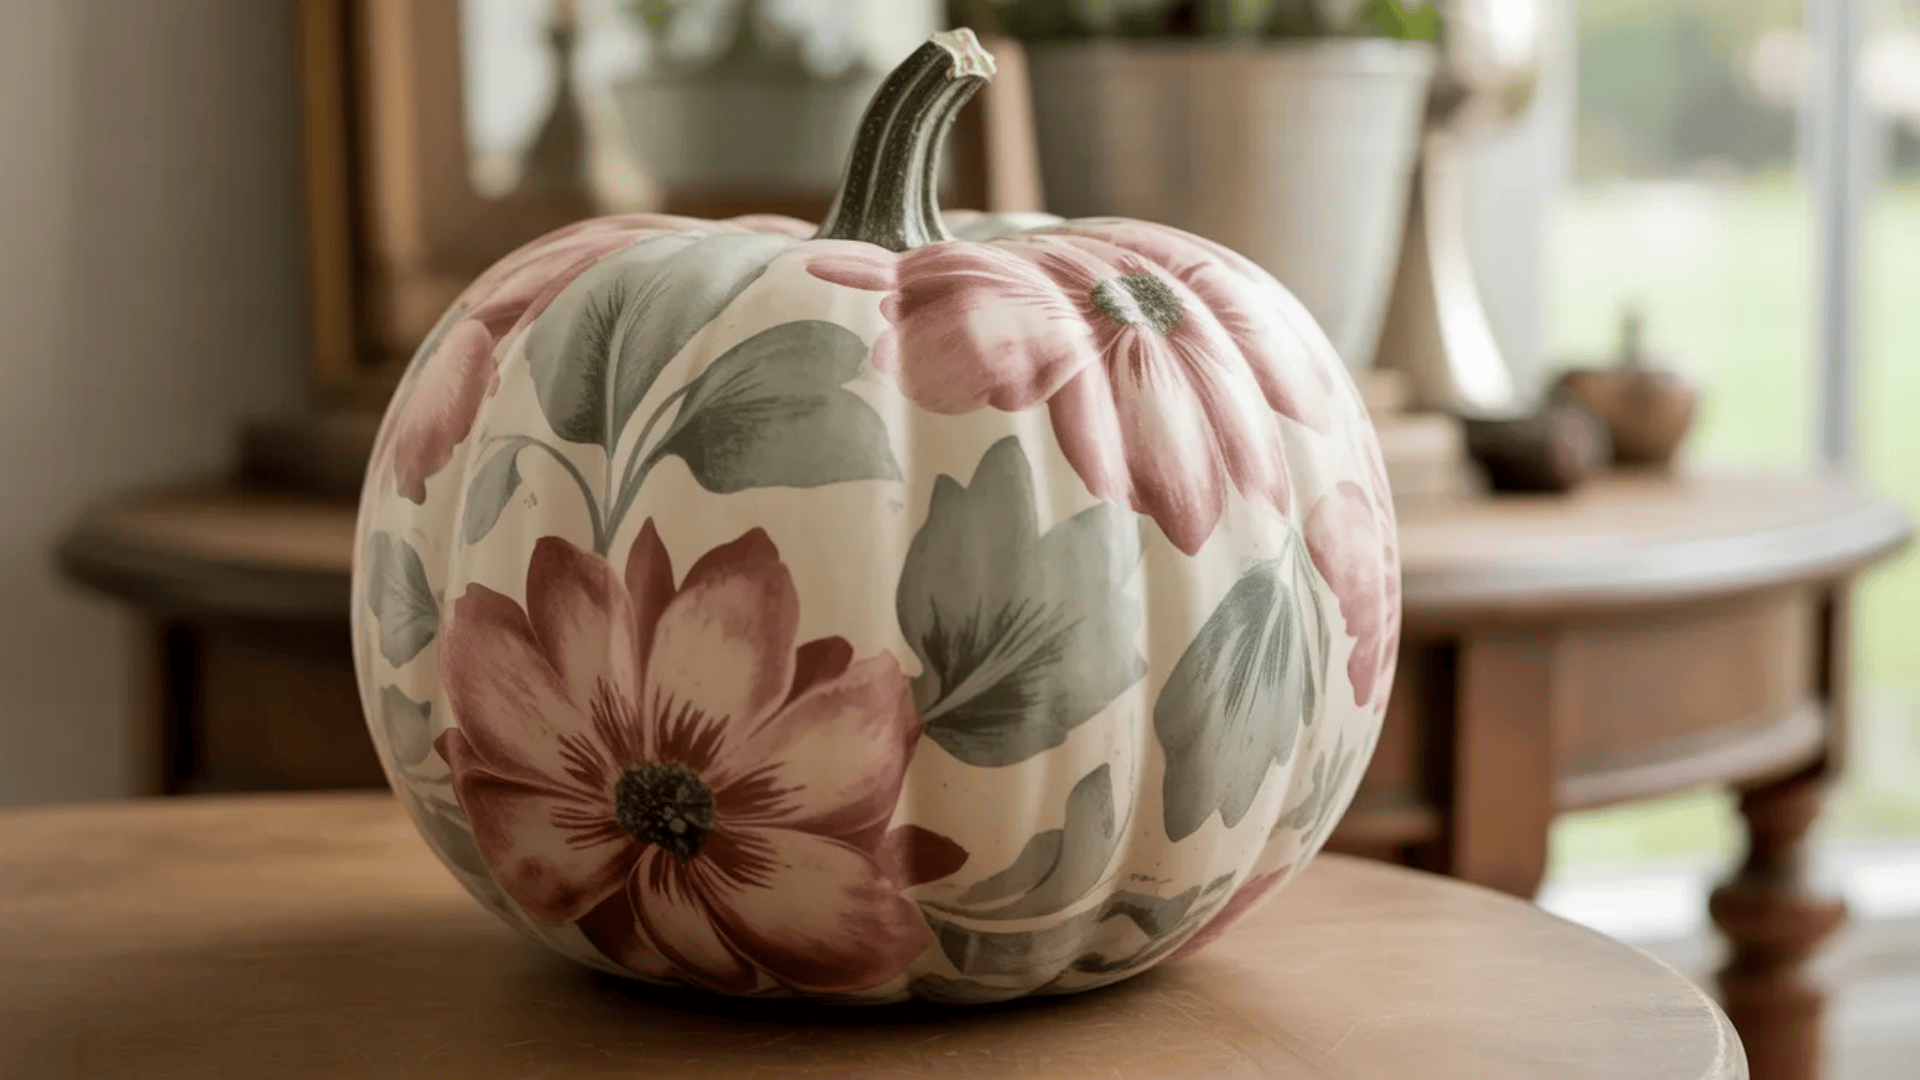
16. Floral Pumpkin
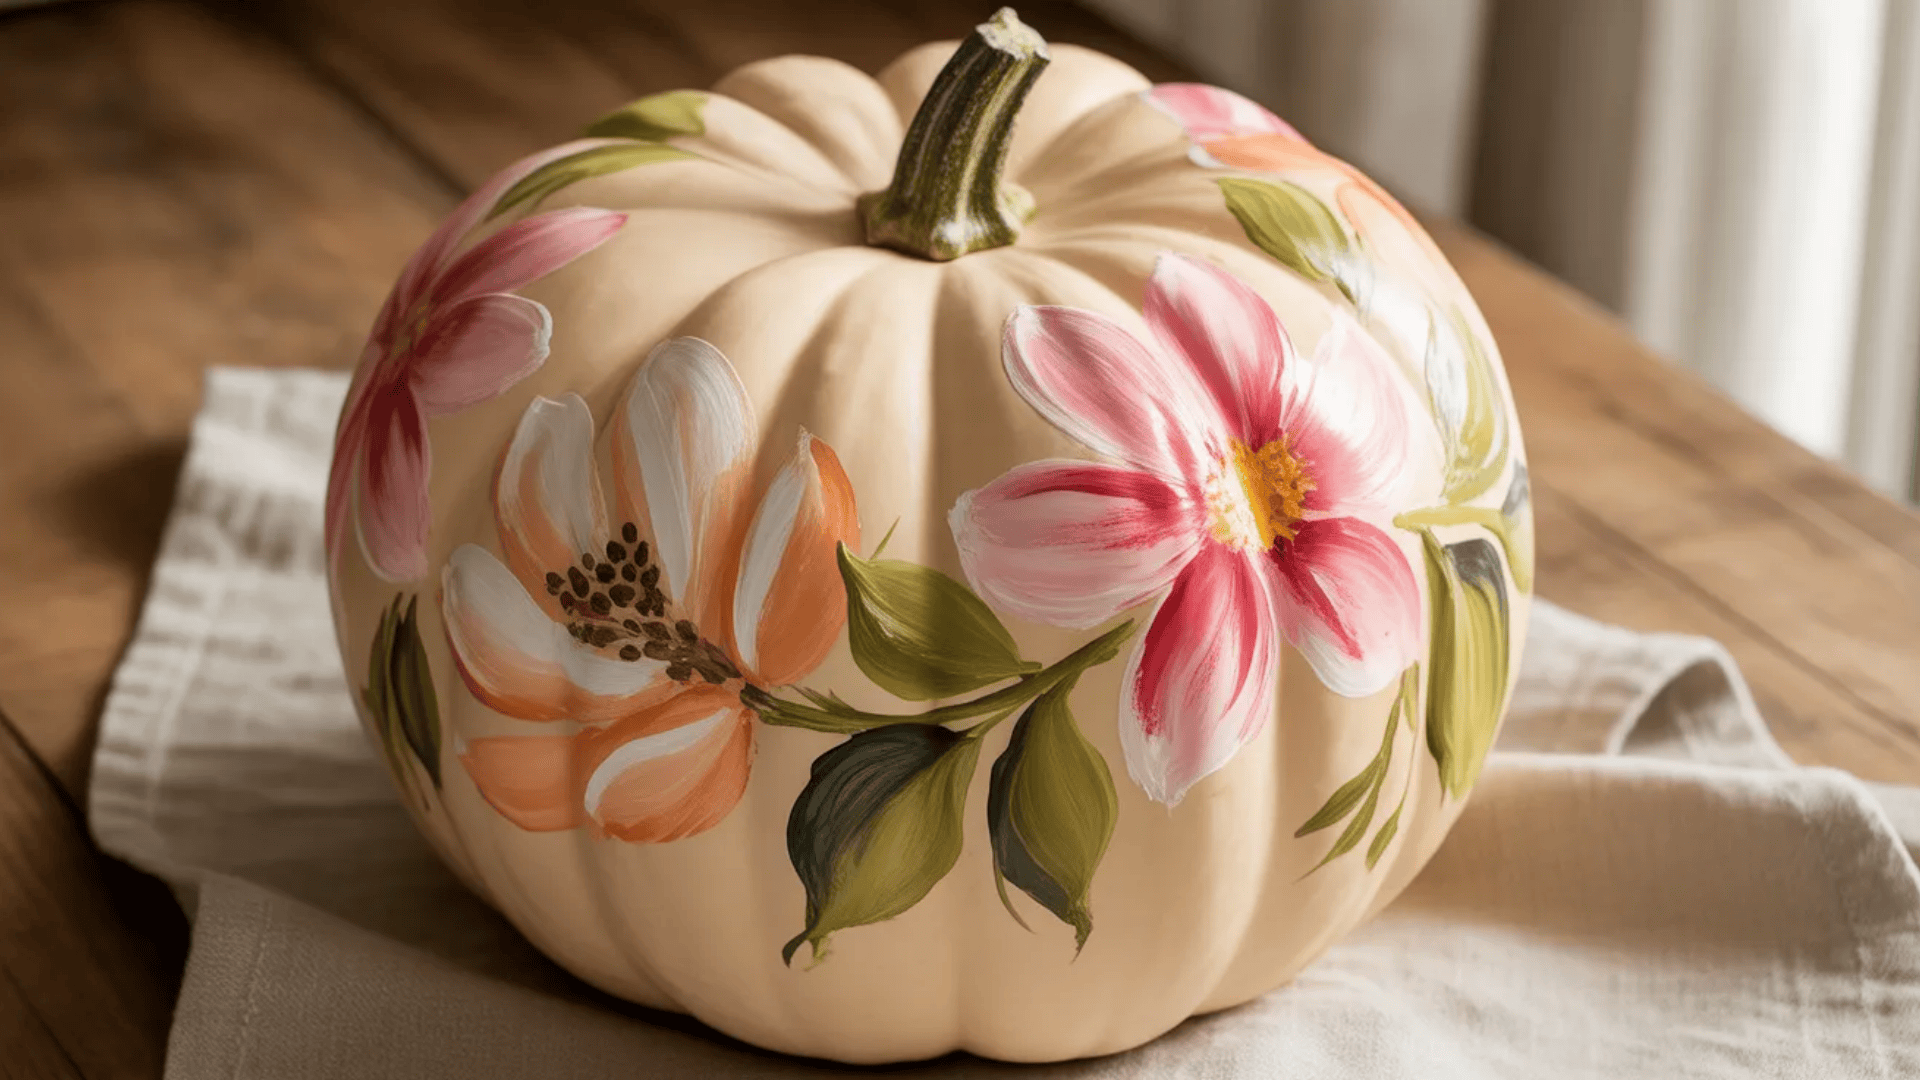
Floral pumpkins bring a softer, more feminine touch to fall decor. Paint delicate flowers and leaves for a garden-inspired look.
Choose a base color that lets your flowers stand out. White, cream, or soft pink work best for this style.
Try these floral designs:
- Small daisies scattered around
- Large blooms like roses or sunflowers
- Vines with tiny flowers
- Wildflower mix in fall colors
Use a fine-tipped brush for petals and details. Paint flowers in clusters or spread them evenly around the pumpkin.
Add green leaves between flowers for a complete garden effect. Gold accents on petals or centers add extra elegance to your design.
17. Boho Neutral Pumpkin
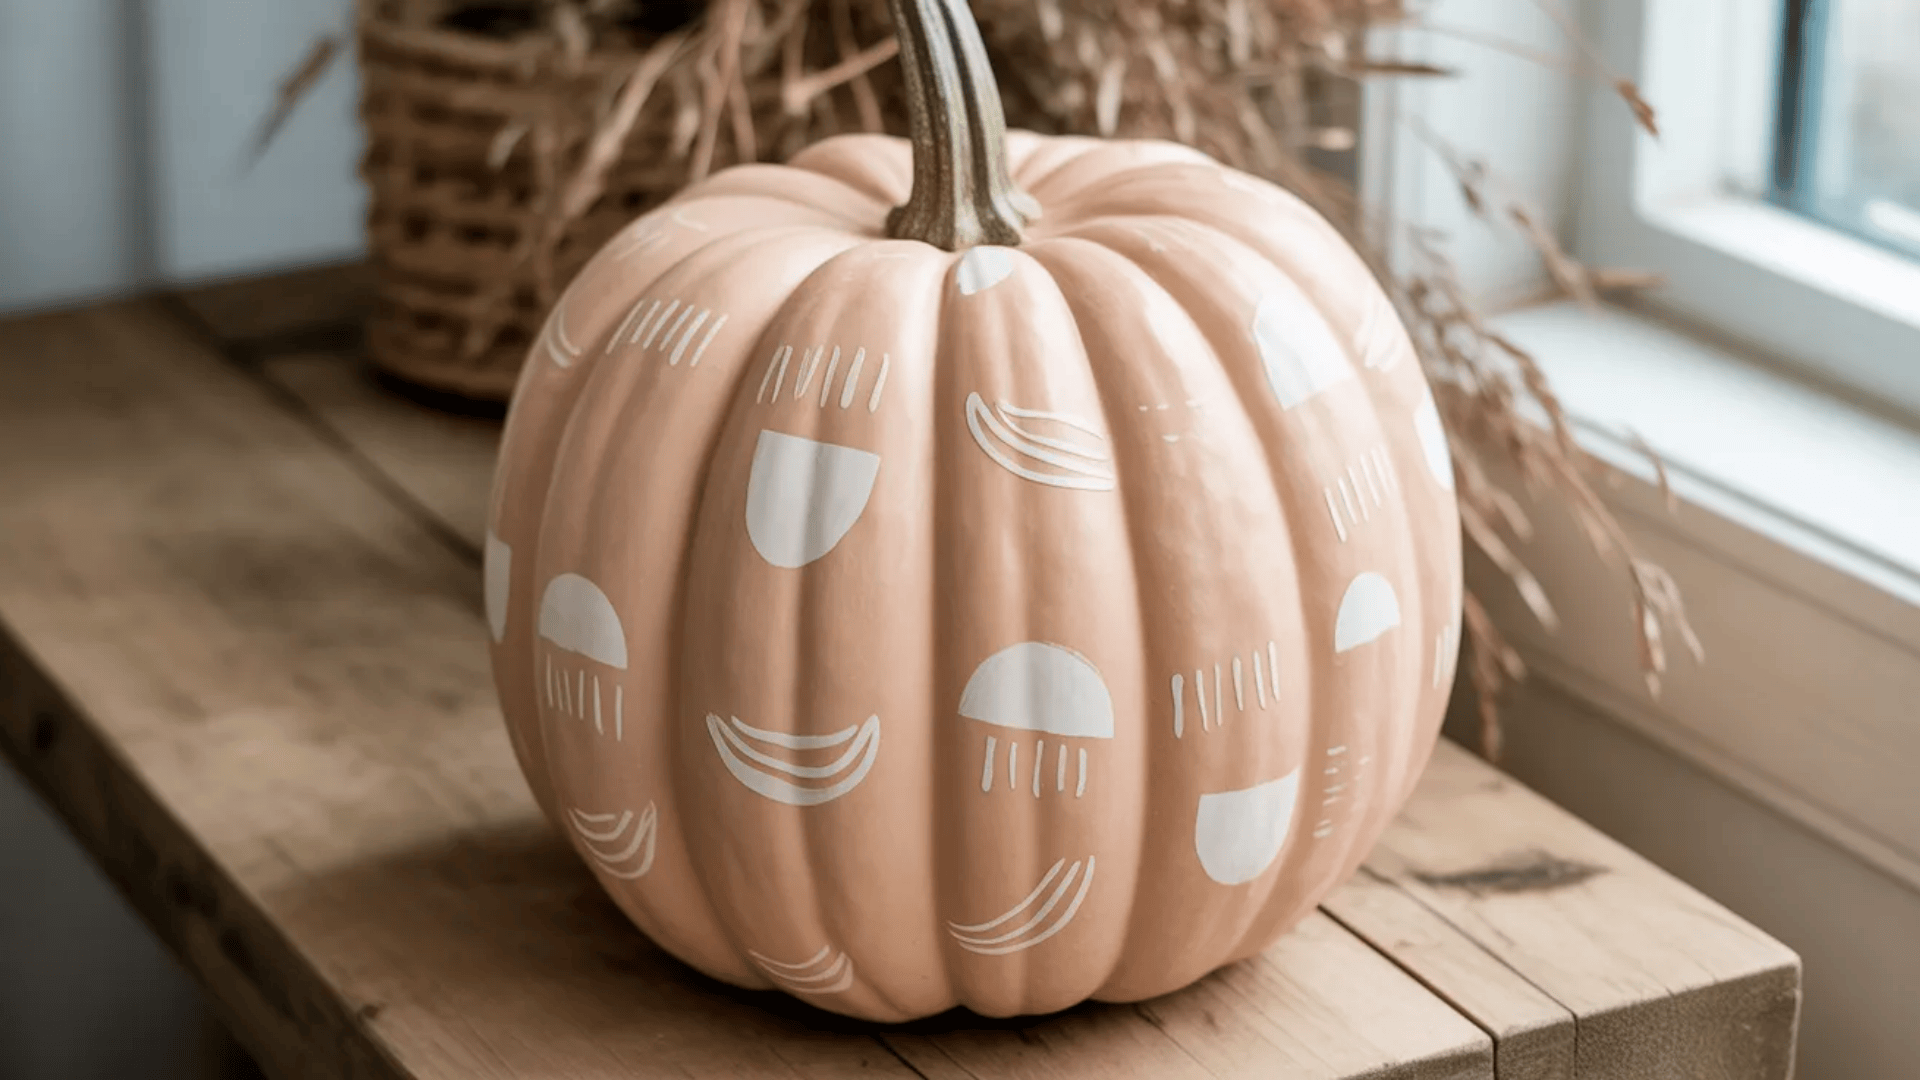
Boho neutral pumpkins fit perfectly with farmhouse or rustic decor. They use earthy tones and simple patterns for a relaxed vibe.
Paint your pumpkin in cream, beige, tan, or soft gray. Add subtle details like dots, lines, or small shapes in similar tones.
Try these boho elements:
- Half-moon shapes in rows
- Simple line patterns
- Tiny dots in neutral colors
- Feather or leaf motifs
Keep your design minimal and organic-looking. Imperfect lines and shapes actually add to the boho charm.
Mix different neutral shades on the same pumpkin for depth. These pumpkins work year-round, not just for Halloween.
18. White and Gold Pumpkin
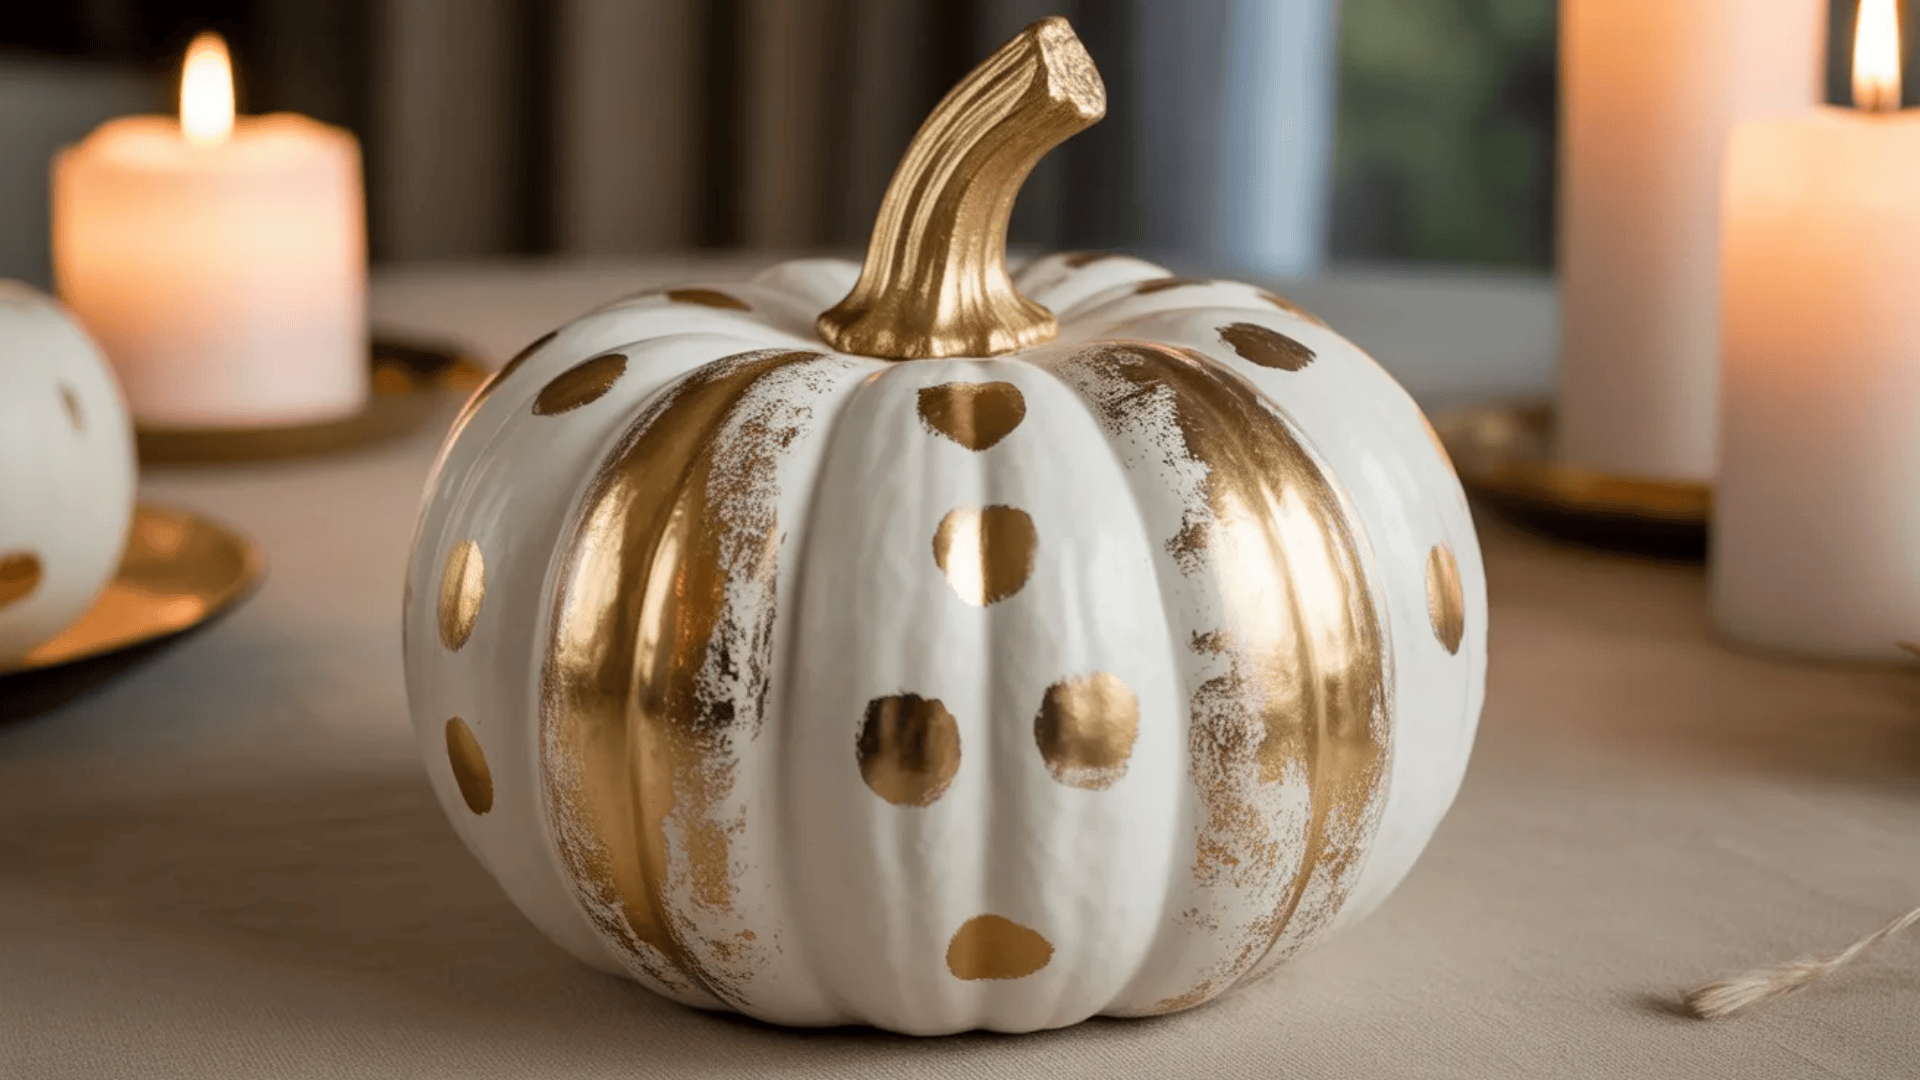
White and gold pumpkins bring elegance and glamour to your fall display. This combination works for both Halloween and Thanksgiving decor.
Paint your pumpkin white first as the base. Once dry, add gold accents using metallic paint or gold leaf.
Try these gold accent ideas:
- Gold polka dots scattered around
- Gold painted stem
- Gold stripes or geometric shapes
- Full gold sections at top or bottom
Use a sponge to dab on gold paint for a softer, textured look. Or brush it on smoothly for a sleek, polished finish.
Seal with a clear coat to protect the metallic finish. Display these pumpkins with candles and white decor for a sophisticated setup.
19. Plaid Pumpkin
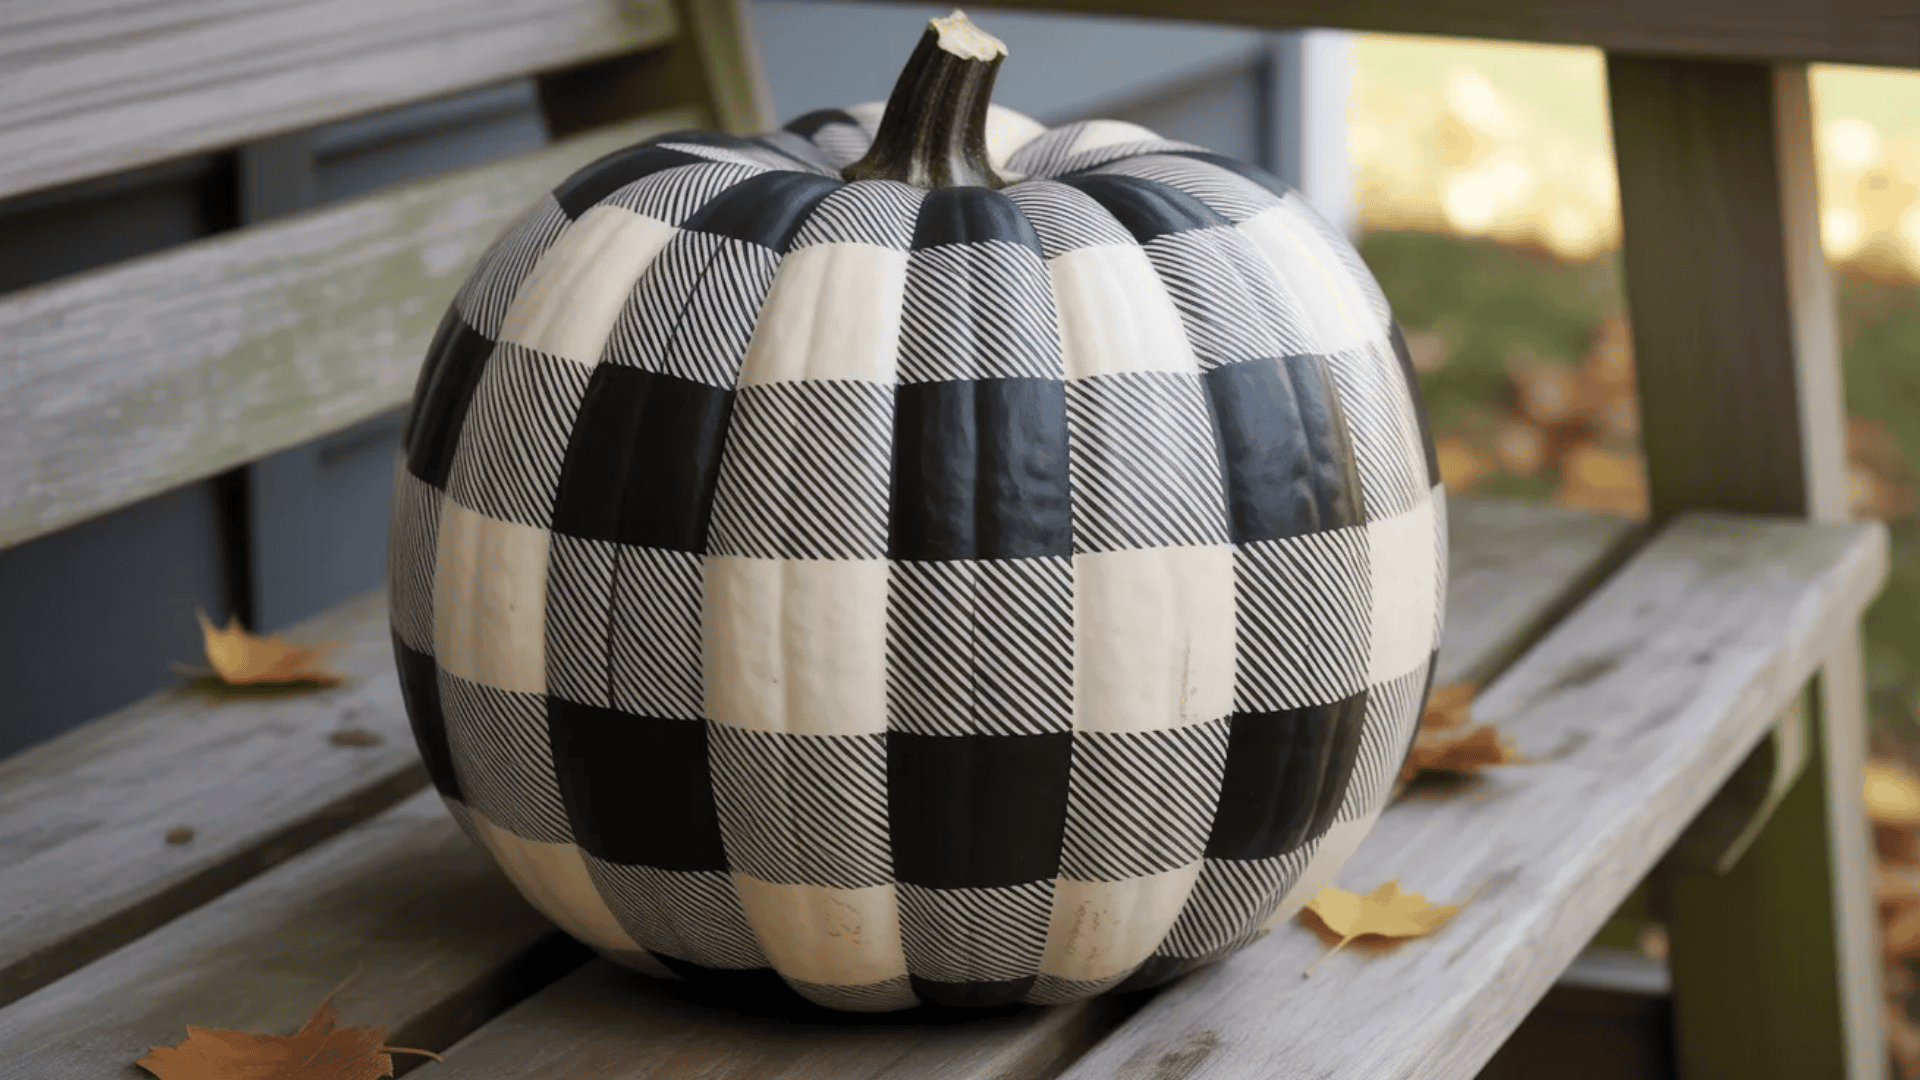
Plaid pumpkins give you that cozy fall feeling. The pattern looks complex but is actually simple with the right technique.
Use painter’s tape to create your plaid grid. Start with vertical lines, then add horizontal lines to form squares.
Try these plaid colors:
- Black and white buffalo check
- Red and black lumberjack plaid
- Orange and cream fall plaid
- Navy and white nautical plaid
Paint your base color first. Apply tape in your pattern, then paint over it with your second color.
Remove the tape while paint is still slightly wet for the cleanest lines. Touch up any bleeding with a small brush once everything dries.
20. Minimal Line Art Pumpkin
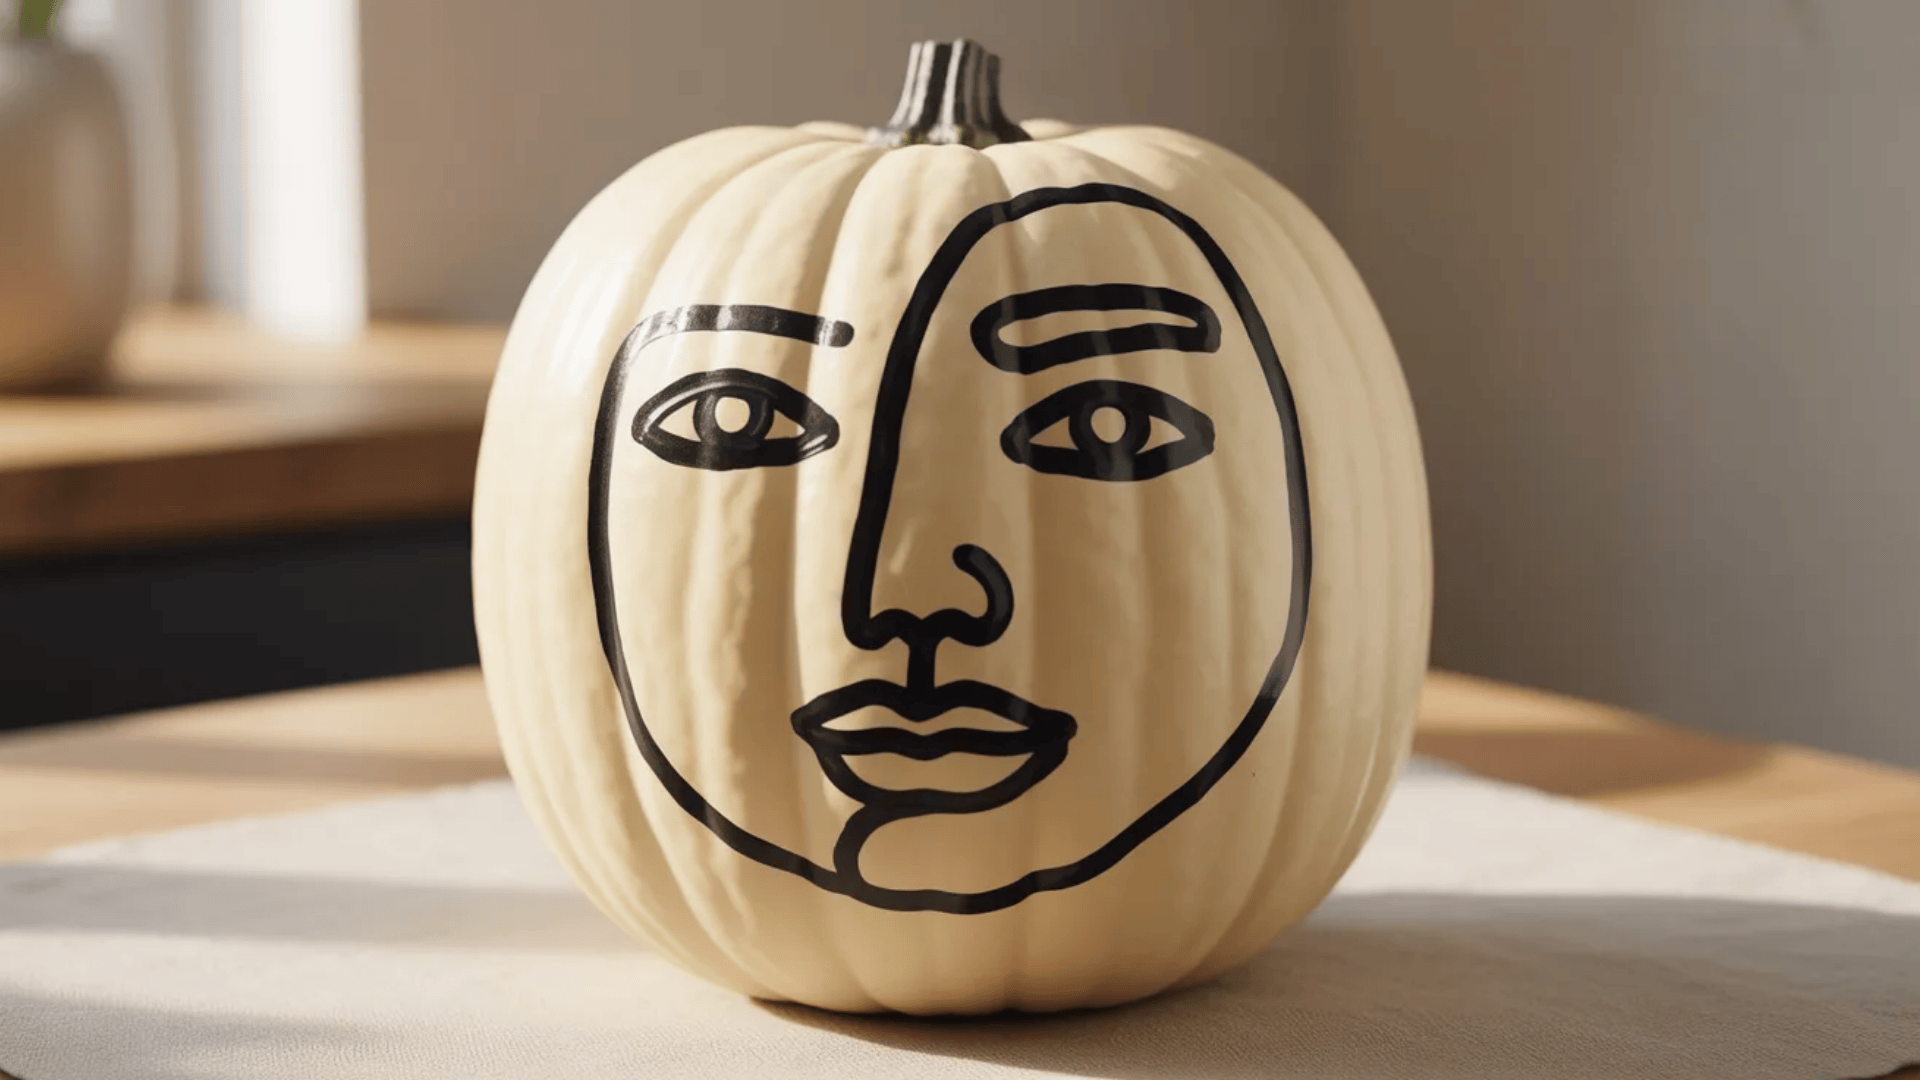
Minimal line art pumpkins have a modern, artistic feel. Simple black lines create faces, shapes, or abstract designs on a neutral background.
Paint your pumpkin white or leave it natural. Use black paint or a paint marker to draw clean, simple lines.
Try these line art ideas:
- Abstract face with continuous lines
- Simple leaf or branch outline
- Geometric shapes and patterns
- Single line drawing of an object
Keep your design sparse and intentional. The beauty is in the simplicity, not adding too many elements.
Use a fine-tipped paint marker for the steadiest lines. Practice your design on paper first if you want to get it just right.
21. Galaxy Pumpkin
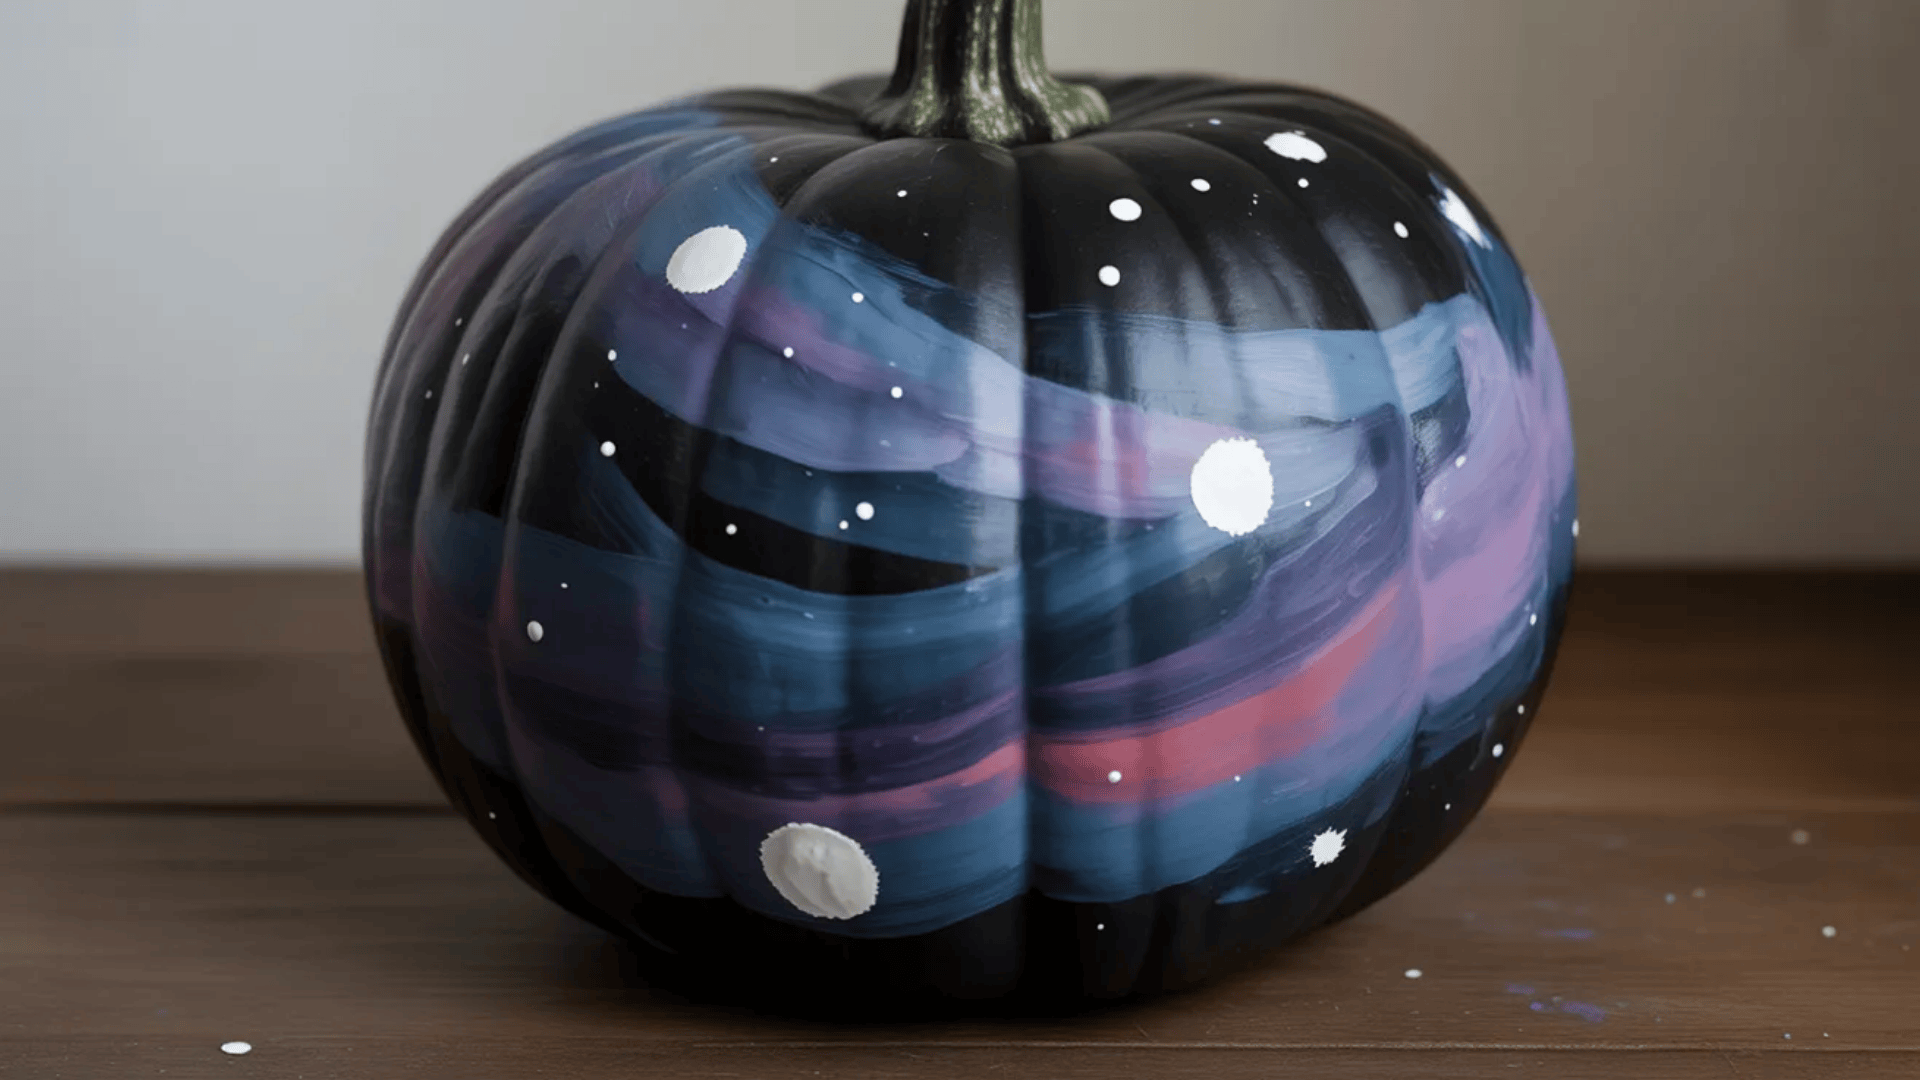
Galaxy pumpkins bring the night sky to your fall decor. Swirls of purple, blue, and black create a cosmic effect that looks impressive.
Start with a black base coat. Then sponge on dark blue and purple in random patches while the black is still slightly wet.
Try these galaxy additions:
- White paint splattered for stars
- Silver or gold metallic accents
- Pink or teal color pops
- Glitter for extra sparkle
Use a toothbrush to flick white paint for realistic star patterns. Add larger dots with a brush for brighter stars or planets.
Blend your colors where they meet for a smooth transition. The messier and more random, the better it looks.
22. Chalkboard Paint Pumpkin
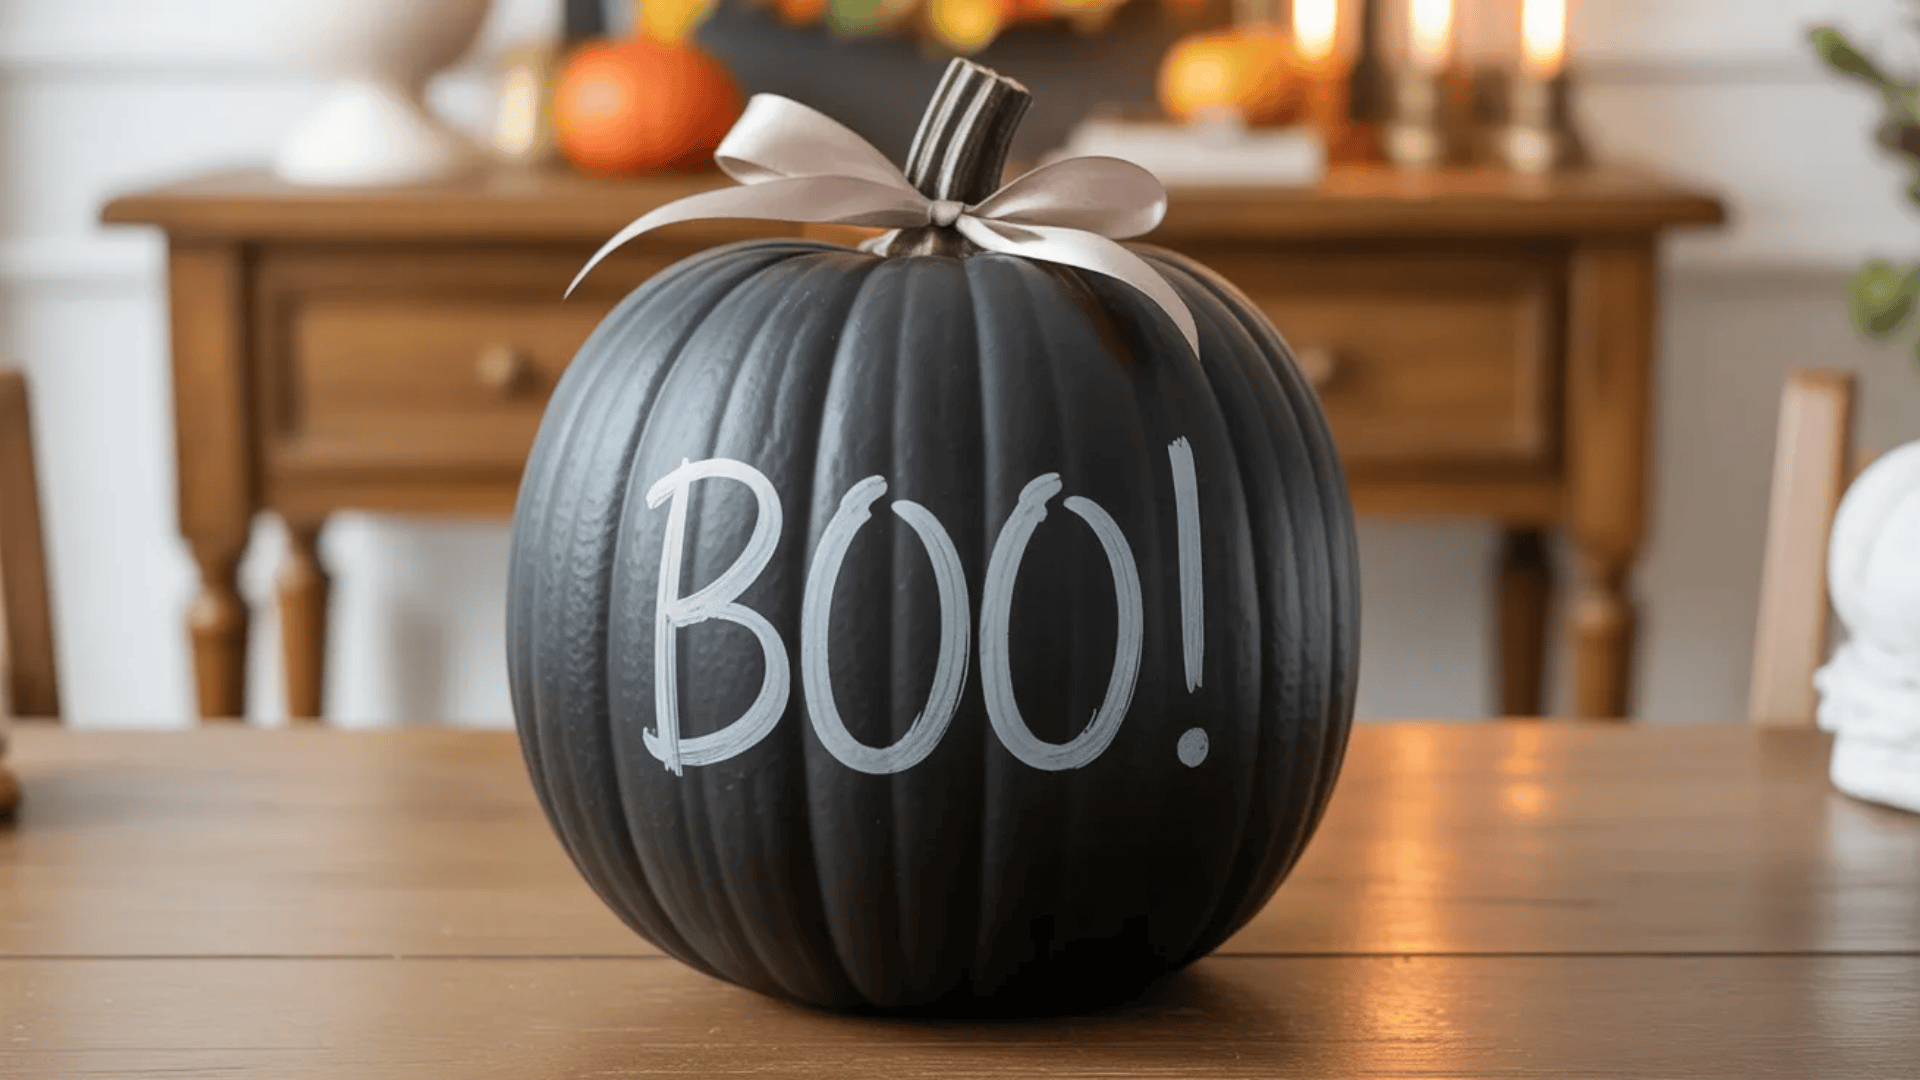
Chalkboard paint pumpkins let you change your message throughout the season. Write different words or draw new designs whenever you want.
Paint your entire pumpkin with chalkboard paint. Apply two or three coats for a smooth, writable surface.
Try these chalkboard messages:
- “BOO” for Halloween
- Your family name
- Countdown to Halloween
- Spooky quotes or sayings
Let the paint cure for a full day before writing on it. Use chalk or chalk markers for your designs.
Add a ribbon or bow at the stem for decoration. Erase and rewrite as often as you like throughout fall.
23. Drip Paint Pumpkin
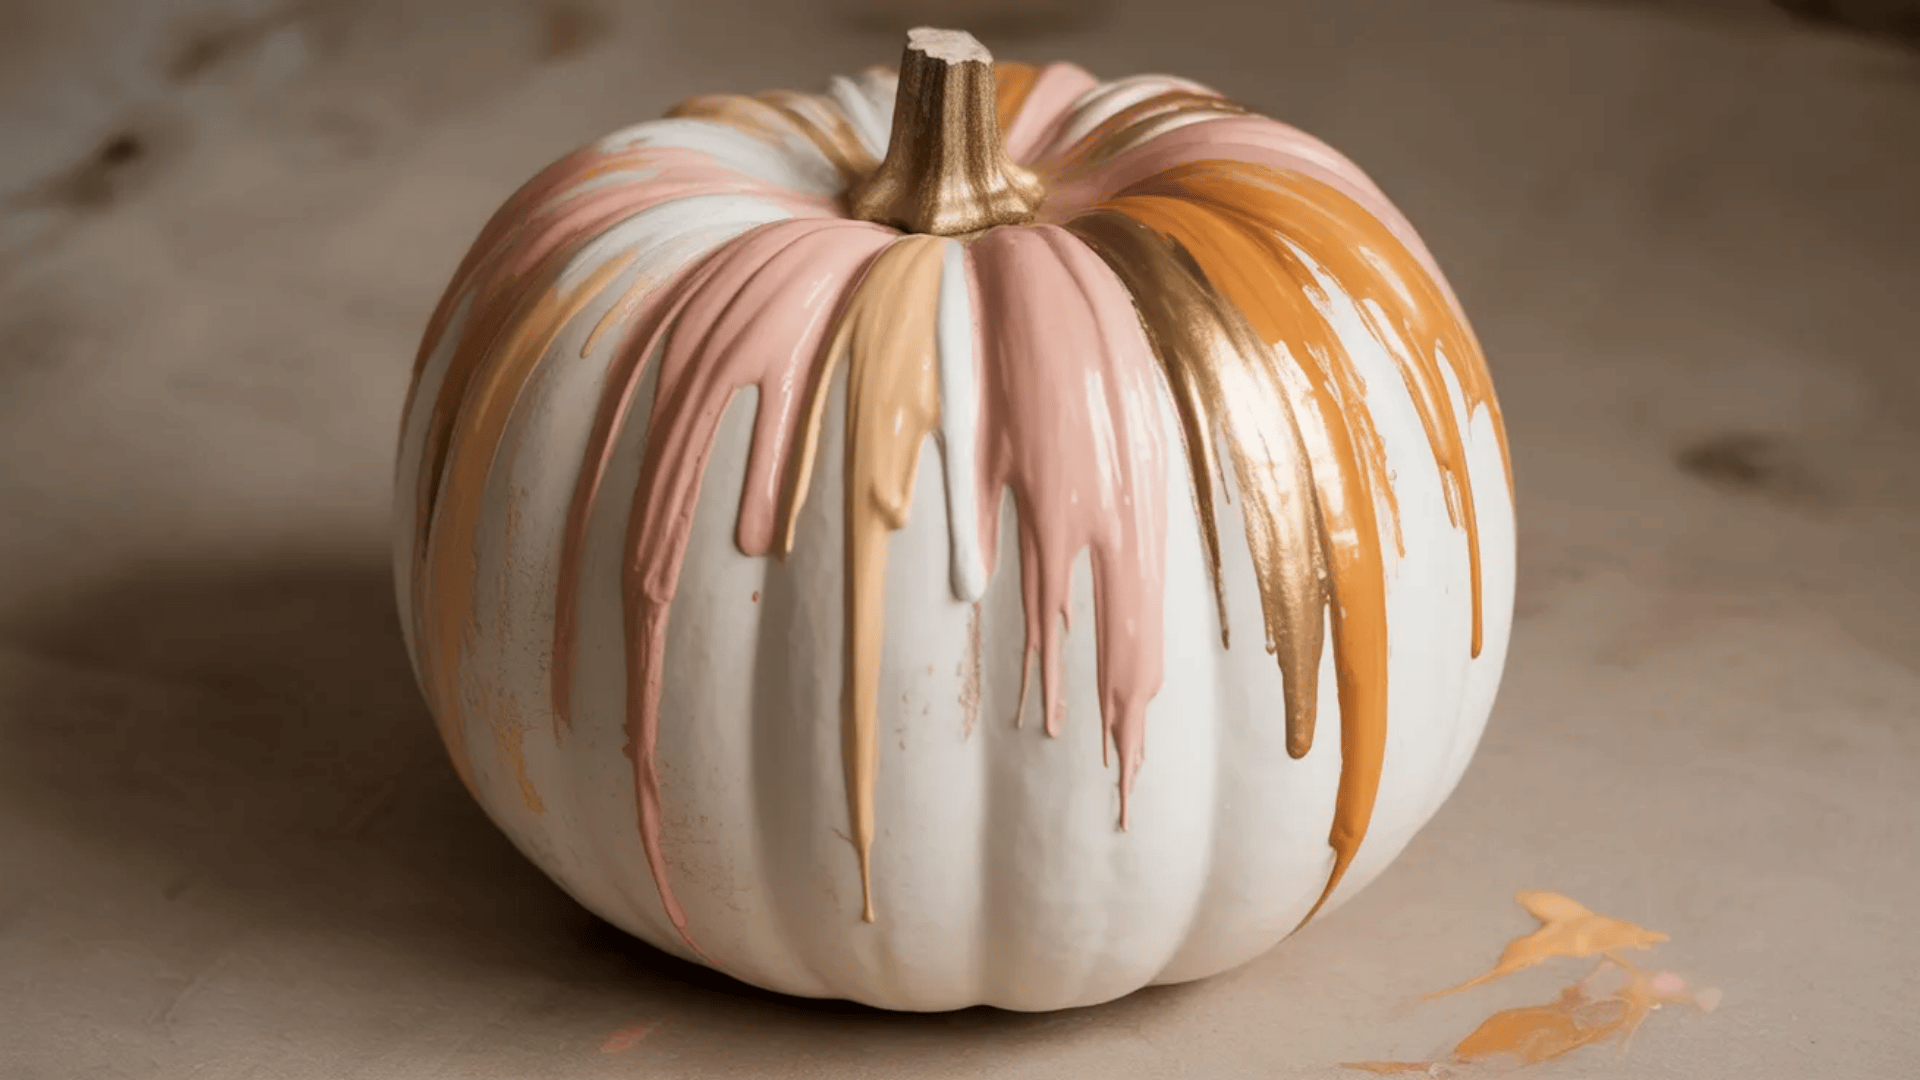
Drip paint pumpkins look artistic and modern. Colorful paint flows down the sides for an abstract, eye-catching effect.
Pour or squeeze paint around the stem area. Let gravity pull the paint down the sides of the pumpkin in natural drips.
Try these drip styles:
- Single color drips on white base
- Rainbow colors side by side
- Metallic paint for glam drips
- Black paint for a spooky effect
Set your pumpkin on a cup or can to catch excess drips. Use thinner paint or add water to help it flow better.
Let it dry completely before moving. The drips create unique patterns every time, so no two pumpkins look the same.
24. Textured Sponge-Paint Pumpkin
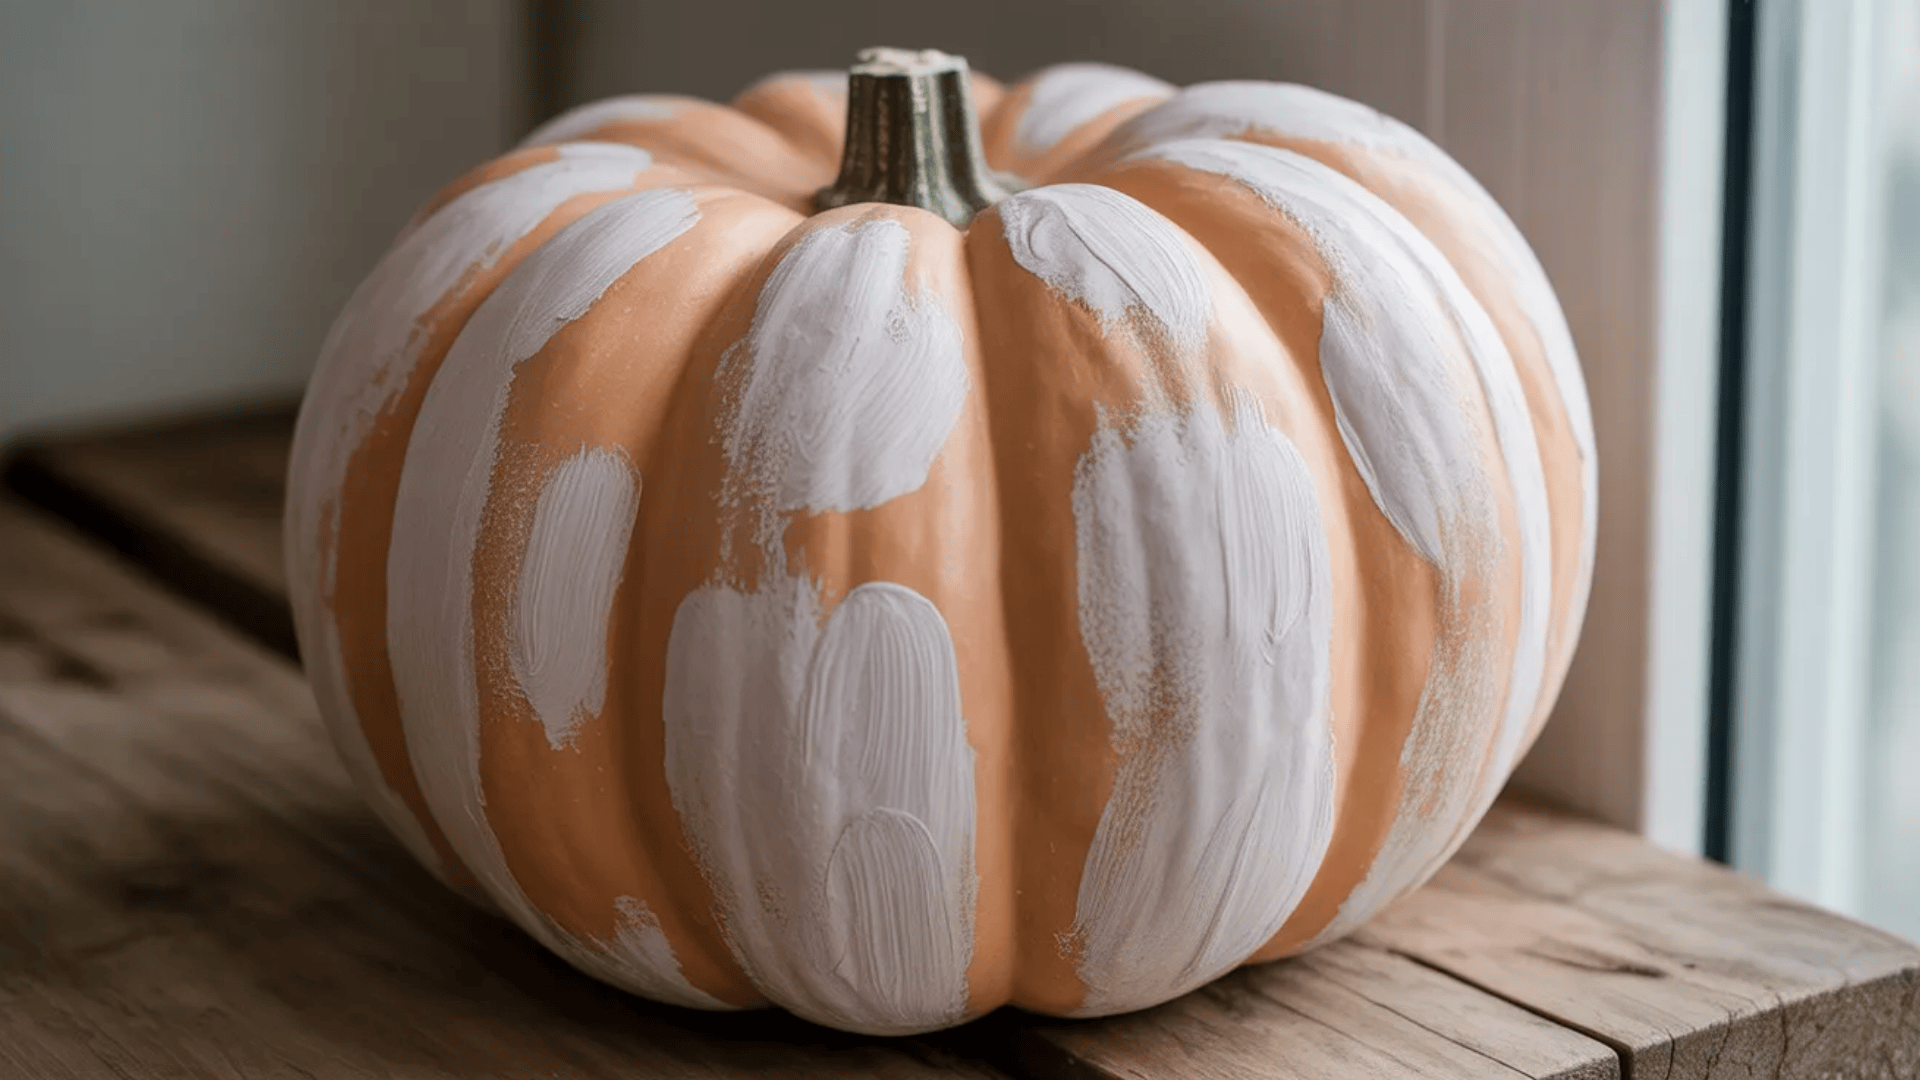
Textured sponge-paint pumpkins have depth and interest that regular brush painting doesn’t create. The sponge adds a soft, dimensional quality.
Dip a sponge in paint and dab it onto your pumpkin. Build up color with multiple light layers instead of one heavy coat.
Try these sponge techniques:
- Ombre effect with graduated colors
- Two-tone texture mixing colors
- Metallic over matte base
- All-over texture in one color
Use different sponge types for varied effects. Natural sponges create organic patterns, while synthetic sponges give more uniform texture.
Rotate your sponge as you dab to avoid repetitive patterns. This technique is perfect for kids since it’s forgiving and fun.
25. Glow-in-the-Dark Painted Pumpkin
Glow-in-the-dark pumpkins add a fun surprise when the lights go out. They’re perfect for outdoor displays or kids’ rooms during Halloween.
Use glow-in-the-dark paint over a base color. Paint designs like ghosts, stars, or simple patterns that will shine at night.
Try these glowing designs:
- Ghost faces that appear after dark
- Stars and moon patterns
- Spooky eyes watching in the dark
- Abstract swirls and dots
Paint your design with regular paint during the day, then add glow paint on top. Or use only glow paint for a hidden surprise.
Charge the paint under a light before displaying. The longer it sits under light, the brighter it glows when dark.
26. Monochrome Pumpkin

Monochrome pumpkins use shades of just one color for a sleek, cohesive look. This style feels modern and intentional without being boring.
Pick one color family and use light, medium, and dark shades. Paint sections, patterns, or designs using your chosen tones.
Try these monochrome palettes:
- All blues from sky to navy
- Greens from mint to forest
- Grays from white to charcoal
- Pinks from blush to burgundy
Create interest through different shades rather than different colors. Paint some areas lighter and others darker for contrast.
This approach works especially well grouped with other monochrome pumpkins in the same color family. Mix sizes for added visual appeal.
27. Metallic Accent Pumpkin

Metallic accent pumpkins add shine and glamour without going overboard. Small touches of gold, silver, or copper make a big impact.
Start with a matte base color like white, black, or navy. Add metallic paint to specific areas for contrast.
Try these metallic accents:
- Gold painted stem only
- Metallic dots or stripes
- Silver leaf details
- Copper drips from the top
Use metallic spray paint for smooth, even coverage. Or brush on metallic acrylic paint for more controlled application.
Seal metallic finishes with clear spray if displaying outdoors. This protects the shine from weather and keeps your pumpkin looking fresh.
28. Vintage Pattern Pumpkin
Vintage pattern pumpkins bring retro charm to your fall decor. Use old-fashioned designs or copy patterns from vintage fabrics and wallpapers.
Print or trace vintage designs onto paper, then transfer them to your pumpkin. Or freehand classic patterns like damask or toile.
Try these vintage styles:
- Victorian floral patterns
- Retro geometric designs
- Classic toile scenes
- Old-fashioned wallpaper prints
Use Mod Podge to attach printed paper designs directly onto your pumpkin. This is easier than hand-painting intricate patterns.
Stick with muted, vintage-inspired colors like sage green, dusty rose, or cream. These tones enhance the old-fashioned feel.
29. Checkerboard Pumpkin
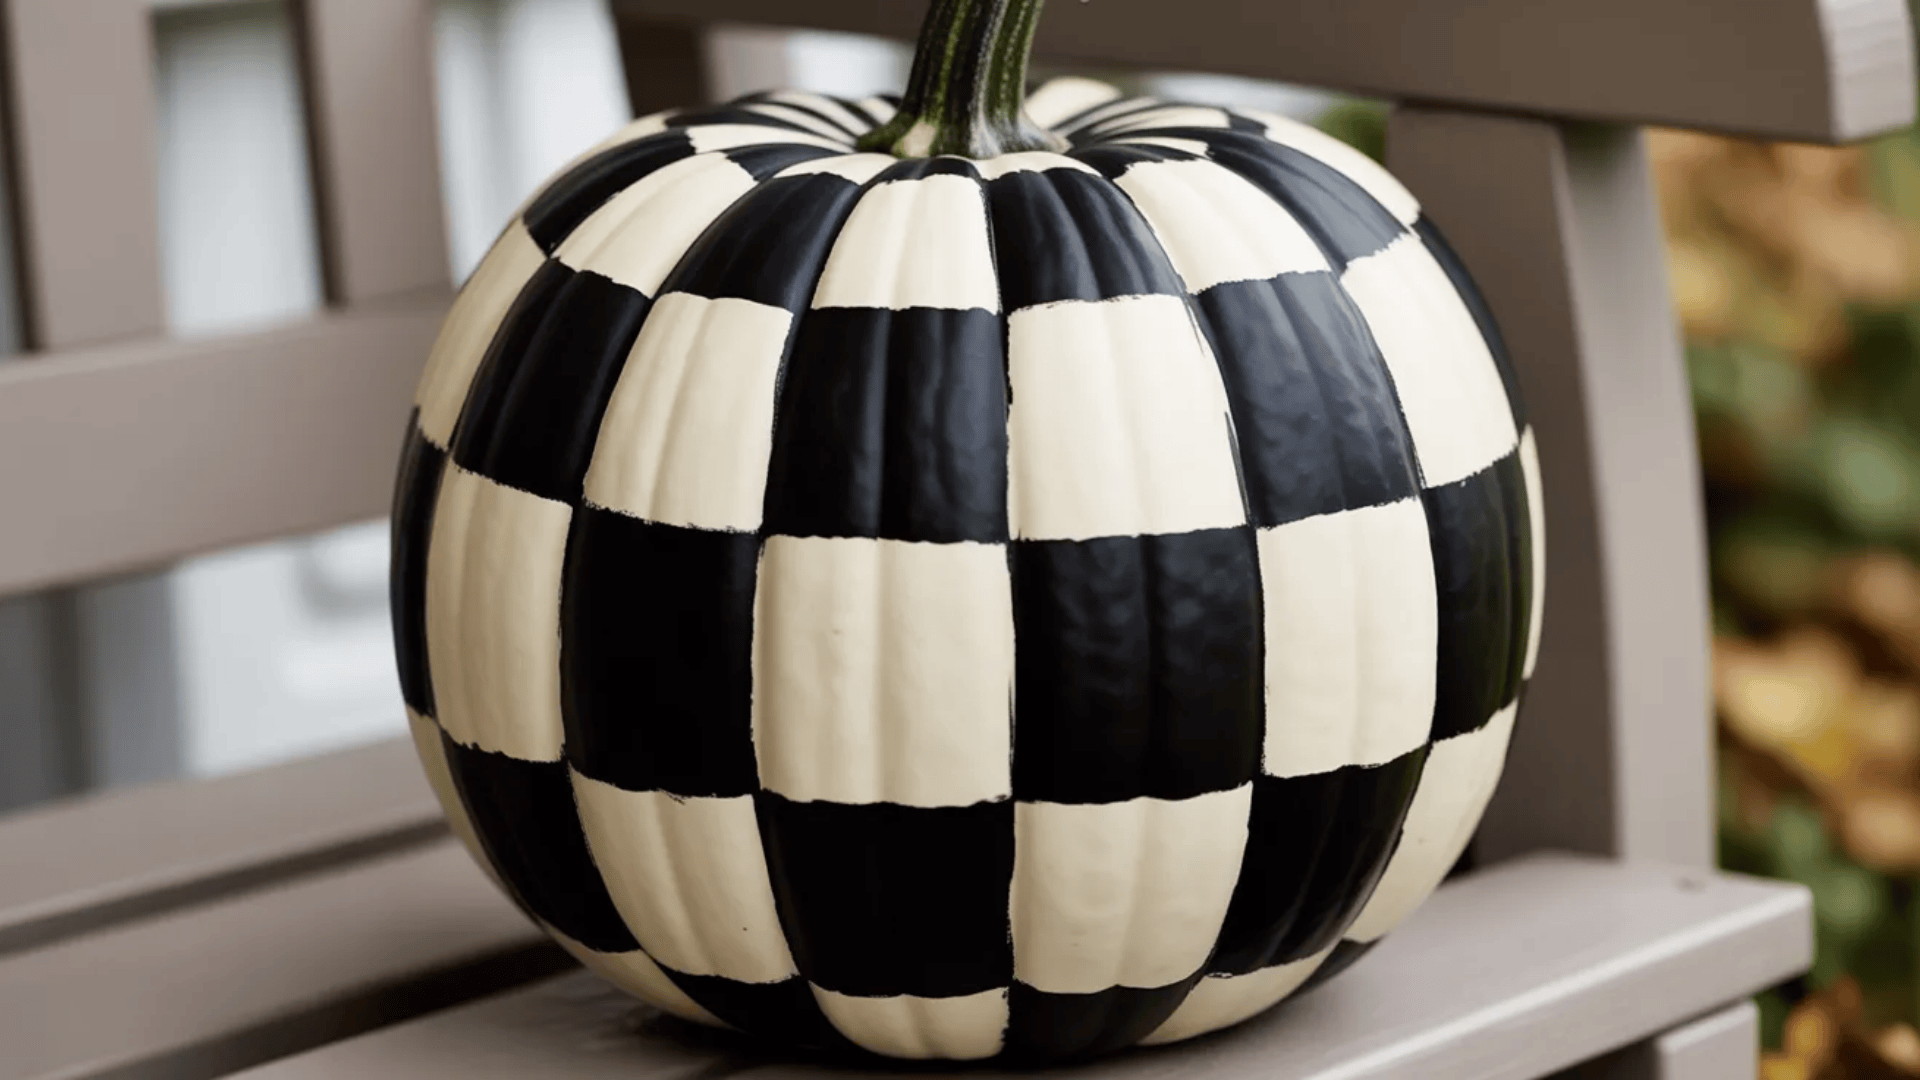
Checkerboard pumpkins have a bold, graphic look that catches the eye. The alternating squares create a fun optical effect on the curved surface.
Use painter’s tape to mark out your checkerboard grid. Paint alternating squares in two contrasting colors.
Try these color combos:
- Classic black and white
- Orange and white for fall
- Two pastel shades for softness
- Metallic gold and matte black
Start at the top and work your way down in rows. Let each row dry before taping the next to avoid smudging.
Keep squares relatively large since pumpkins are curved. Tiny squares get distorted and are harder to paint neatly on round surfaces.
30. Ombre Pumpkin
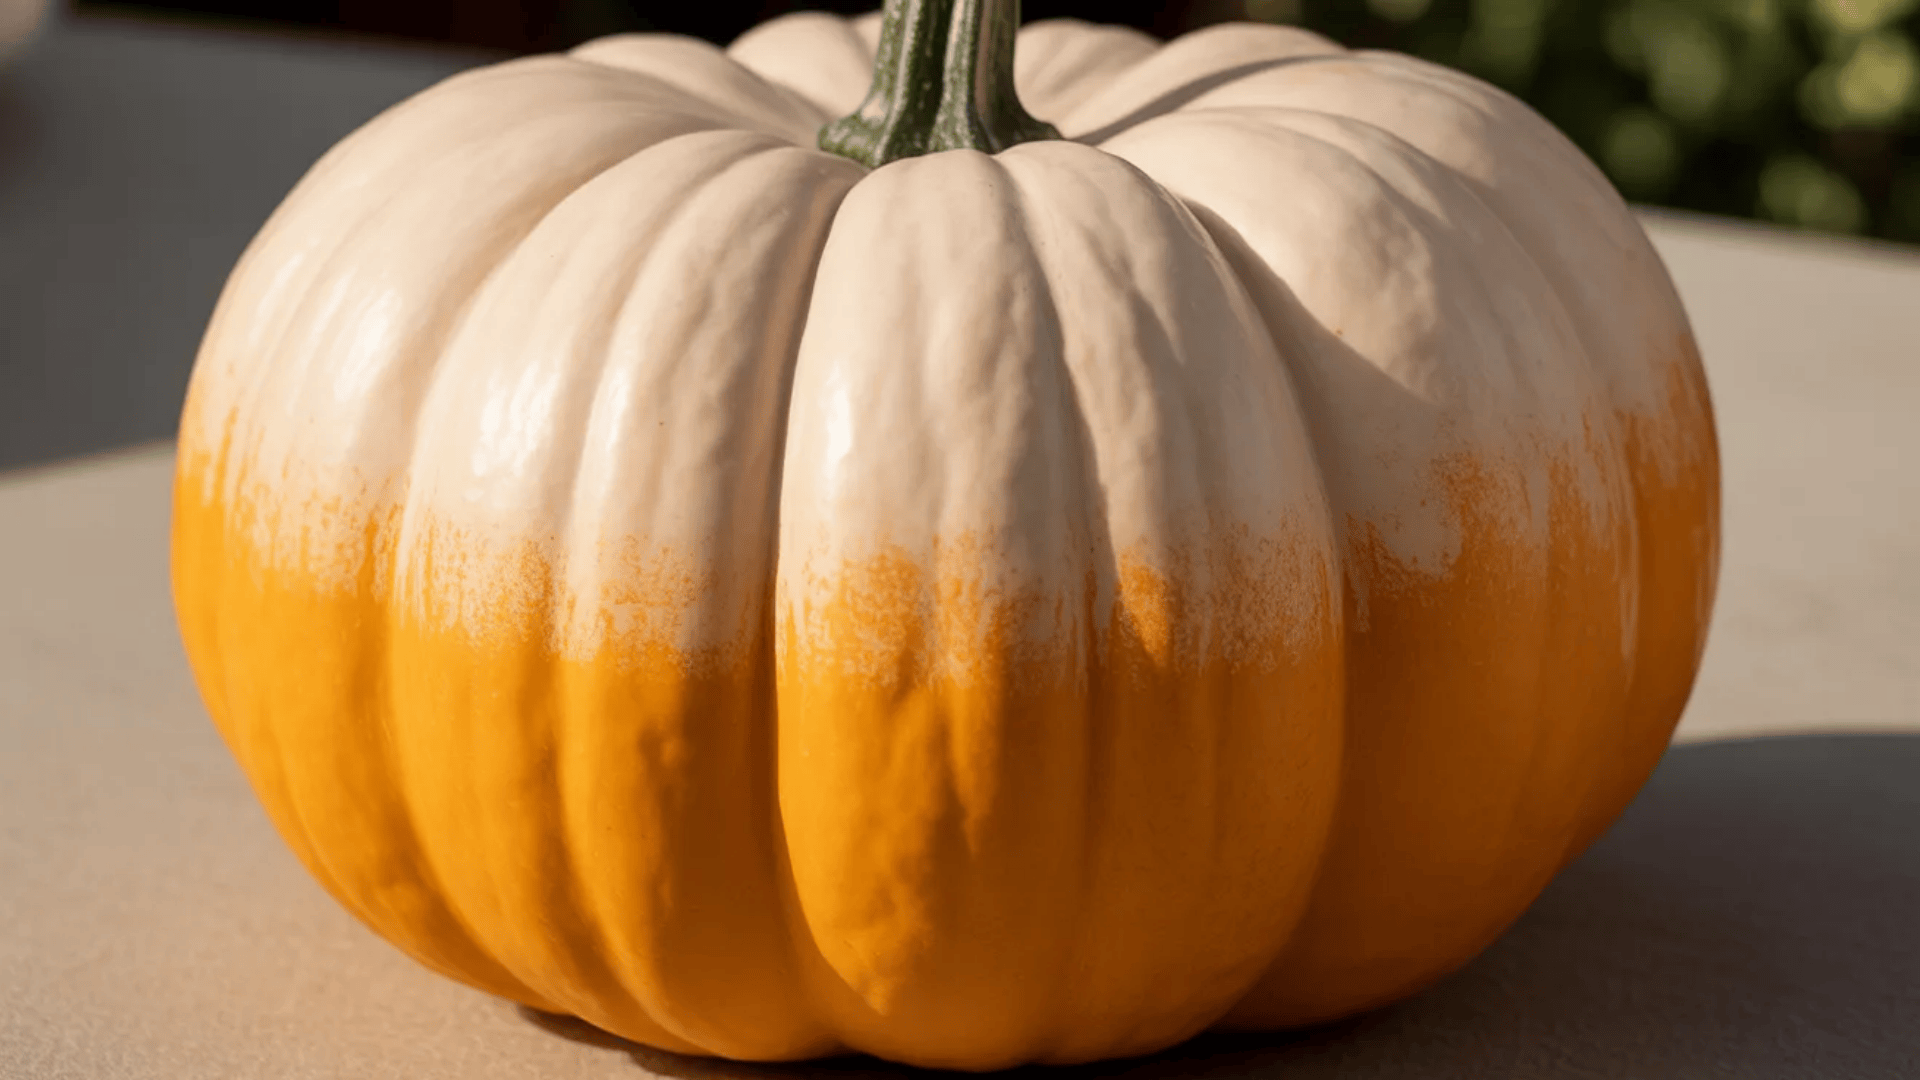
Ombre pumpkins feature a smooth color gradient that flows from light to dark. This technique looks professional but is simpler than it appears.
Choose colors from the same family for the best blend. Start with the lightest shade at the top and gradually darken as you move down.
Try these ombre combinations:
- White to orange for fall vibes
- Pink to burgundy for romance
- Blue to purple for sunset effect
- Cream to brown for neutral tones
Use a sponge to blend where colors meet. Dab the lighter color first, then the darker, blending the middle area while both are wet.
Work in sections and blend quickly before the paint dries. Add more coats if needed to smooth out the transition between shades.
31. Monster Face Pumpkin
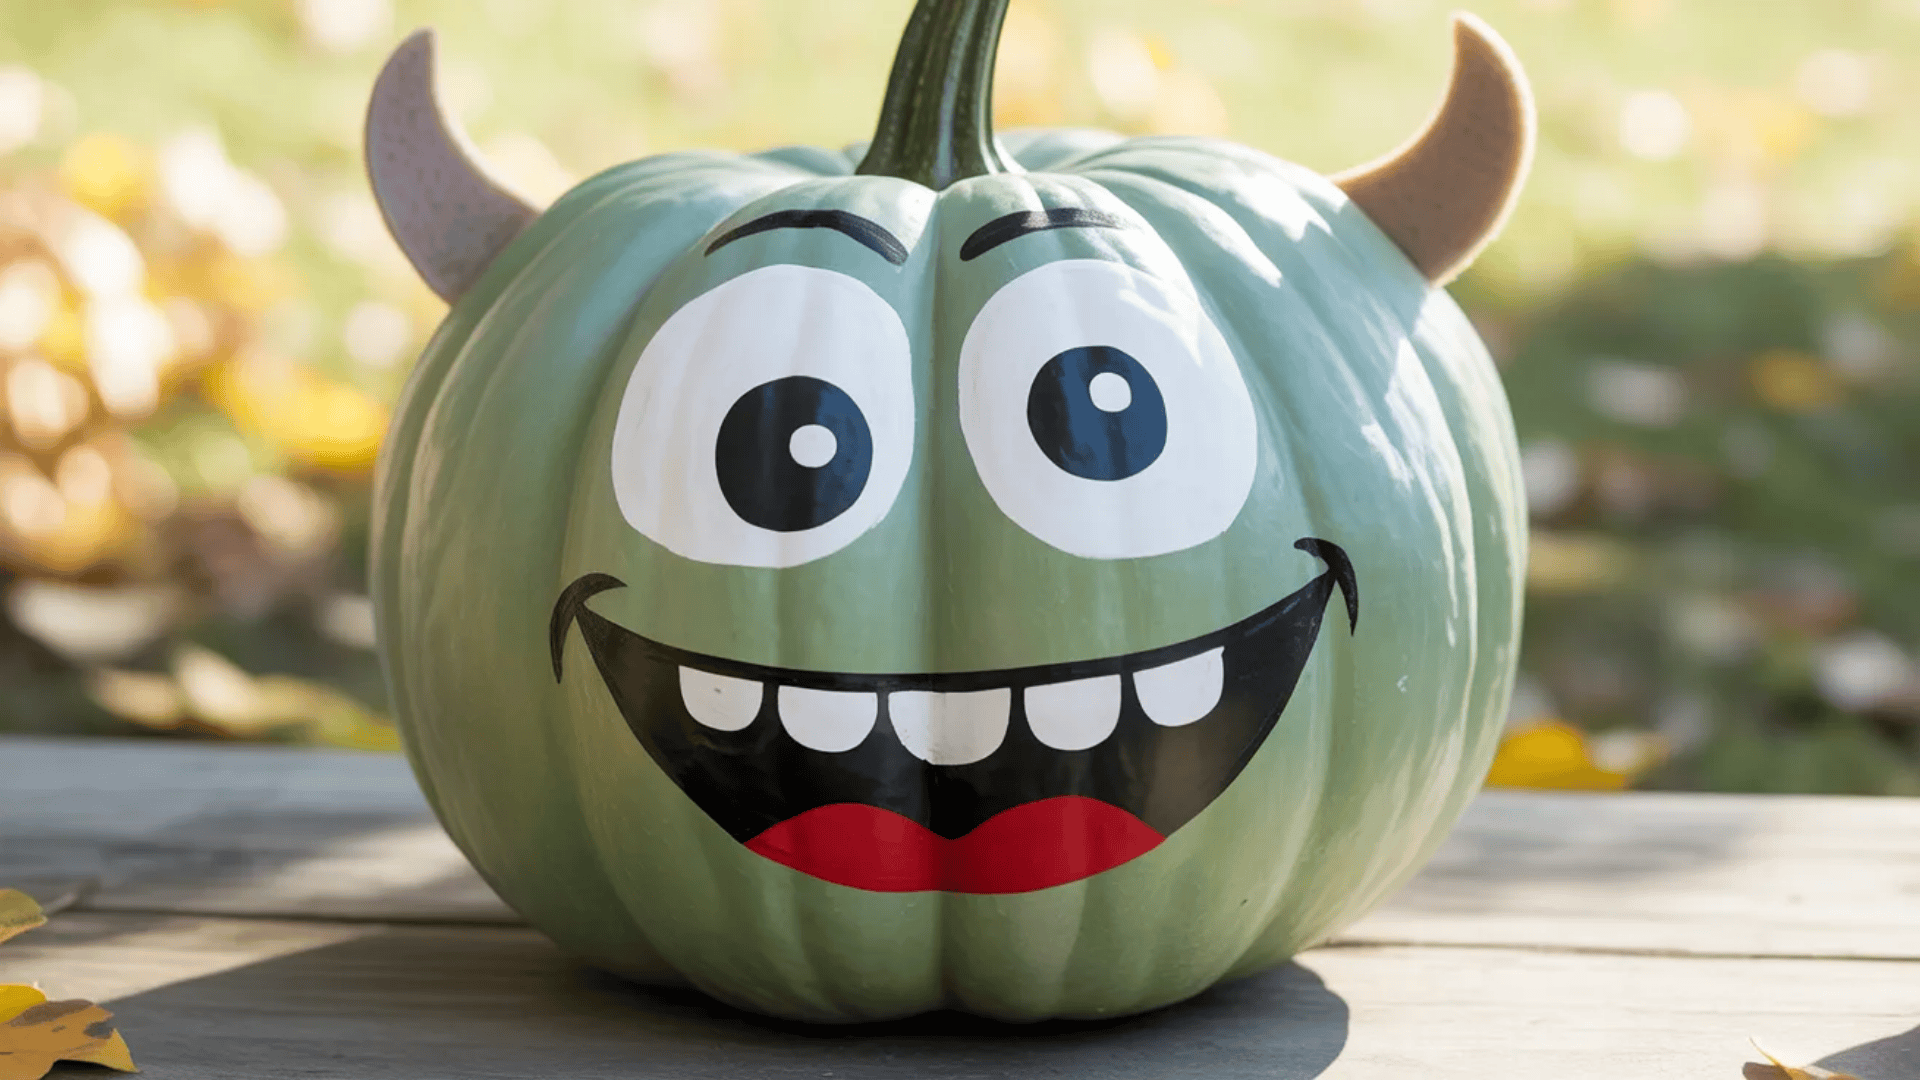
Monster face pumpkins are fun, friendly, and perfect for kids. Create silly creatures with oversized features and bright colors.
Paint your pumpkin base in green, purple, blue, or any monster color. Add huge eyes, a goofy mouth, and other exaggerated features.
Try these monster features:
- One eye or three eyes
- Fangs or buck teeth
- Horns made from painted cones
- Wild hair from yarn or paper
Use googly eyes instead of painting them for instant personality. Hot glue works great for attaching craft materials like felt or foam.
Make each monster unique with different expressions and colors. Line them up to create a whole monster family on your porch.
32. Mummy Pumpkin
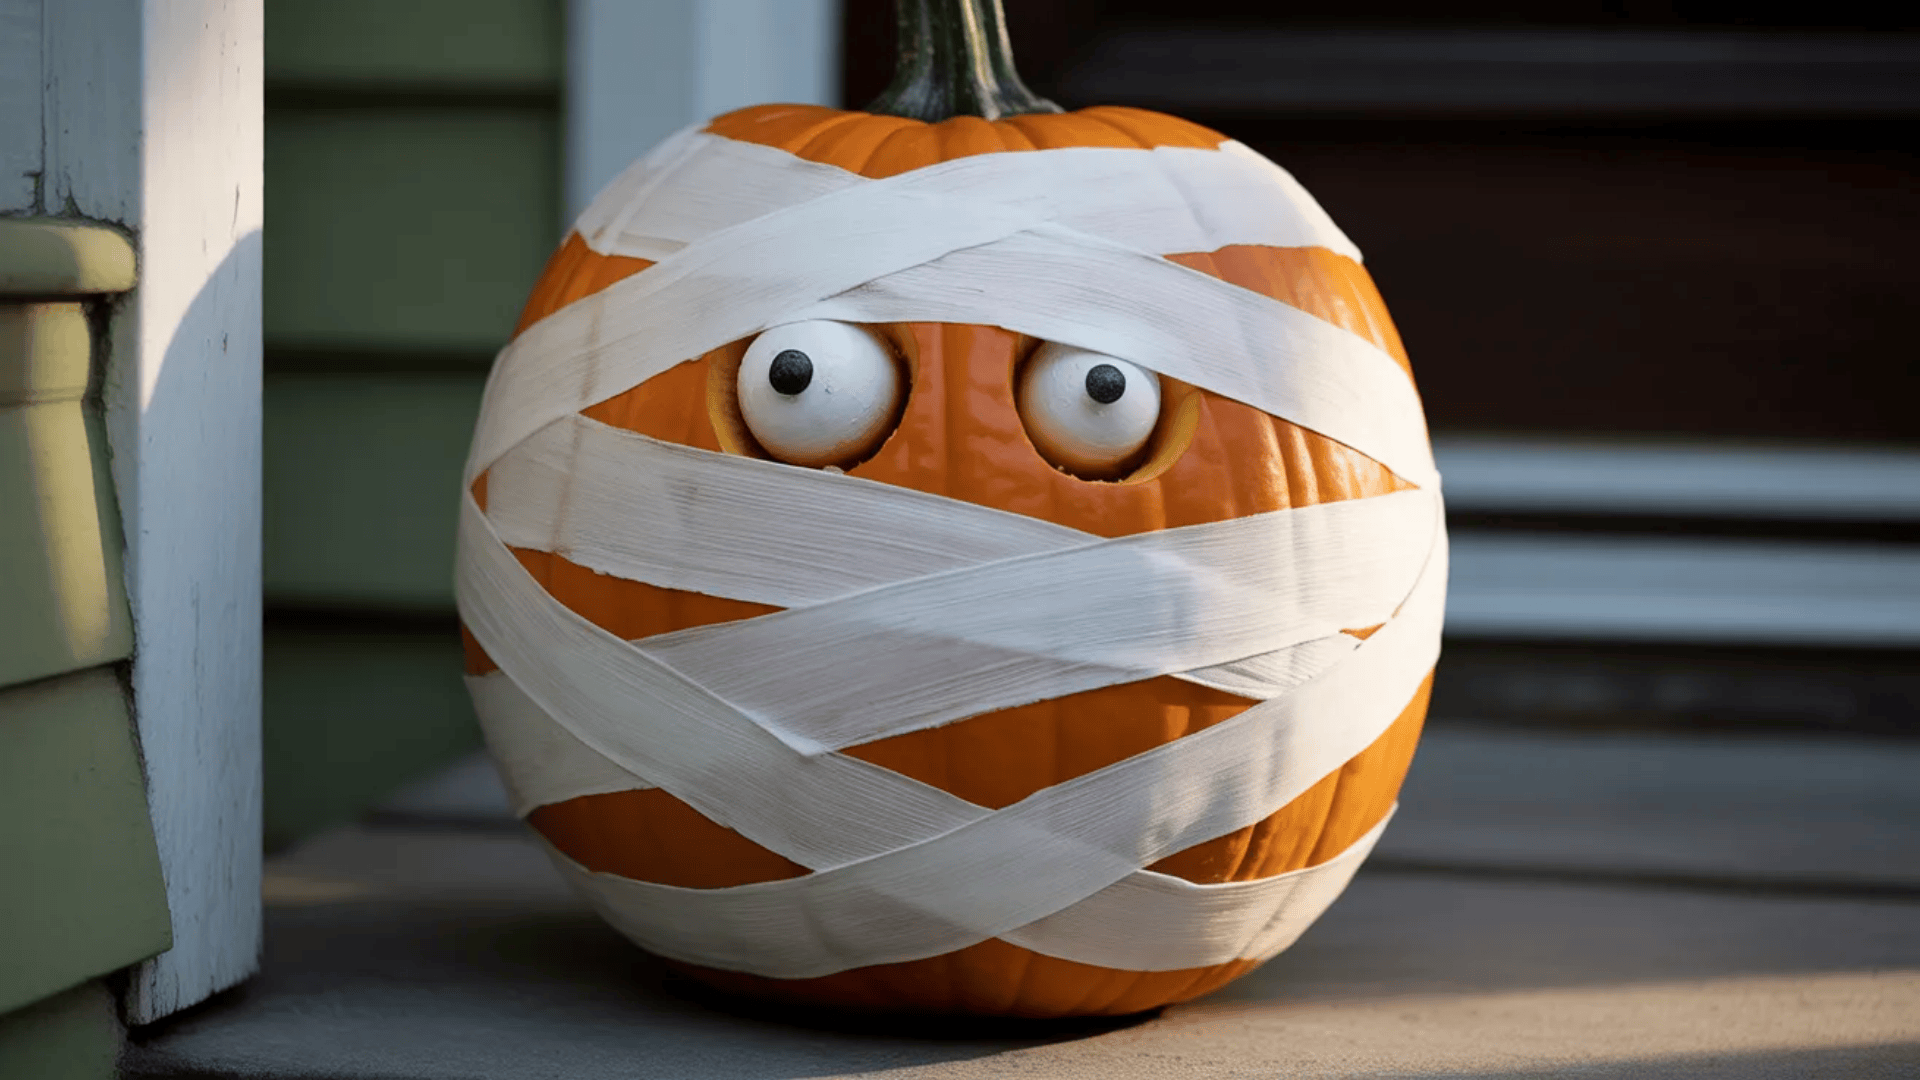
Mummy pumpkins wrap up Halloween fun with a classic spooky character. White strips wrapped around the pumpkin create bandages with eyes peeking through.
Paint your pumpkin white or cream as the base. Use white paint or actual gauze strips to create the mummy bandage effect.
Try these mummy styles:
- Messy, overlapping bandages
- Neat, organized wrapping
- Just a few strips for minimal look
- Bandages only on the front
Paint two large circles black or add googly eyes where the face would be. Leave space between bandages so eyes show through clearly.
Add a few loose ends of bandage hanging down for a more realistic mummy effect. Keep it simple for the best visual impact.
33. Pumpkin with Painted Quotes or Words
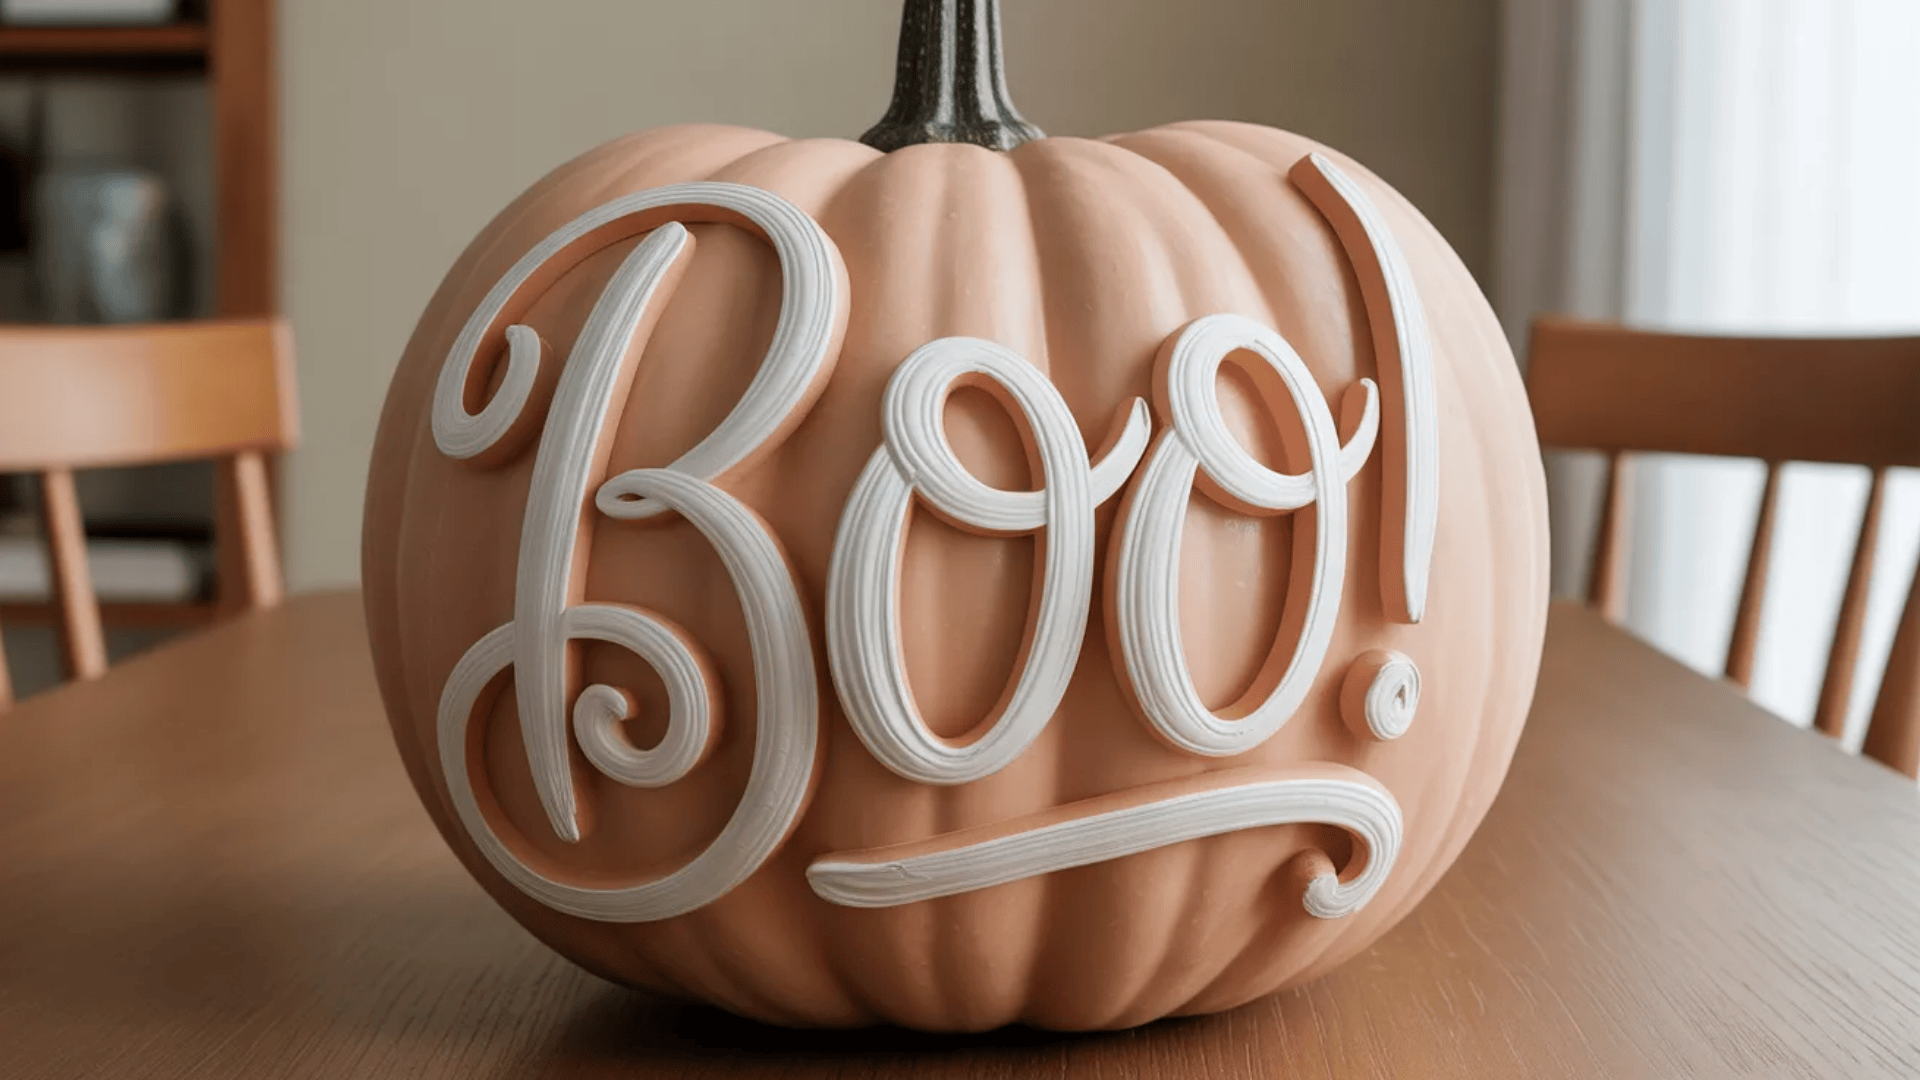
Painted word pumpkins let you share messages or set the mood for your display. Choose sayings that match your style and the season.
Use a paint marker or fine brush for clean lettering. Practice your layout on paper first to get spacing right.
Try these popular phrases:
- “BOO” for classic Halloween
- “Trick or Treat” for fun vibes
- “Hello Fall” for seasonal greeting
- Family name or house number
Paint the background in a solid color so words stand out clearly. White or black text shows up best on most base colors.
Add small decorative elements like stars, leaves, or dots around your words. Keep lettering large enough to read from several feet away.
Tips for Painting Pumpkins
Getting your pumpkin painting ideas to look great and last long comes down to a few basic tips. Follow these guidelines for the best results.
| Category | Tip | Details |
|---|---|---|
| Preparation | Clean First | Wipe with soap and water. Dry completely. Use rubbing alcohol on fake pumpkins. |
| Paint Types | Best Options | Acrylic for details. Spray for full coverage. Chalk for matte finish. |
| Drying | Wait Between Coats | 20-30 minutes for touch-dry. One hour minimum before sealing or moving. |
| Protection | Seal When Done | Clear acrylic sealer prevents scratches and fading. Apply with foam brush or spray. |
| Indoor vs Outdoor | Location Matters | Keep real pumpkins out of direct sun. Place outdoors under cover to avoid rain. |
| Display | Arrange for Impact | Group in odd numbers. Mix sizes and heights for best visual effect. |
These tips work for both real and fake pumpkins. Start with proper prep, choose quality paint, and seal your finished work.
Your painted pumpkins will last the entire season when you follow these steps. Now get creative and bring your pumpkin painting ideas to life.
Conclusion
Pumpkin painting ideas give you endless ways to celebrate fall and Halloween. You can go simple with dots and stripes, or try something detailed like galaxy designs or monster faces.
The best part? No mess, no sharp tools, and your work lasts much longer than carved pumpkins. Kids and adults can both join in and create something unique.
Pick a few designs from this list and grab your paints. Start with easy options if you’re new to this, or challenge yourself with more complex patterns.
Mix different styles on your porch or dining table for a display that’s all your own. There’s no wrong way to paint a pumpkin.
Ready to get started? Clean off a pumpkin, pick your favorite colors, and let your creativity flow. Share your finished pumpkins with friends and family, and enjoy the compliments all season long.
Happy painting!