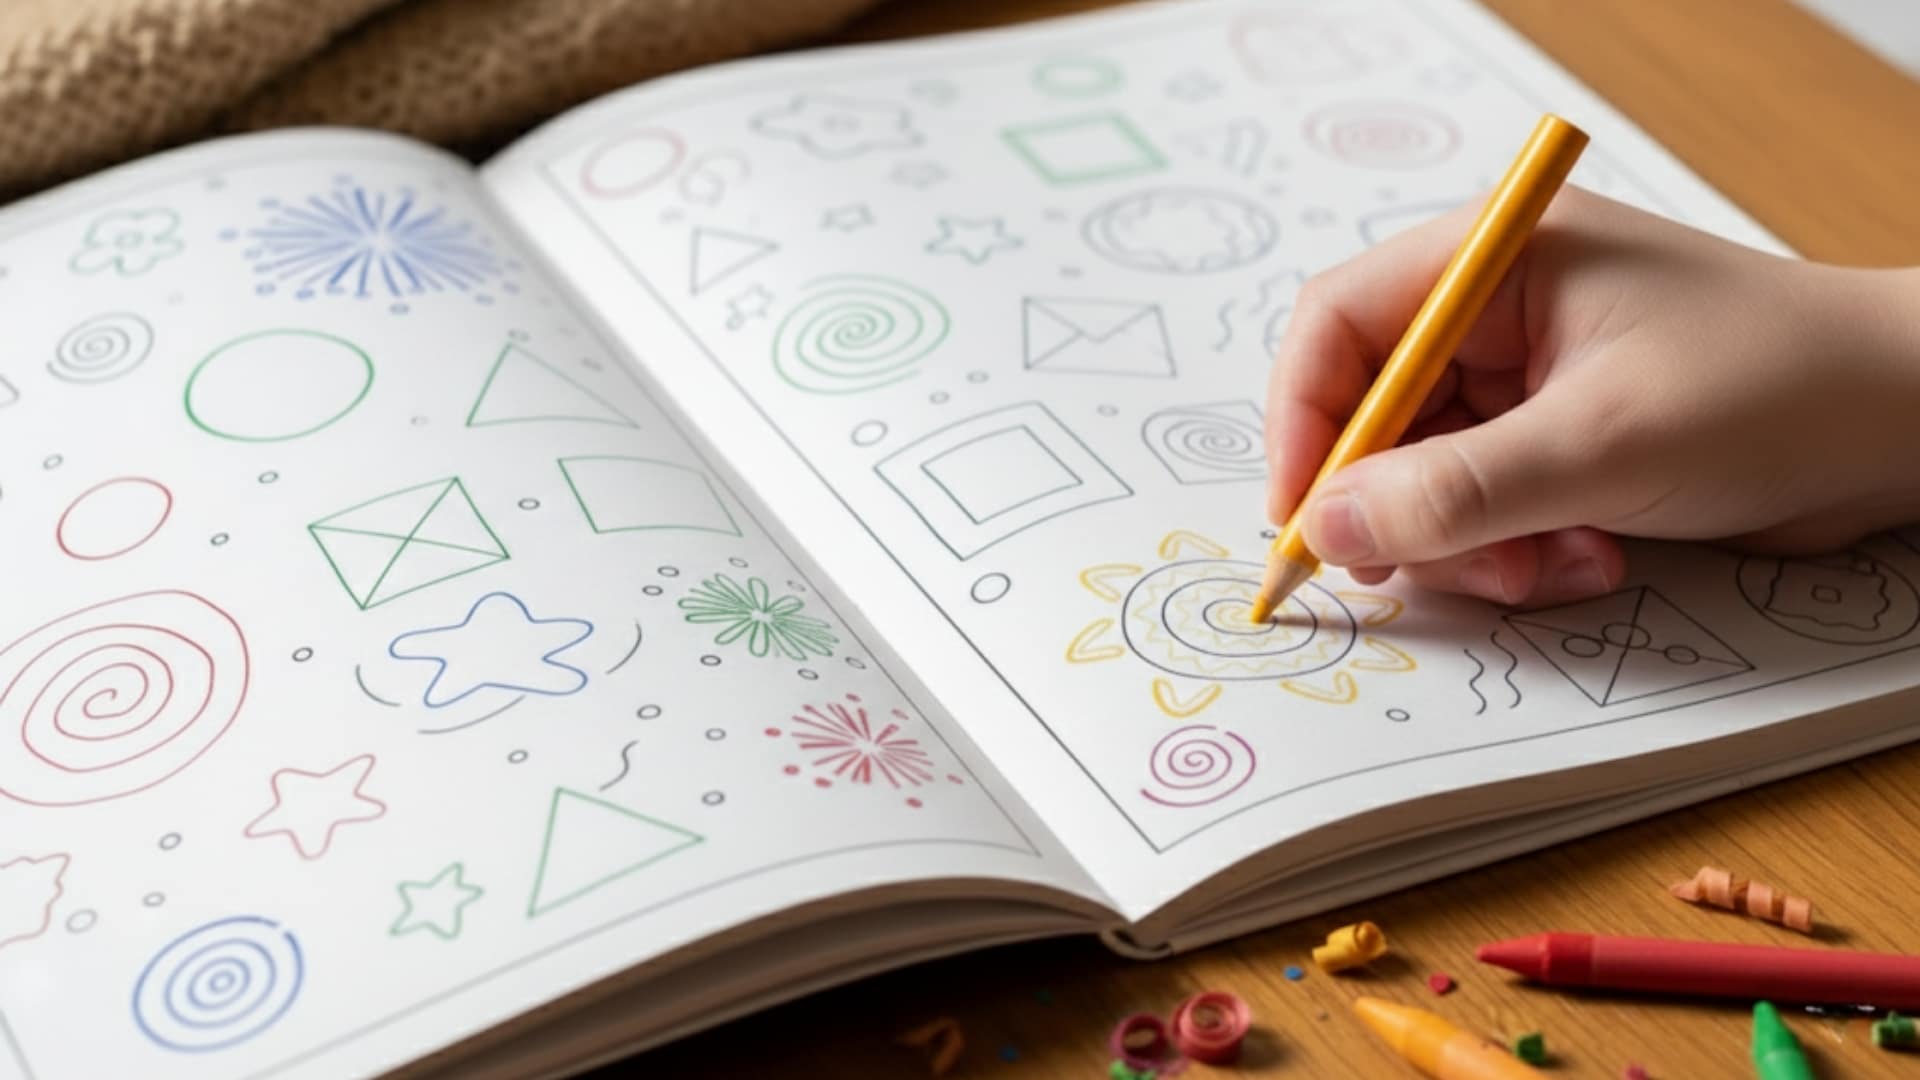
Paint has a way of fixing things. A boring room. A forgotten chair. A Sunday with nothing to do.
You don’t need talent for this. Honestly, you don’t even need a plan. Some of the best DIY painting ideas come from happy accidents. A color you mixed wrong. A drip that looked cool. A brush stroke that went sideways.
That’s the fun part. Nobody grades your work. No client breathes down your neck. It’s just you, some paint, and whatever you feel like making.
This guide shares plenty of projects worth trying. Walls, furniture, canvas, and small crafts. Pick one that catches your eye. Start there.
Your hands will get messy. Your space will look better. Fair trade.
DIY Painting Ideas to Refresh Your Space
From accent walls to painted planters, these projects cover a little bit of everything. Some need just an hour. Others take a full weekend. You’ll find ideas for your walls, old furniture, canvas art, and small decor pieces.
Each project includes a supply list and simple steps. Skill levels range from total beginner to intermediate. Pick what fits your mood and time. There’s no order here. Jump to whatever catches your attention first.
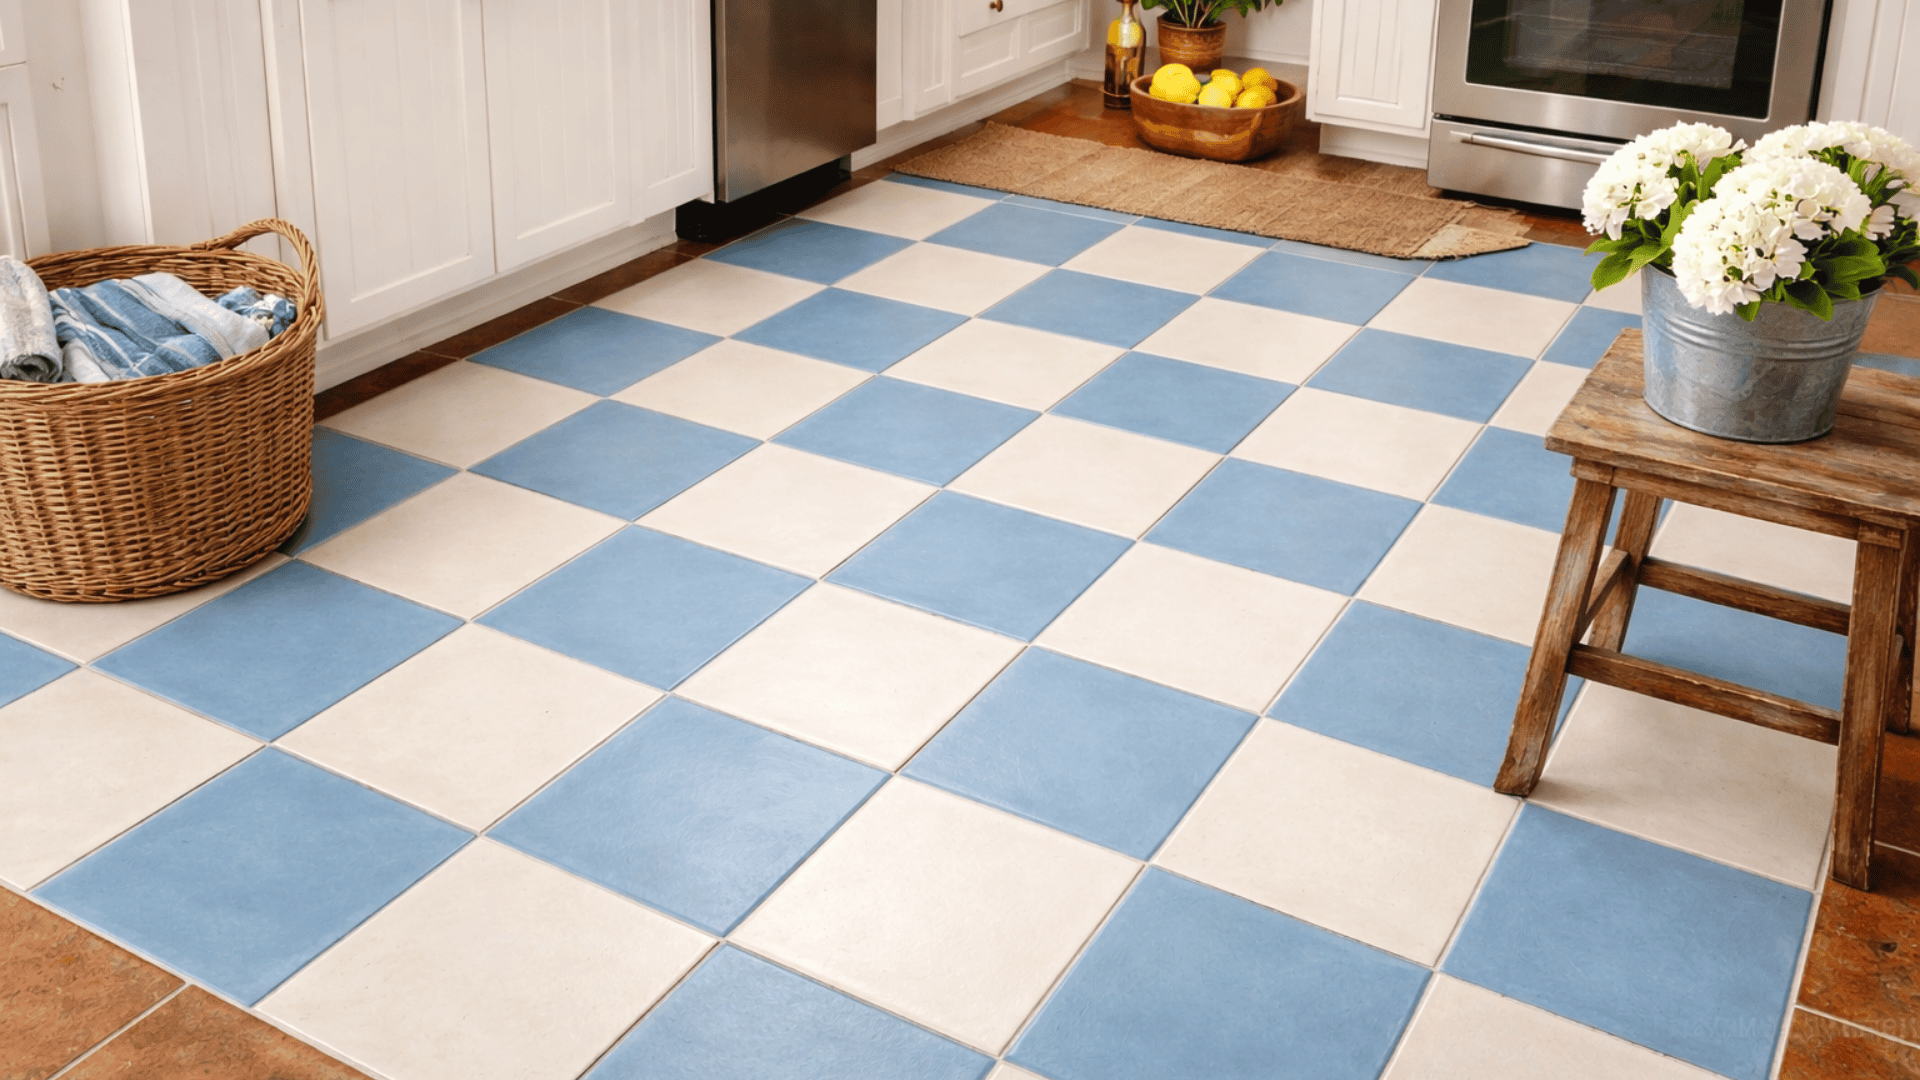
1. Geometric Accent Wall
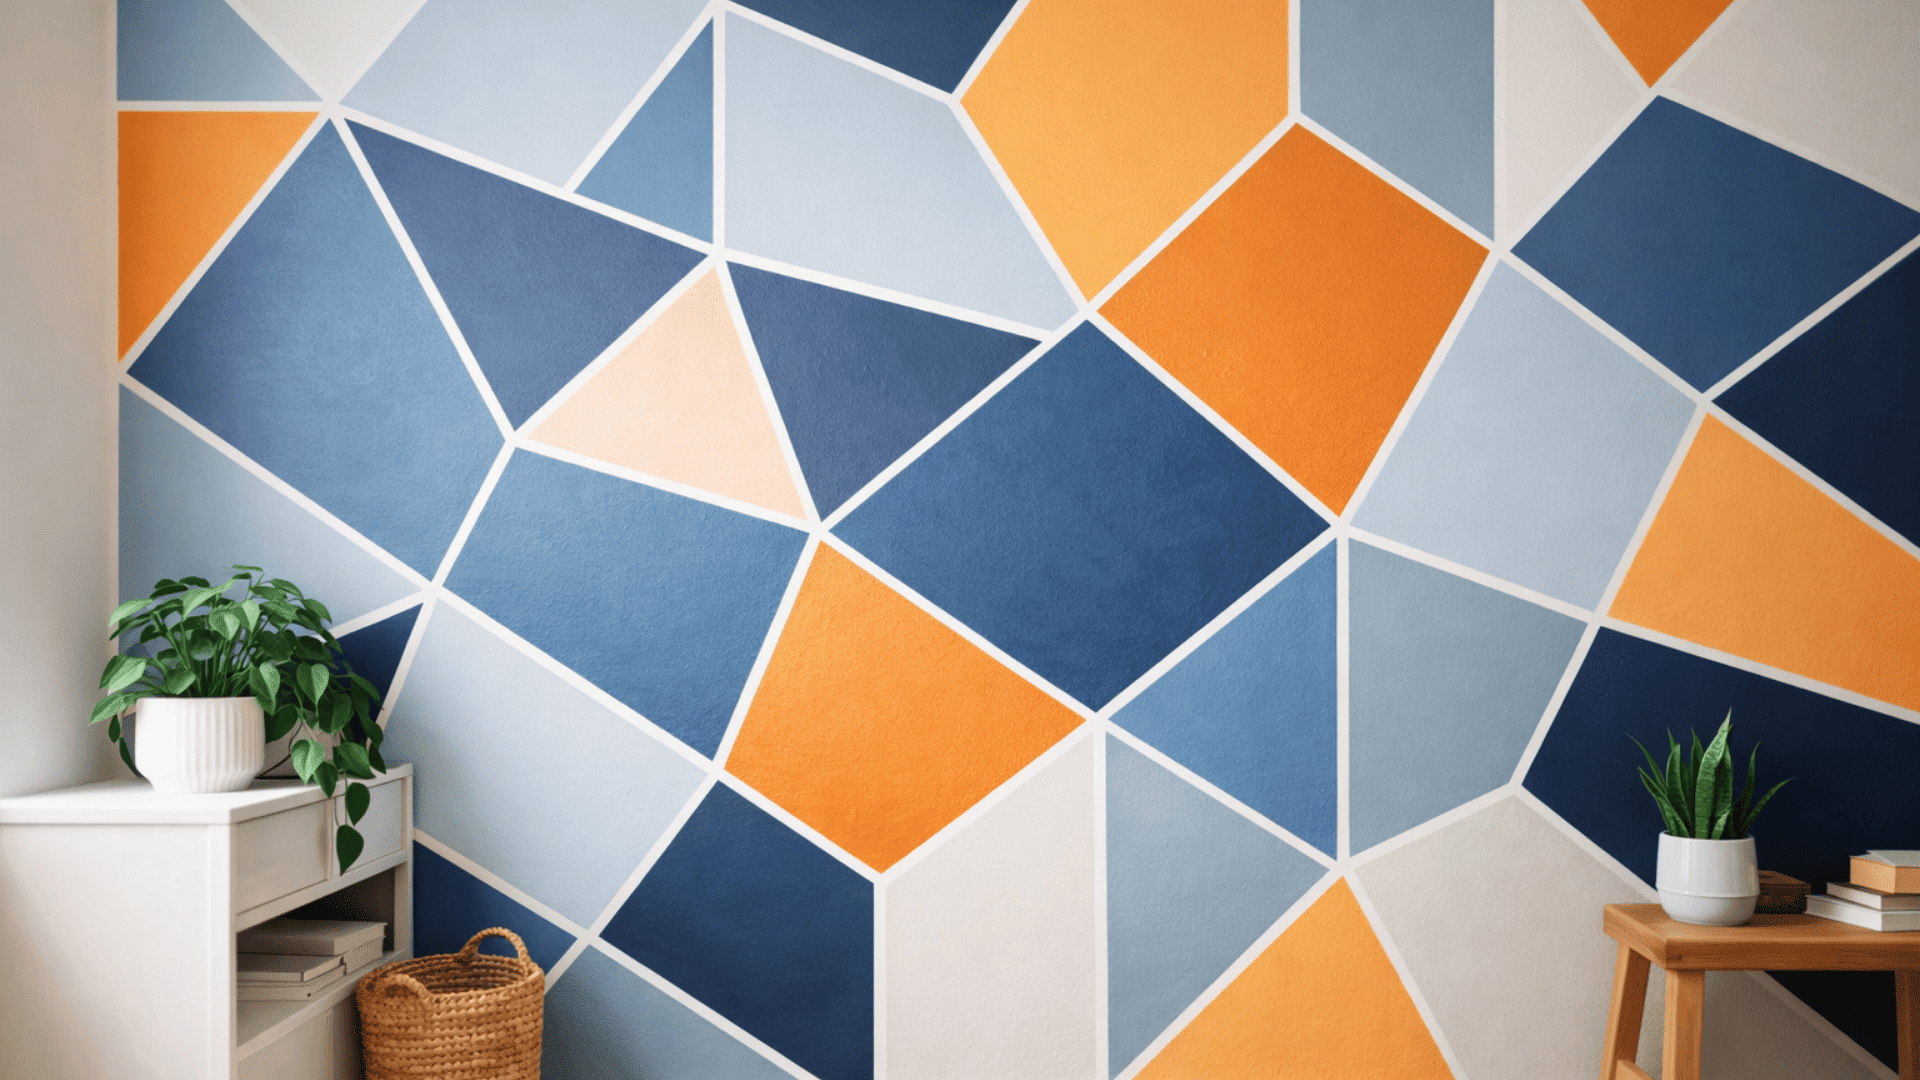
Triangles, diamonds, hexagons. Geometric shapes turn a plain wall into a statement piece. This project looks complex, but it’s not. Painter’s tape does all the hard work.
What You Need:
- Painter’s tape
- Two to three paint colors
- Foam roller and brush
- Level tool
How to Do It:
Paint your base color first. Give it a full day to dry. Then grab your tape. Map out your shapes. Use a level to keep lines crisp and even.
Fill each section with your chosen colors. Work from top to bottom. Peel the tape off while the paint is still a bit wet. This gives you sharp, clean edges every time.
Pro Tip: Stick to colors in the same family for a subtle look. Go bold with contrasting shades if you want drama.
Skill Level: Beginner
Time Required: One afternoon
2. Ombre Wall Effect
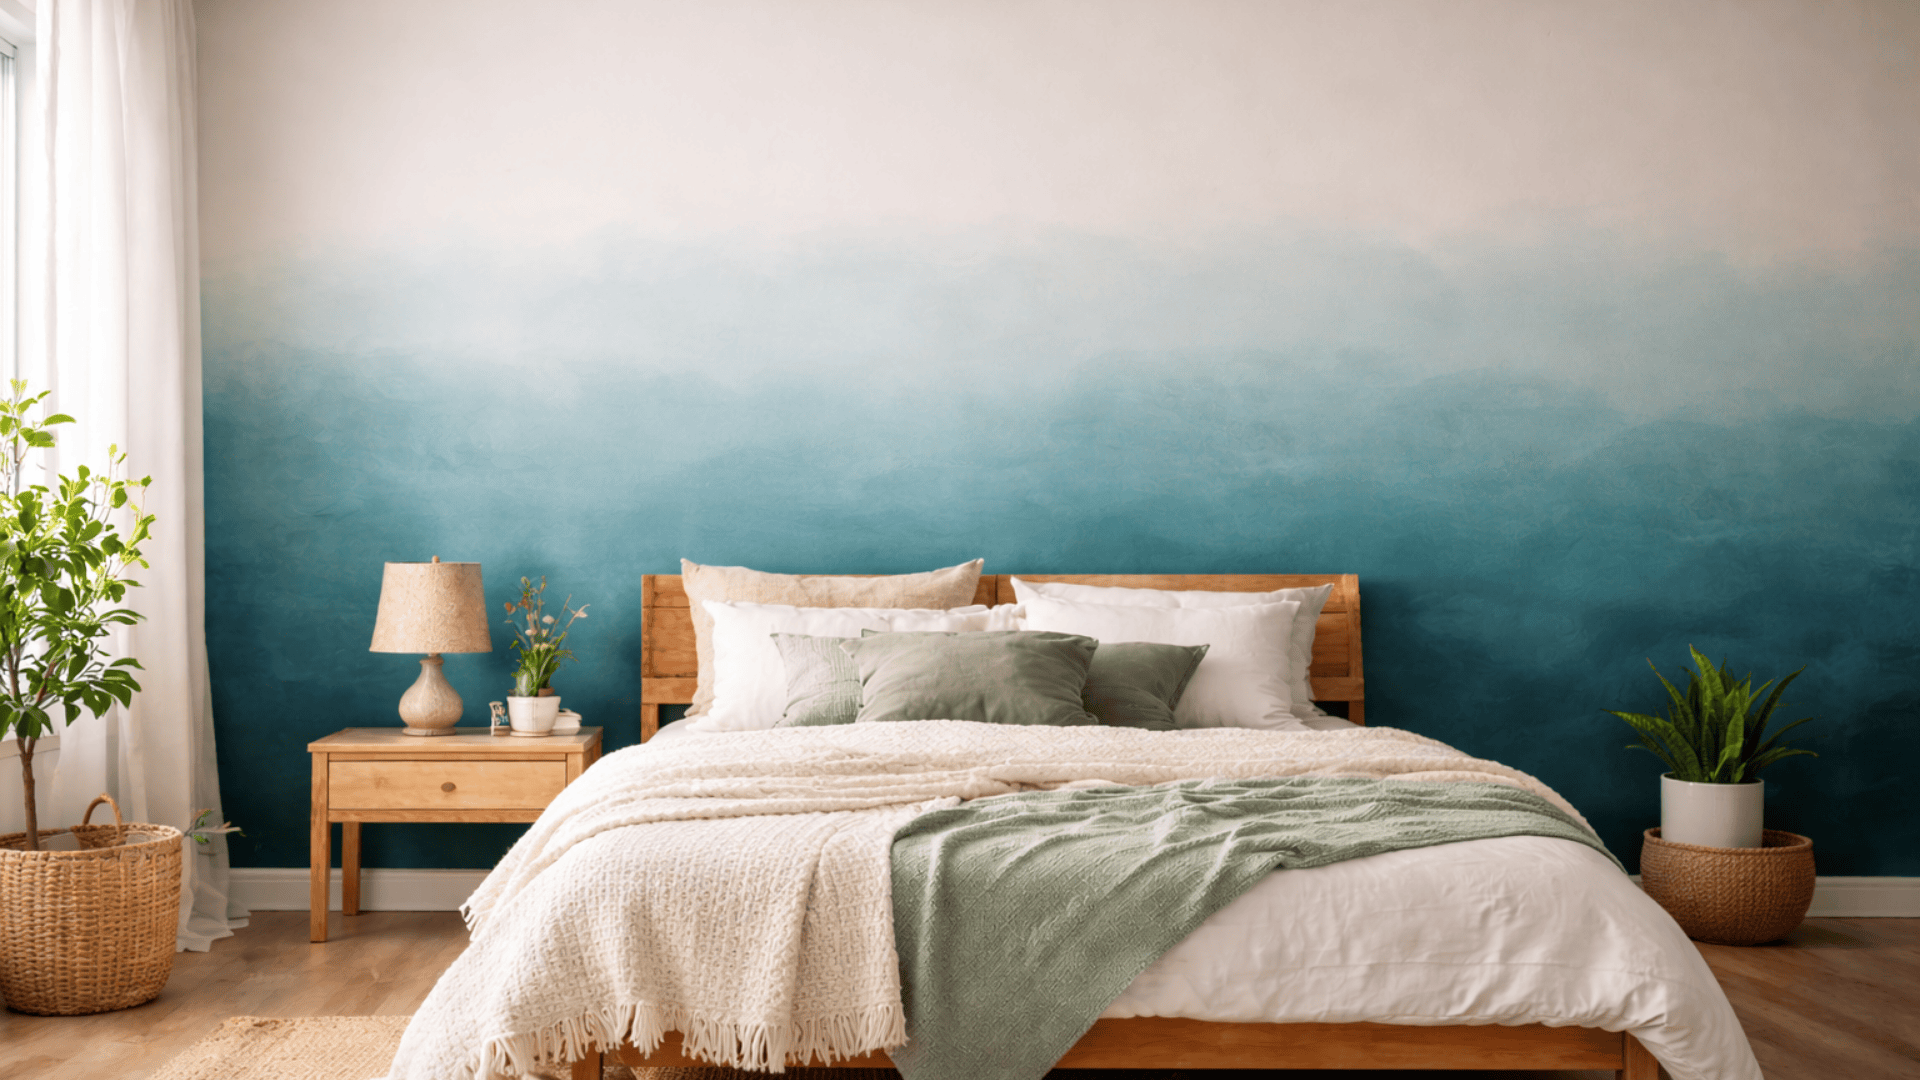
One color. Three shades. That’s all you need for an ombre wall. The look is soft and calming. It works great in bedrooms, nurseries, and bathrooms.
What You Need:
- One paint color in light, medium, and dark shades
- Wide paint roller
- Large blending brush
- Spray bottle with water
How to Do It:
Split your wall into three sections in your mind. Start with the darkest shade at the bottom. Roll the medium shade in the middle. Finish with the lightest at the top.
Now comes the blending. While the paint is still wet, use a damp brush. Sweep back and forth where the colors meet. Work fast. Paint dries quicker than you think. Mist the wall lightly if it starts to dry too soon.
Pro Tip: Practice on cardboard first. It helps you get the blending motion right before hitting the wall.
Skill Level: Intermediate
Time Required: One full day
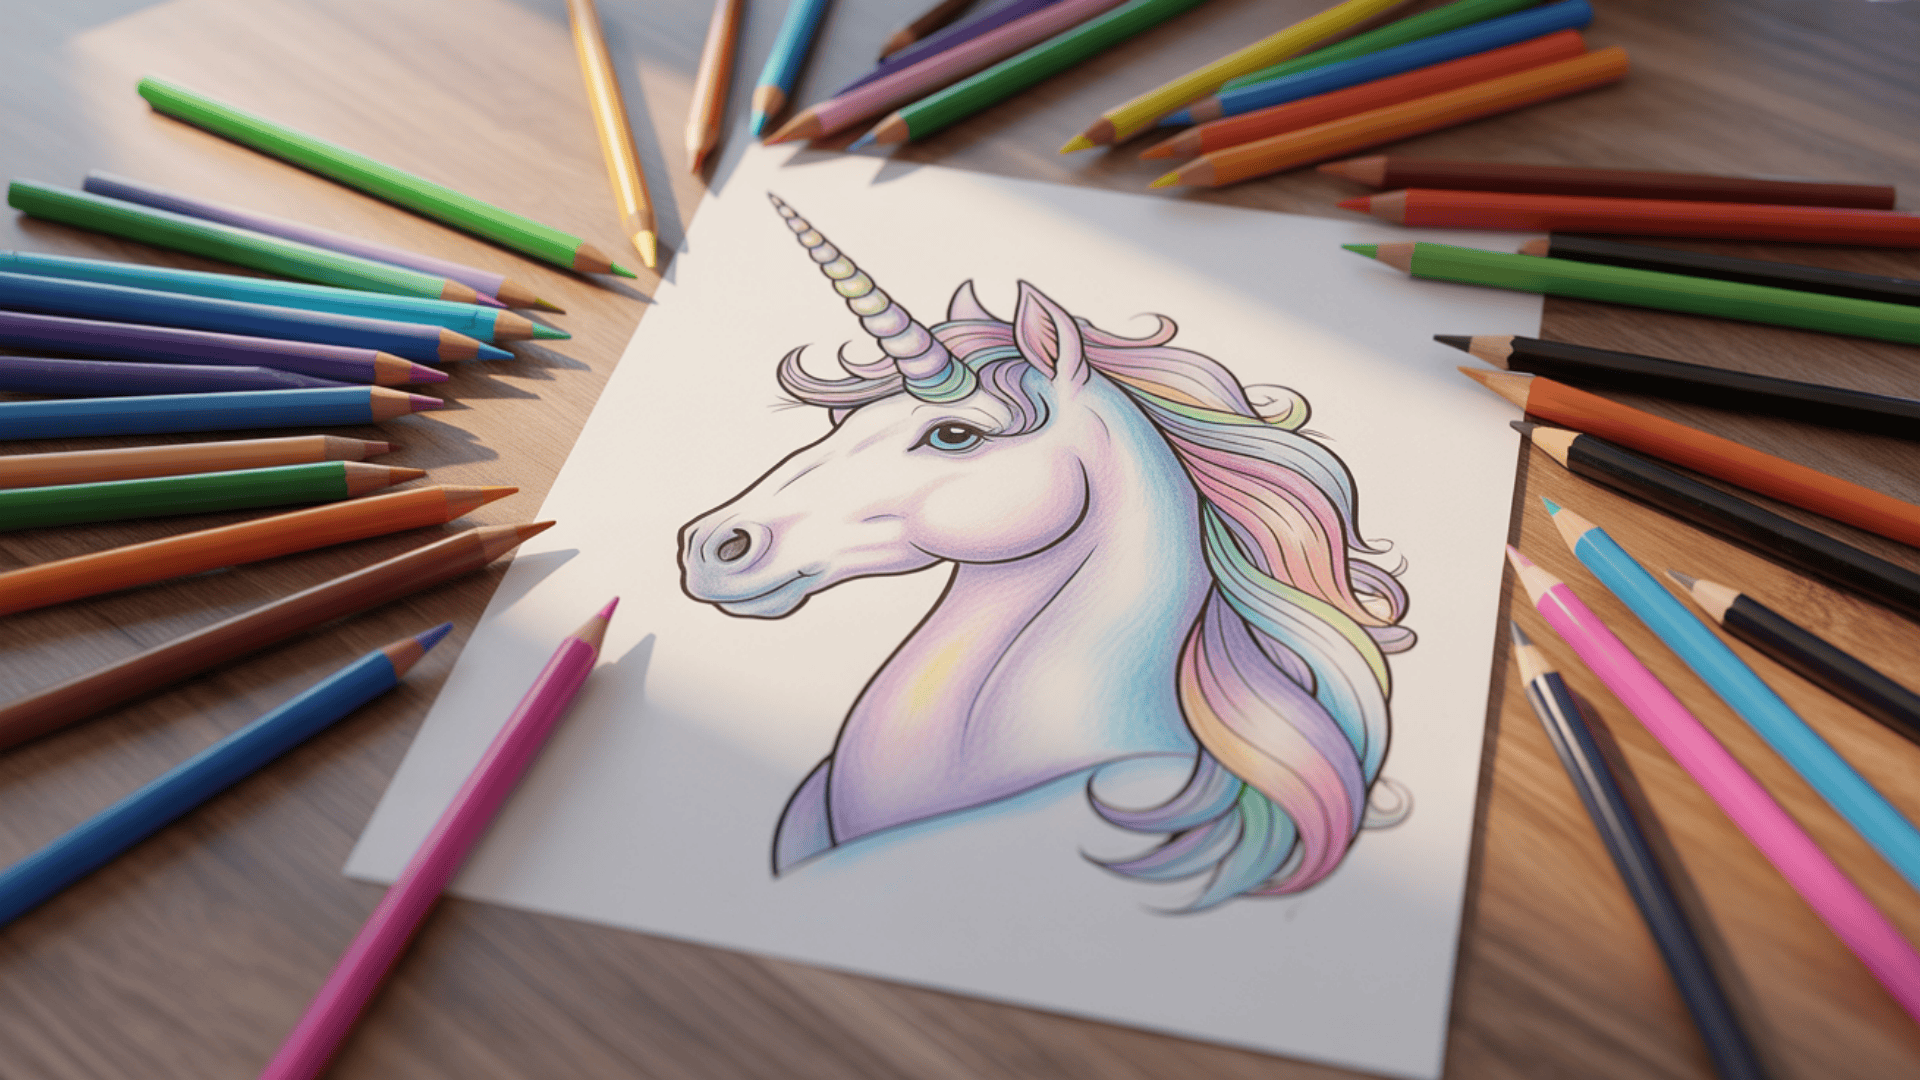
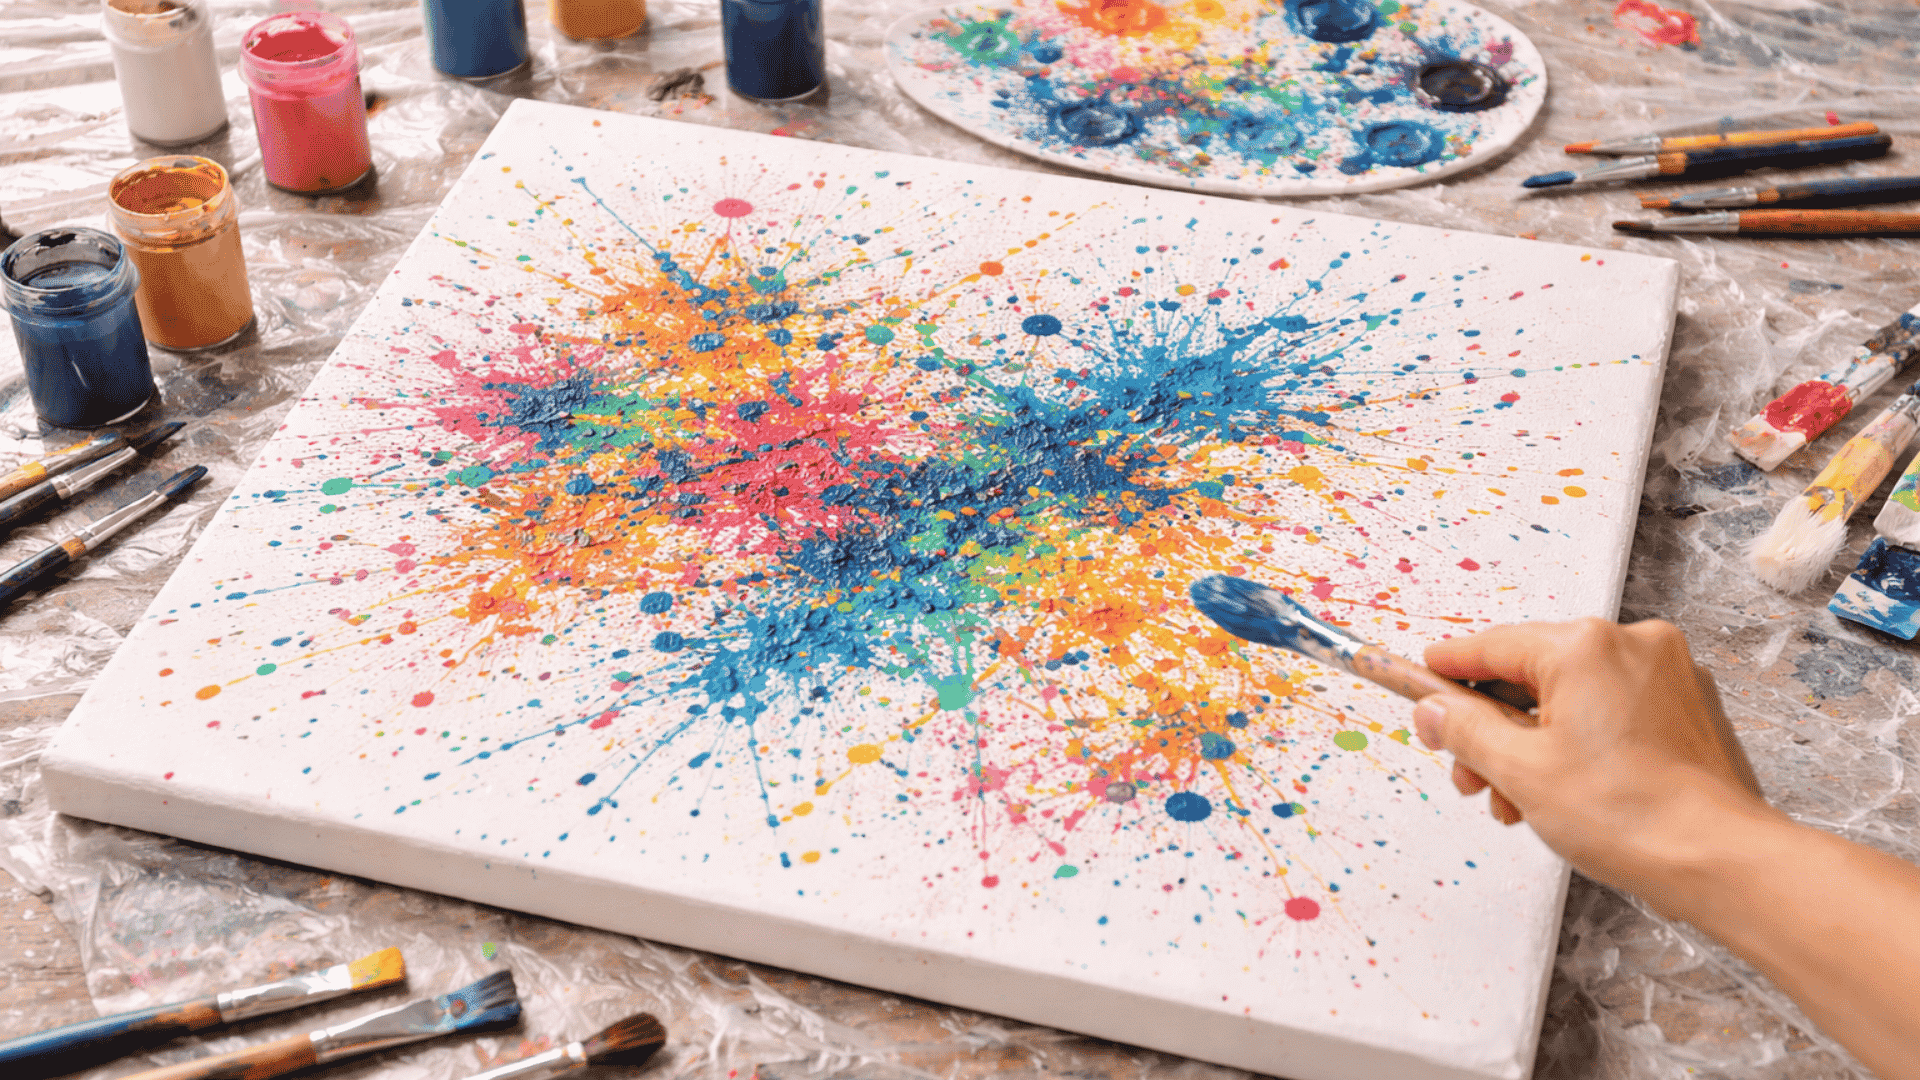
3. Abstract Canvas Art
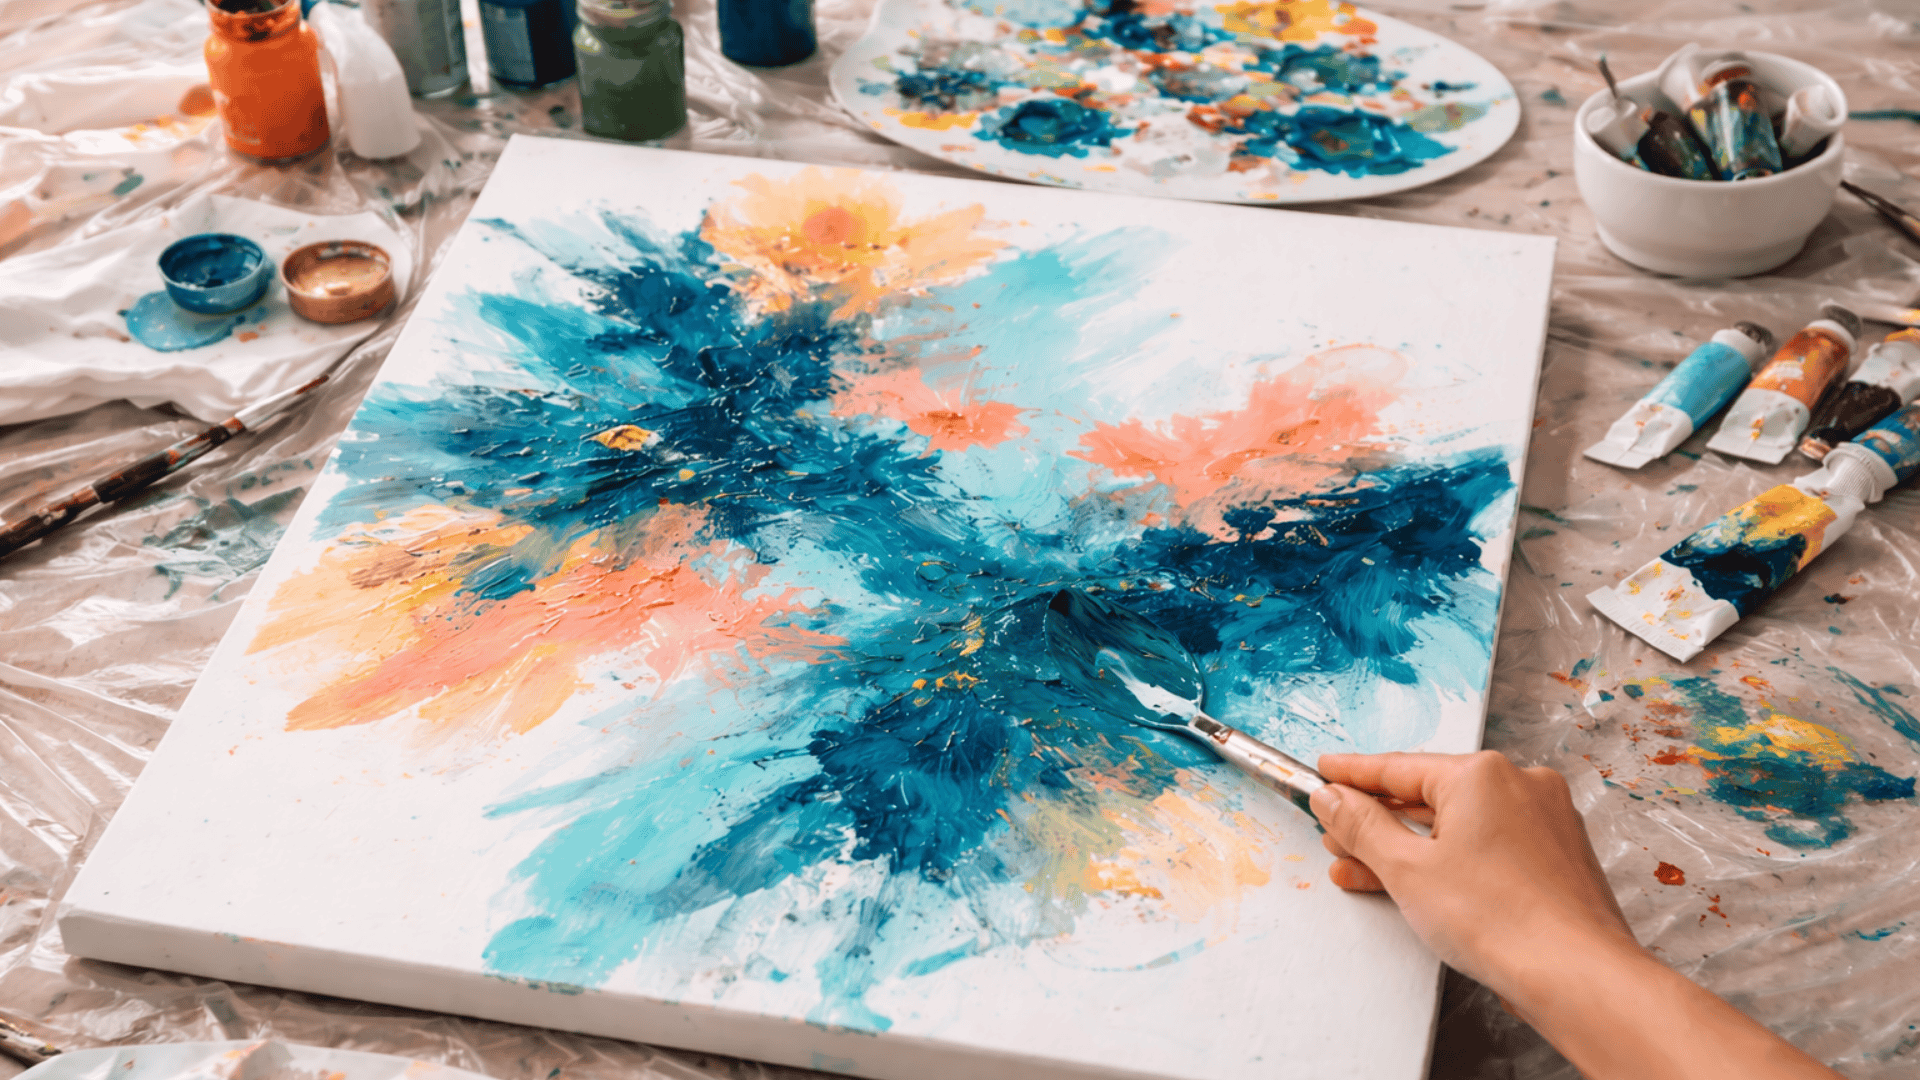
No rules. No right or wrong. Abstract painting is pure freedom. Splash it, pour it, smear it. Whatever feels good works.
What You Need:
- Blank canvas in any size
- Acrylic paints
- Palette knife or old credit card
- Drop cloth or newspaper
How to Do It:
Lay your canvas flat. Protect your floor with a drop cloth. Squeeze paint directly onto the canvas. Use a palette knife to spread it around. Drag, swirl, dab. Mix colors on the canvas itself.
Let one layer dry before adding another. Press a paper towel into wet paint for texture. Scrape through layers to reveal colors underneath. There’s no finish line. Stop when it feels done to you.
Pro Tip: Limit yourself to three or four colors. Too many shades can turn muddy fast.
Skill Level: Beginner
Time Required: One to two hours
4. Painted Terra Cotta Pots
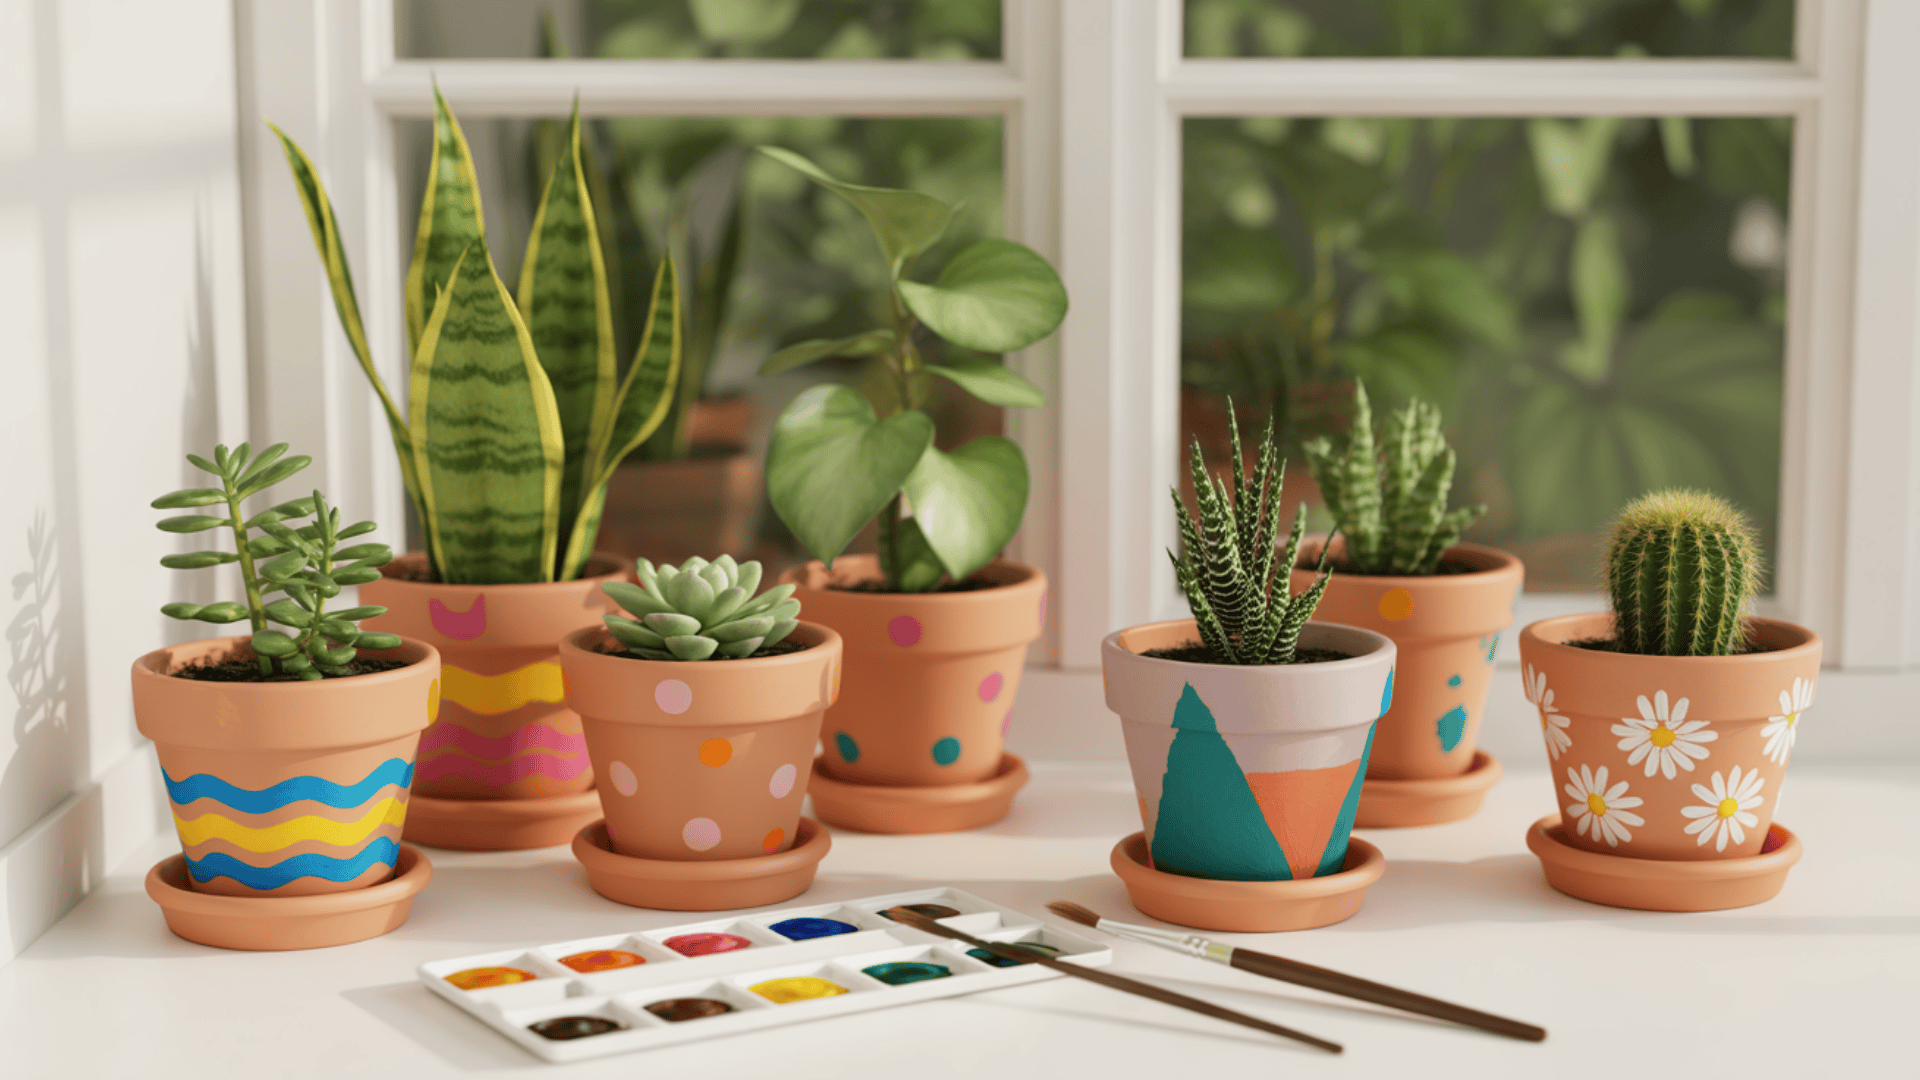
Plain clay pots do their job. But painted ones do it with style. A few coats of color turn basic planters into eye-catching decor. Line them on a windowsill or group them on your porch.
What You Need:
- Terra cotta pots in various sizes
- Acrylic craft paint
- Foam brushes
- Clear sealant spray
How to Do It:
Wipe down your pots. Remove any dust or dirt. Let them dry completely. Start with a coat of white paint as your base. This makes your colors pop brighter.
Once dry, add your design. Try stripes, dots, zigzags, or solid color blocks. Use tape for clean lines if needed. Let everything dry overnight. Finish with a clear sealant. This protects your work from water and weather.
Pro Tip: Paint the rim a different color from the body. It adds a nice contrast without extra effort.
Skill Level: Beginner
Time Required: One to two hours
5. Stenciled Feature Wall
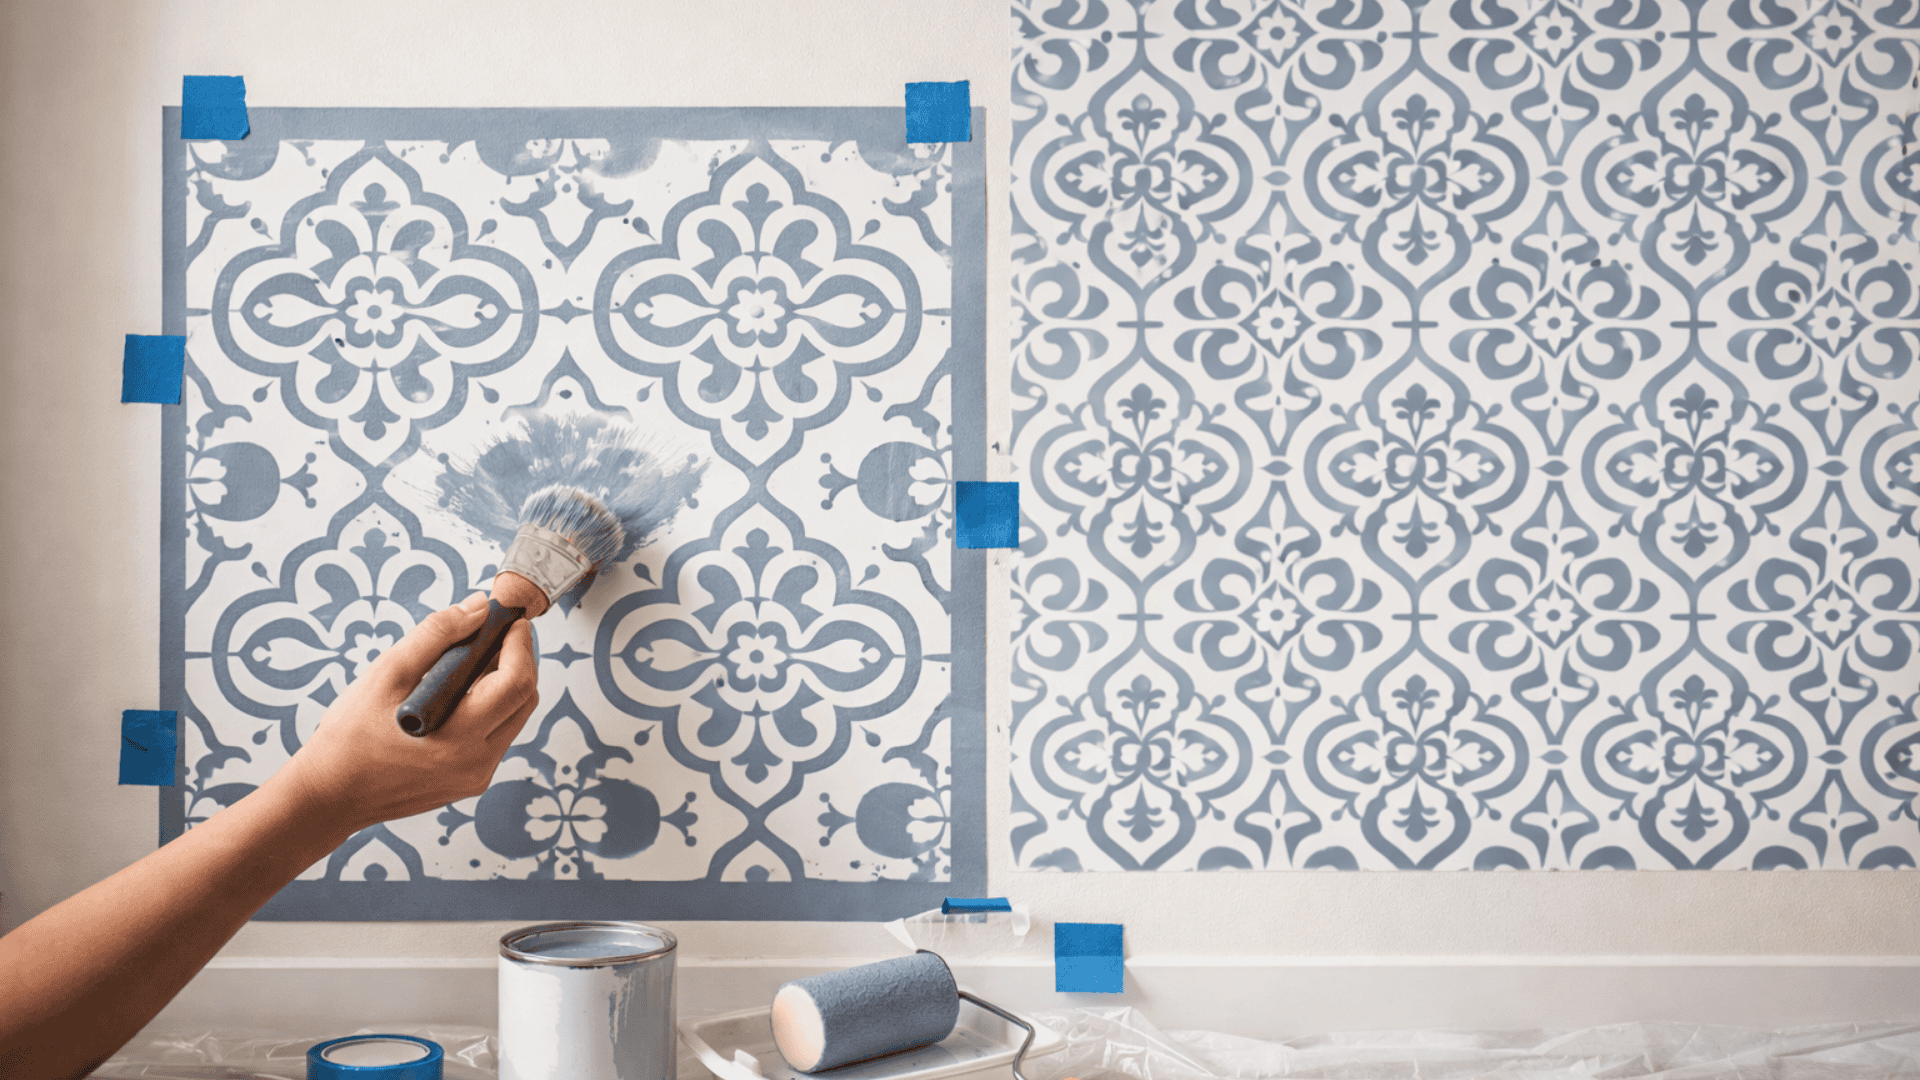
Want a patterned wall without the hassle of wallpaper? Stencils are your answer. You get precise designs without freehand stress. Moroccan tiles, floral prints, geometric repeats. The options are huge.
What You Need:
- Wall stencil of your choice
- Stencil brush or small foam roller
- Painter’s tape
- Accent paint color
How to Do It:
Paint your wall with a base color. Wait a full day for it to cure. Position your stencil in one corner. Tape it flat against the wall.
Dip your brush in paint. Dab off the excess on a paper towel. Apply with a light tapping motion. Too much paint causes bleeding under the stencil. Move your stencil and repeat. Line up the pattern carefully each time.
Pro Tip: Clean your stencil after every few uses. Paint buildup ruins crisp edges.
Skill Level: Beginner
Time Required: One weekend
6. Pour Painting on Canvas
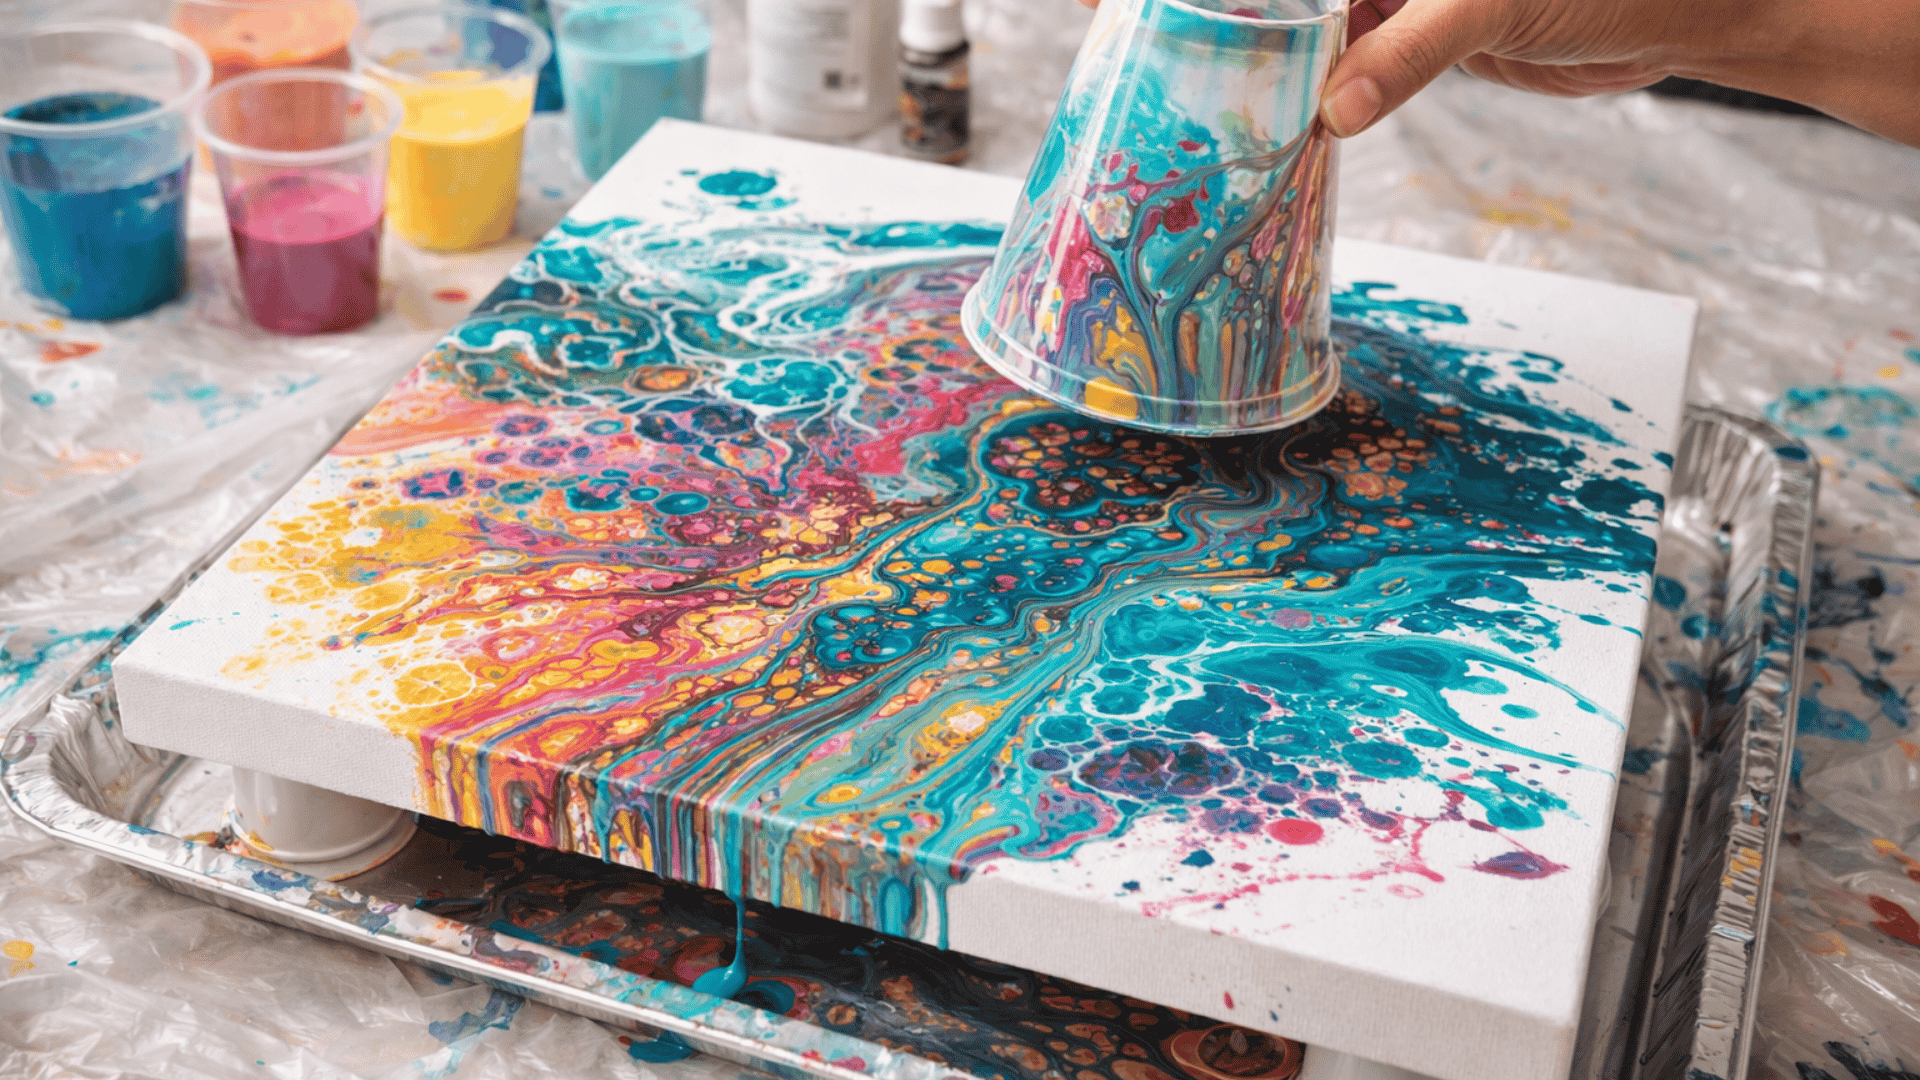
Pour painting is part art, part science, part luck. You layer colors in a cup, flip it onto canvas, and watch magic happen. Swirls and cells form on their own. No two pieces ever look the same.
What You Need:
- Canvas
- Acrylic paints
- Pouring medium
- Plastic cups
- Silicone oil (optional)
How to Do It:
Mix each paint color with pouring medium. Aim for a consistency like warm honey. Not too thick. Not too runny. Layer your colors into one cup. Don’t stir them together.
Place your canvas on top of the cup. Flip both over in one quick motion. Lift the cup slowly. Let the paint spread on its own. Tilt the canvas to move color toward the edges. Add a drop of silicone oil for bubble-like cells.
Pro Tip: Work on a raised surface. Paint will drip off the sides. Catch it with a tray underneath.
Skill Level: Beginner
Time Required: One to two hours plus drying time
7. Chalkboard Wall
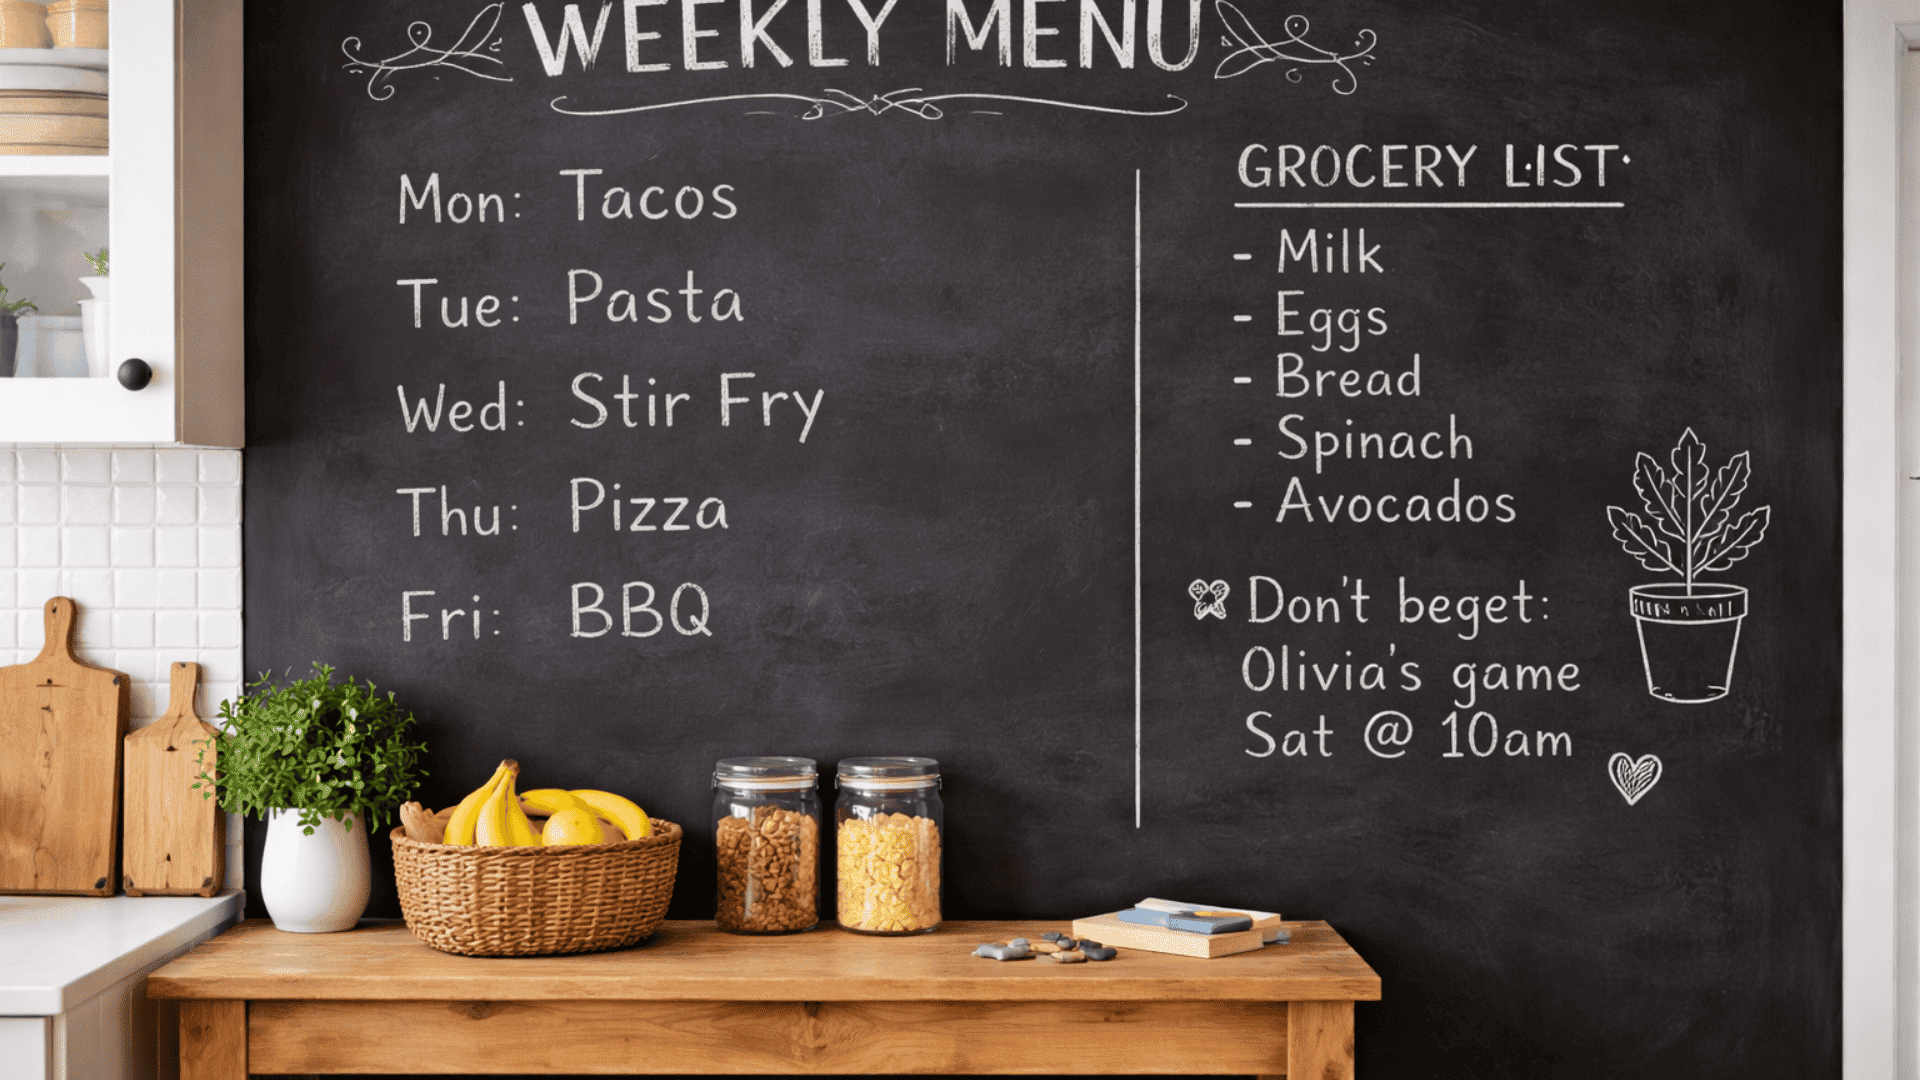
A chalkboard wall is useful and fun. Jot grocery lists in the kitchen. Let kids draw in the playroom. Write quotes in your office. It works anywhere you need a writable surface.
What You Need:
- Chalkboard paint
- Paint roller
- Painter’s tape
- Fine sandpaper
How to Do It:
Sand your wall lightly. Wipe away the dust. Tape off the area you want to cover. Apply chalkboard paint in thin, even coats. Three coats give you the best coverage. Let each coat dry for four hours before adding the next.
Here’s the important part. Wait three full days before using chalk. Then season the board. Rub the side of a chalk stick across the entire surface. Wipe it off with a dry cloth. Now your wall is ready.
Pro Tip: Use a damp cloth to erase. Dry erasers leave ghost marks over time.
Skill Level: Beginner
Time Required: Three days with drying time
8. Painted Mason Jar Vases

Mason jars sit in almost every home. Most collect dust. Give them a purpose. A little paint turns them into charming vases, candle holders, or storage containers. Group several sizes together for a full display.
What You Need:
- Mason jars in different sizes
- Chalk paint or acrylic paint
- Foam brushes
- Sandpaper
How to Do It:
Remove any labels. Wash jars and dry them fully. Decide if you want to paint inside or outside. Outside gives a solid look. Inside creates a glossy, tinted effect.
For outside painting, apply two thin coats. Let each dry before adding the next. Sand the edges lightly for a rustic, worn finish. For inside painting, pour paint in and swirl it around. Turn the jar upside down and let the excess drip out.
Pro Tip: Use chalk paint for a matte farmhouse vibe. Acrylic works better for bright, glossy colors.
Skill Level: Beginner
Time Required: One hour
9. Color Block Furniture
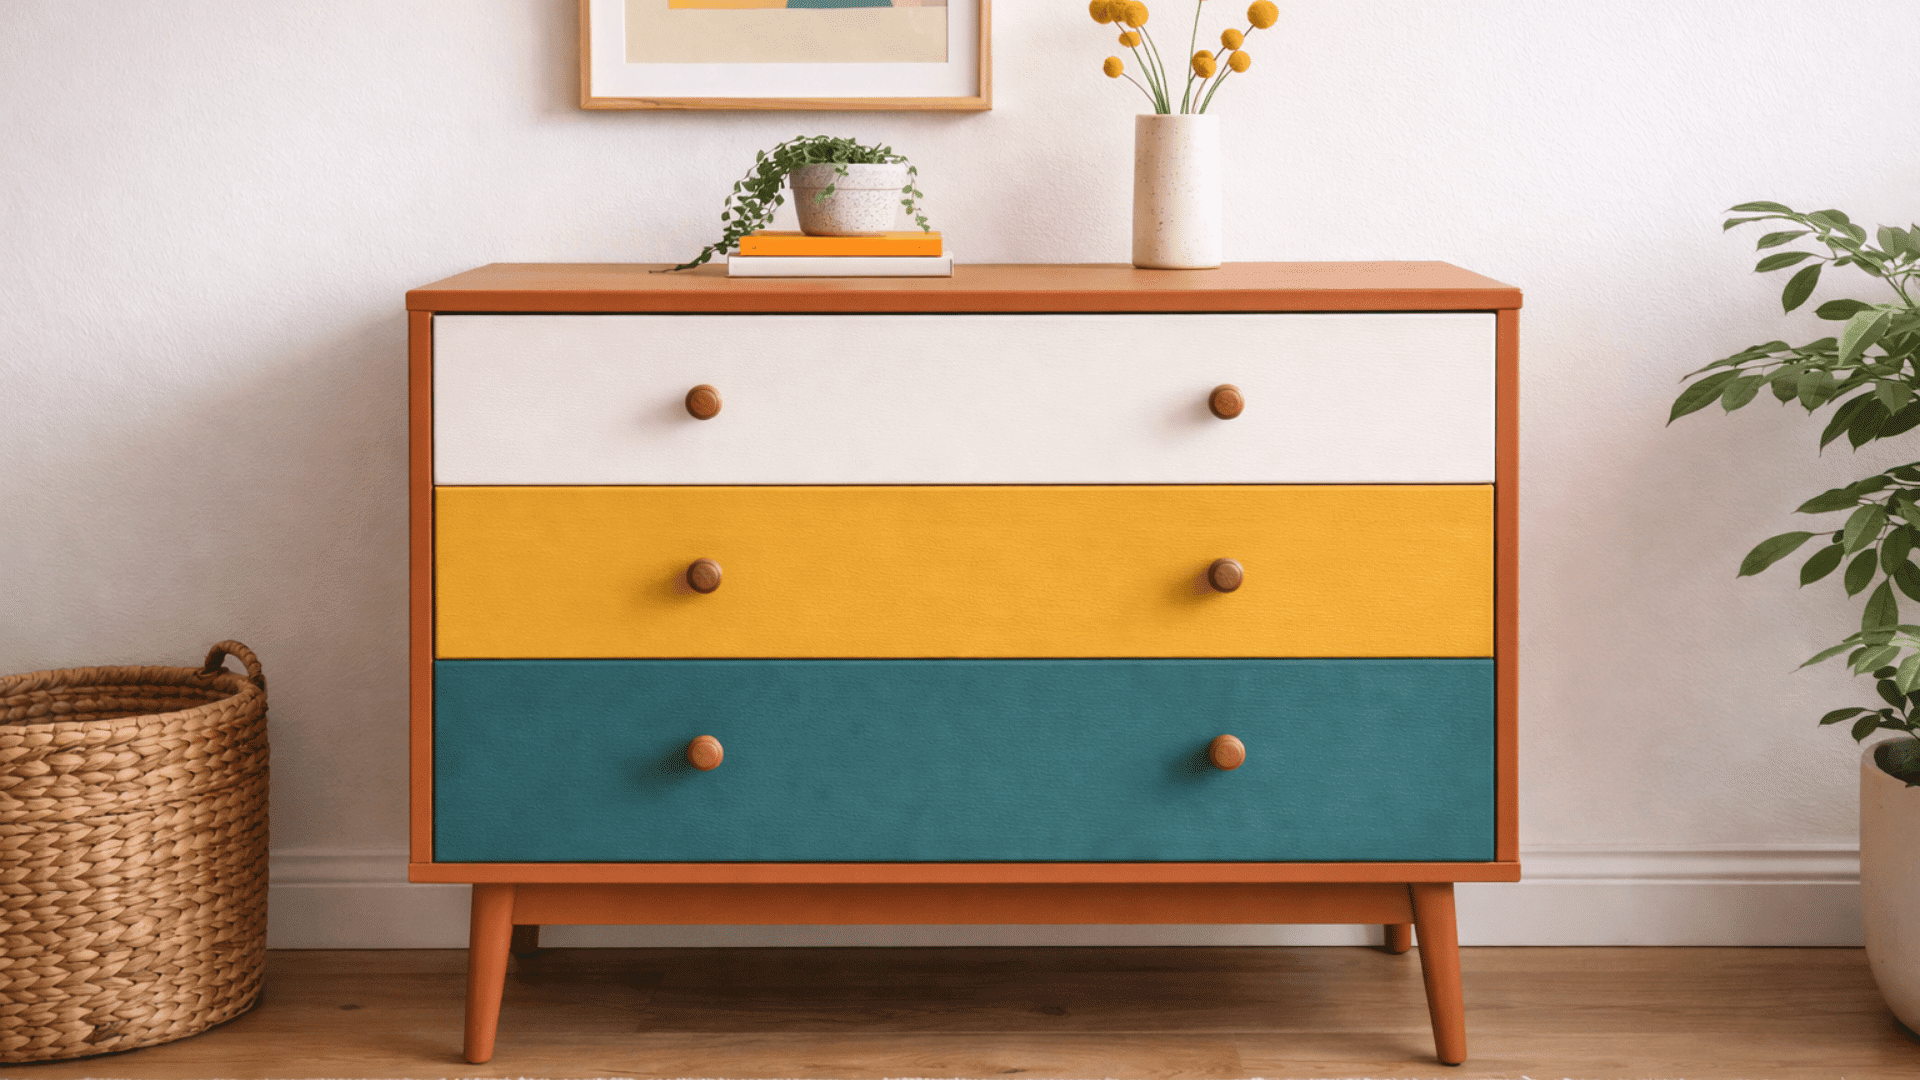
That old dresser or side table doesn’t need to go. Color blocking gives tired furniture a fresh identity. Two or three bold colors. Clean lines. Instant update.
What You Need:
- Furniture piece
- Two to three paint colors
- Painter’s tape
- Chalk paint or furniture paint
- Wax or polyurethane sealer
How to Do It:
Sand your piece lightly. Wipe it clean. Plan your color sections. Drawers in one shade. Frame in another. Top in a third. Tape off your first section and paint it. Let it dry completely.
Move to the next section. Tape carefully along the edges. Paint and dry. Repeat until finished. Remove all tape at a slight angle. This prevents peeling. Seal everything with wax or polyurethane for protection.
Pro Tip: Pull colors from something already in your room. A rug, pillow, or artwork keeps the look tied together.
Skill Level: Beginner to Intermediate
Time Required: One to two days
10. Watercolor Effect Wall
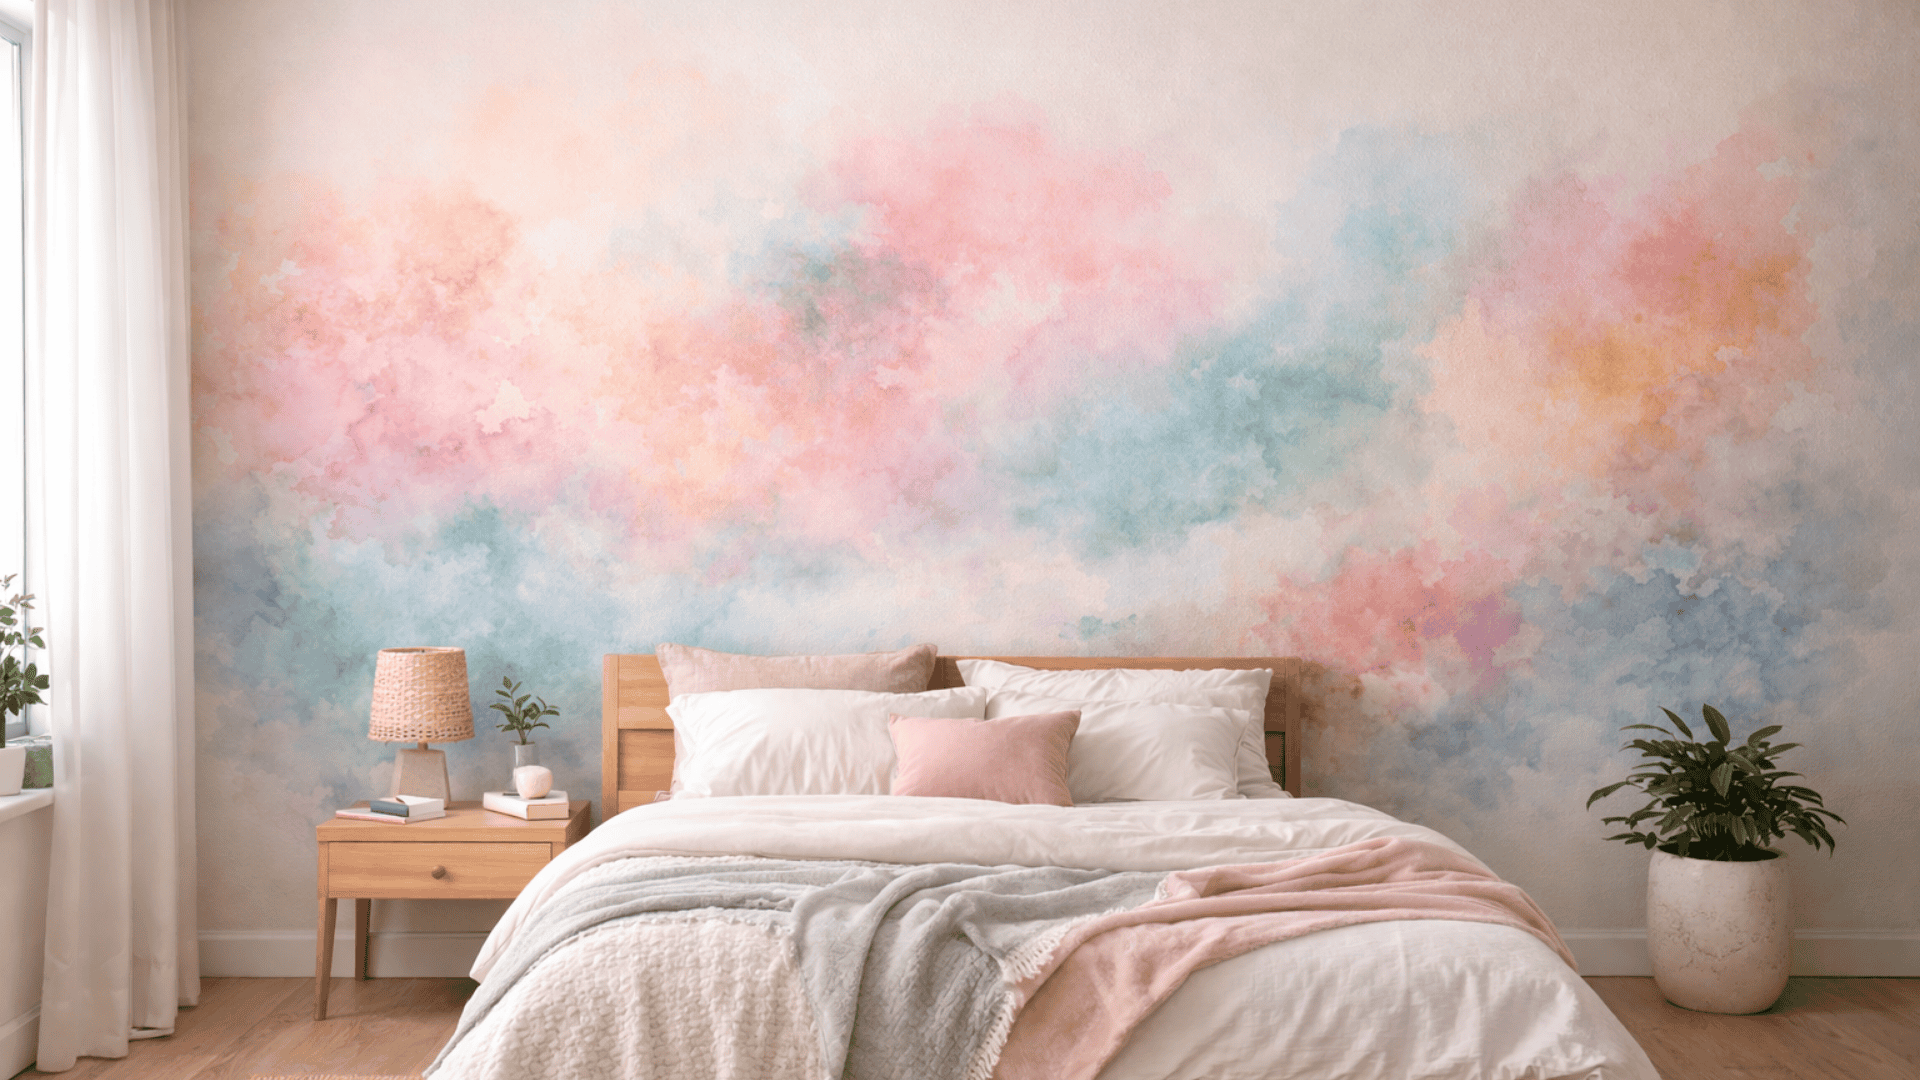
Soft washes of color floating across your wall. That’s the watercolor effect. It feels calm and artistic. Bedrooms and creative studios suit this style best.
What You Need:
- Latex paint in two to three colors
- Large natural sponges
- Spray bottle with water
- Plastic drop cloth
How to Do It:
Start with a white base coat. Let it dry overnight. Mix your chosen colors with water. Thin them down until slightly translucent. Cover your floors well. This gets messy.
Spray a section of the wall with water. Dab your sponge into thinned paint. Press it onto the wet wall in sweeping, random motions.
Let the color bleed and drip naturally. Work in sections. Blend colors where they meet. Step back often to check balance.
Pro Tip: Less is more. You can always add color. Taking it away means starting over.
Skill Level: Intermediate
Time Required: One full day
11. Painted Wooden Crates
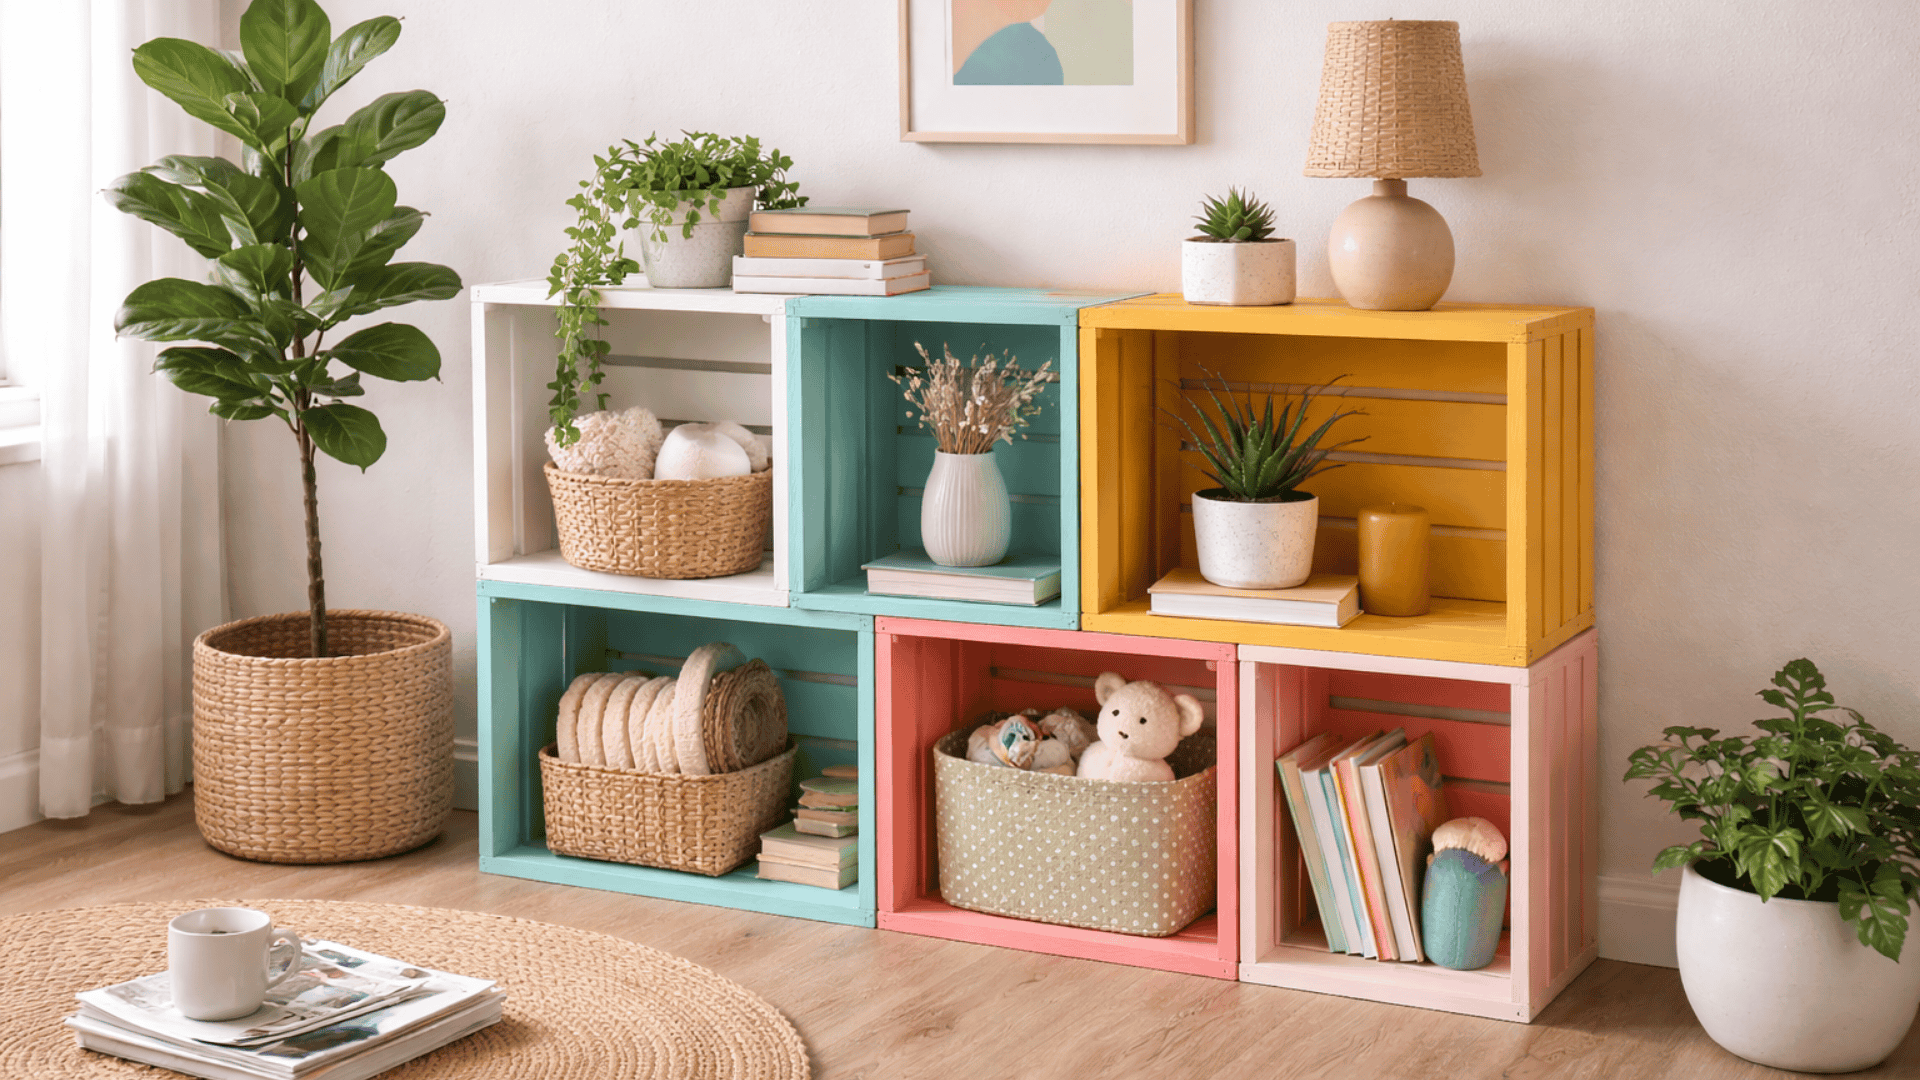
Wooden crates are cheap and easy to find. Paint them, and suddenly you have shelves, storage bins, or side tables. Stack them. Hang them. Lay them flat. The options go on.
What You Need:
- Wooden crates
- Acrylic or spray paint
- Sandpaper
- Primer (optional)
How to Do It:
Sand your crates to smooth out rough spots. Wipe away dust with a damp cloth. If the wood is dark, apply a coat of primer first. This helps lighter colors show up better.
Paint the outside, inside, or both. Spray paint covers faster and reaches tight corners. Brush-on paint gives more control. Apply two coats for solid coverage. Let dry between each. Stack crates once fully cured for instant shelving.
Pro Tip: Leave one side unpainted for a two-tone look. Raw wood against a bright color adds nice contrast.
Skill Level: Beginner
Time Required: Two to three hours
12. Splatter Paint Art
Remember flicking paint as a kid? That’s the whole technique here. Splatter art is messy, loud, and freeing. It looks great in modern spaces and kids’ rooms alike.
What You Need:
- Canvas or thick paper
- Acrylic paints
- Old toothbrush or stiff brush
- Drop cloth or newspaper
How to Do It:
Cover everything around you. Floors, walls, furniture. This gets wild. Lay your canvas flat or prop it at an angle. Dip your brush into paint. Hold it over the canvas.
Flick the bristles with your finger. Or tap the brush handle against your other hand. Paint flies off in random patterns. Switch colors. Layer splatters. Build up until it feels complete. There’s no wrong way to do this.
Pro Tip: Wear old clothes. Tie your hair back. Splatter paint spares nothing.
Skill Level: Beginner
Time Required: One hour
13. Painted Fabric Cushions

Fabric paint opens up a whole new world. Plain cushions become custom pieces. Match them to your room. Add patterns that store-bought pillows don’t offer.
What You Need:
- Plain fabric cushion covers
- Fabric paint
- Foam brushes or stencils
- Cardboard insert
How to Do It:
Wash your cushion covers first. This removes any coating that blocks paint absorption. Let them dry. Slide a piece of cardboard inside. This stops paint from bleeding through to the back.
Paint freehand designs or use stencils. Try simple stripes, dots, or leaf shapes. Apply thin layers. Fabric soaks up a lot. Let dry for a full day. Heat set with an iron according to your paint’s instructions. This makes designs washable.
Pro Tip: Start with light colored fabric. Dark cushions need special fabric paint to show color properly.
Skill Level: Beginner to Intermediate
Time Required: Two to three hours plus drying time.
14. Painted Rock Garden Markers
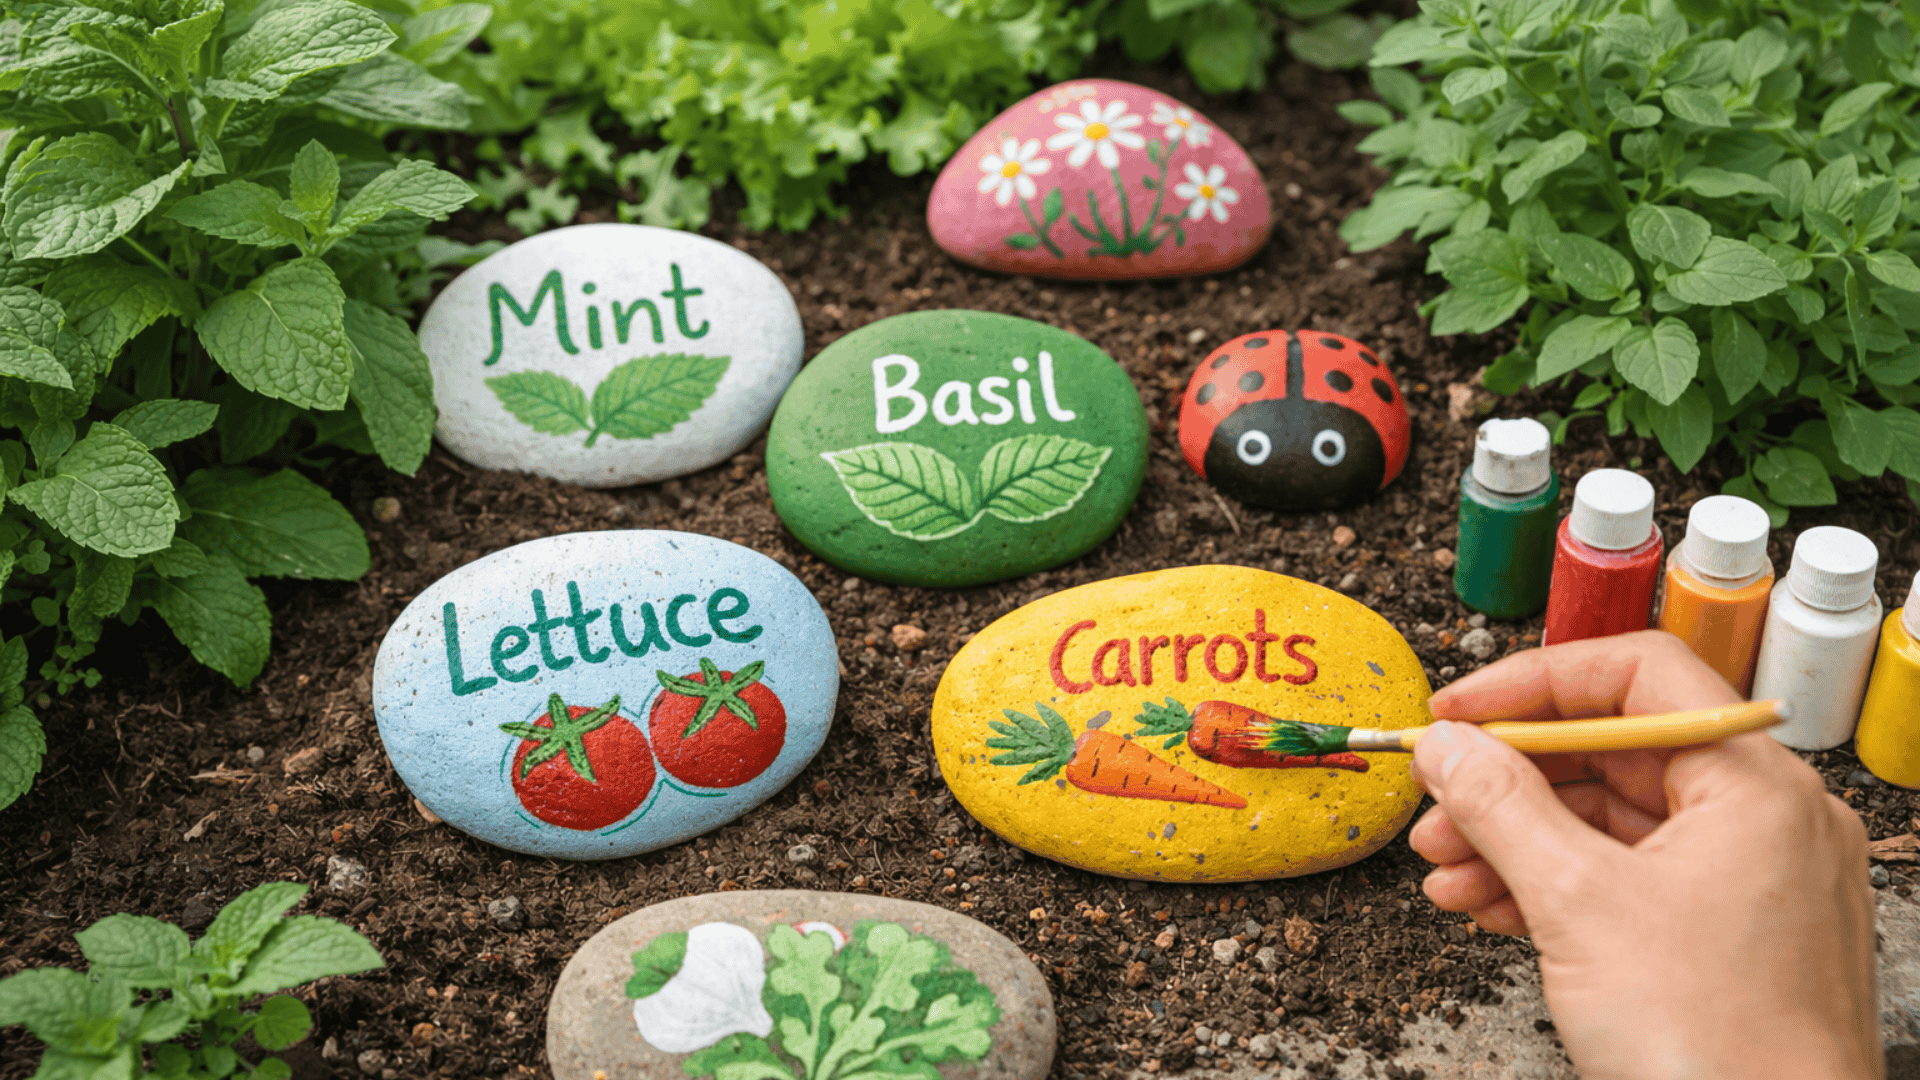
Small rocks become useful and pretty with a bit of paint. Use them as garden markers for herbs and vegetables. Or scatter them around flower beds as colorful accents. Kids love this project too.
What You Need:
- Smooth flat rocks
- Acrylic paint
- Fine tip paint brushes
- Clear outdoor sealant
How to Do It:
Find rocks with flat surfaces. River rocks work best. Wash off dirt and let them dry. Paint a base coat in white or a light color. This makes your design stand out.
Once dry, add your labels or designs. Write herb names for a kitchen garden. Draw little vegetables for a veggie patch. Or paint flowers, ladybugs, or patterns just for fun. Seal with outdoor sealant, so rain doesn’t wash your work away.
Pro Tip: Use a pencil to sketch your design first. Mistakes wipe off easily before the paint goes on.
Skill Level: Beginner
Time Required: One to two hours
15. Two-Tone Painted Doors

Interior doors often get ignored. A two-tone paint job changes that fast. Split the color horizontally or vertically. Your door becomes a design feature instead of just a door.
What You Need:
- Interior door
- Two paint colors
- Painter’s tape
- Foam roller and brush
How to Do It:
Remove the door from its hinges if possible. Lay it flat on sawhorses or a work table. Sand lightly and wipe clean. Decide on your split. Horizontal cuts work well at eye level. Vertical splits look modern.
Tape off your line. Paint one section first. Let it dry fully. Tape along the dried edge. Paint the second color. Remove tape while the second coat is still slightly wet. Rehang once fully cured.
Pro Tip: Pick colors with strong contrast. Soft shades look muddy next to each other on doors.
Skill Level: Intermediate
Time Required: One day
16. Dip-Dyed Painted Baskets

Woven baskets hold everything from blankets to toys. Dip-dyed paint gives them a modern edge. The effect looks like the basket was dipped in color halfway. Simple but striking.
What You Need:
- Woven basket
- Acrylic or latex paint
- Wide brush
- Drop cloth
How to Do It:
Choose where you want the paint line. Most people stop halfway up. Some go just a third for a subtle look. There’s no tape needed here. The weave gives a natural, uneven edge.
Load your brush with paint. Start at the bottom of the basket. Work your way up in sections. Push paint into the weave. Cover all the fibers. Apply two coats for a solid color. Let dry between each coat.
Pro Tip: Flip the basket upside down while painting. It’s easier to reach the bottom this way.
Skill Level: Beginner
Time Required: One to two hours
17. Painted Stair Risers
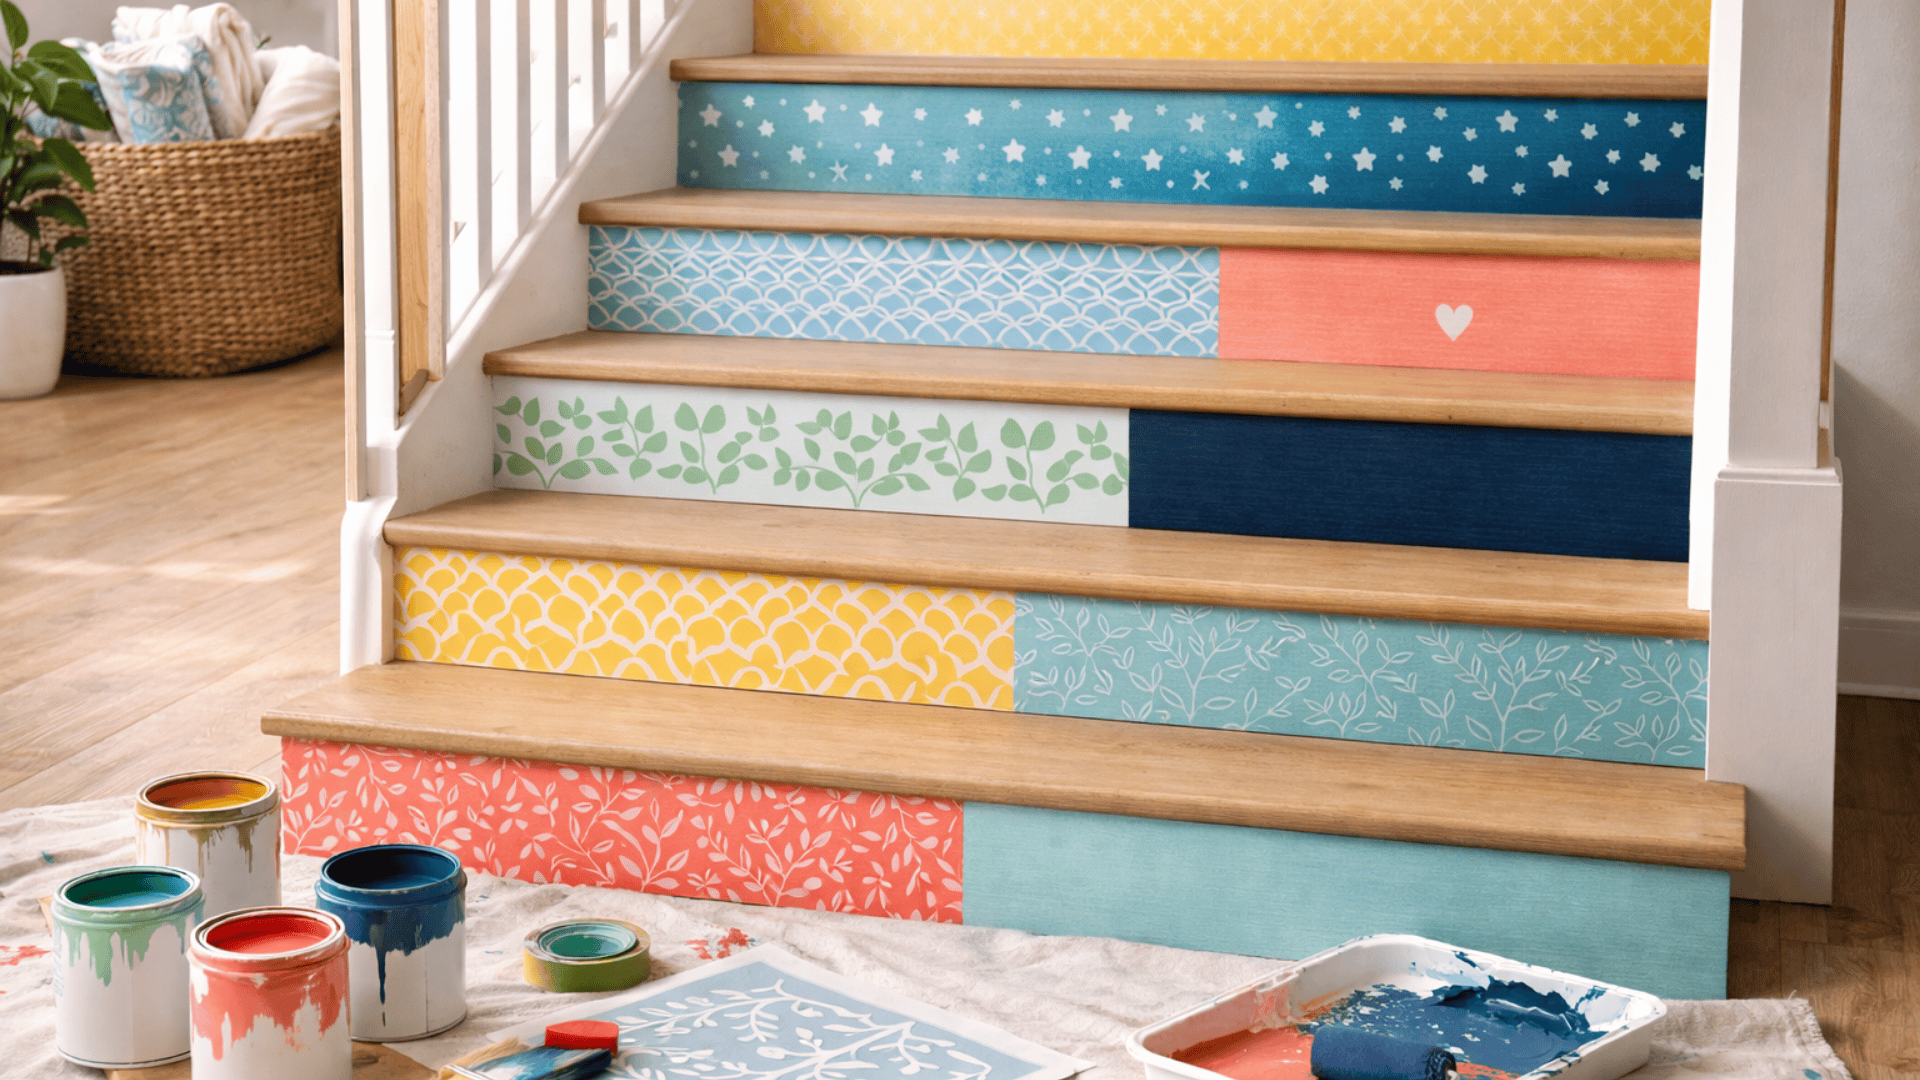
Stairs take up space. Make them work harder. Painted risers add personality to an overlooked spot. Go bold with bright colors. Stay subtle with soft patterns. Either way, guests will notice.
What You Need:
- Stair risers
- Primer
- Paint in your chosen colors
- Painter’s tape
- Stencils (optional)
How to Do It:
Clean each riser well. Sand lightly for better paint grip. Apply primer and let it dry. Now decide on your design. Solid colors work fast. Ombre from dark at the bottom to light at the top looks stunning. Stenciled patterns add detail.
Tape off areas you want to protect. Paint one riser at a time. Start from the top stair and work down. This way you won’t step on wet paint. Let everything cure for two days before using the stairs regularly.
Pro Tip: Use porch or floor paint. It holds up better under foot traffic than regular wall paint.
Skill Level: Intermediate
Time Required: One weekend
18. Painted Lampshade
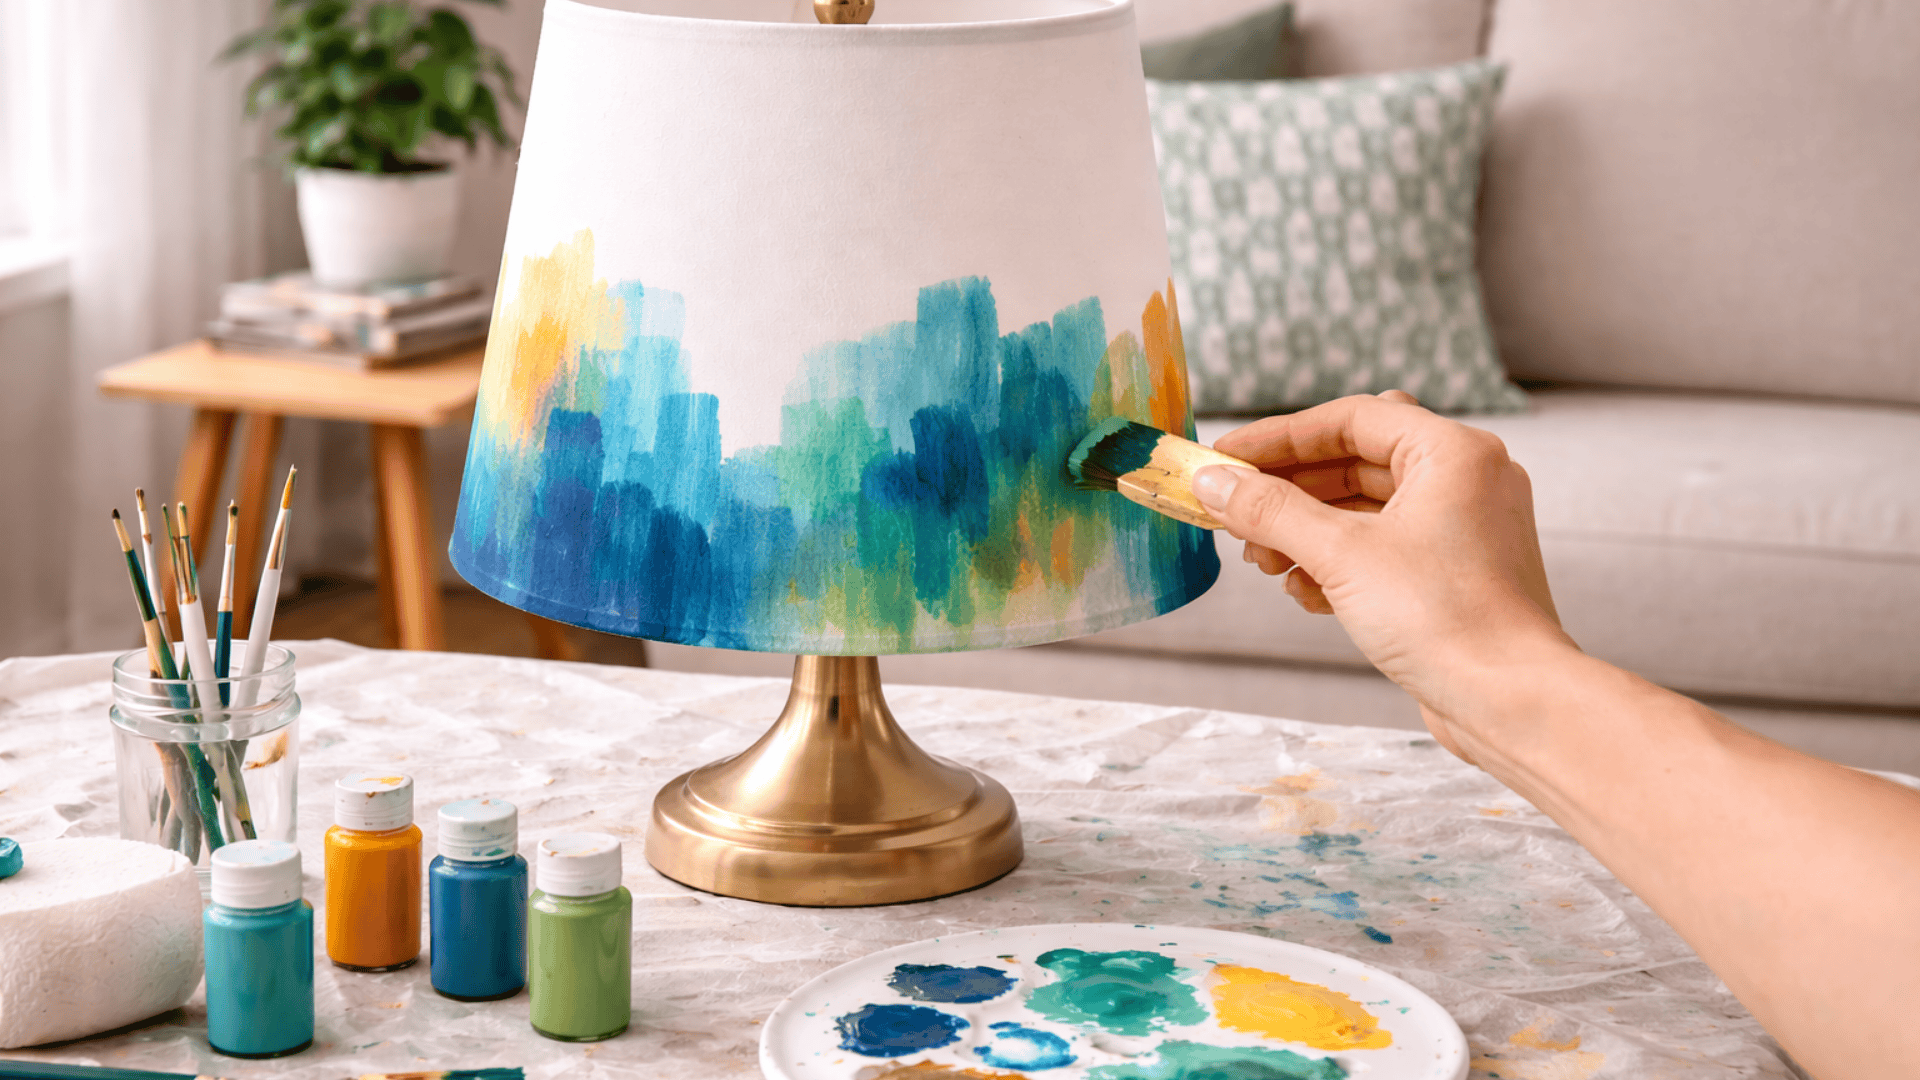
A plain white lampshade does its job. A painted one does it with flair. Customize shades to match your room. Or make them stand out as statement pieces.
What You Need:
- Plain fabric or paper lampshade
- Acrylic paint
- Foam brush or sponge
- Painter’s tape (for patterns)
How to Do It:
Wipe your lampshade clean. Dust hides in the fabric weave. For solid color, apply thin coats with a foam brush. Work in the same direction to avoid streaks. Two to three coats usually cover well.
For patterns, use tape to create stripes or geometric shapes. Paint between the tape lines. Remove tape while the paint is still tacky. For a softer look, try sponging on color in a dabbing motion.
Pro Tip: Test your shade with the light on. Some paints look different when lit from behind.
Skill Level: Beginner
Time Required: One to two hours
19. Reverse Canvas Art

Reverse canvas flips the typical stretched canvas inside out. You paint on the flat back. The wooden frame shows around the edges. It creates a rustic, farmhouse feel without needing a separate frame.
What You Need:
- Stretched canvas
- Staple remover
- Acrylic paint
- Hot glue gun
How to Do It:
Remove staples from the back of the canvas. Pull the canvas fabric off the wooden frame. Flip the fabric over. Now the flat side faces up, and the rough edges tuck behind.
Paint your design on this smooth surface. Quotes, simple flowers, or silhouettes work great. Let it dry. Wrap the painted canvas around the frame again. The edges fold to the back. Hot glue them in place. Done.
Pro Tip: Stain or paint the wooden frame before reassembling. It adds extra polish to the finished piece.
Skill Level: Beginner
Time Required: One to two hours
20. Painted Window Frames
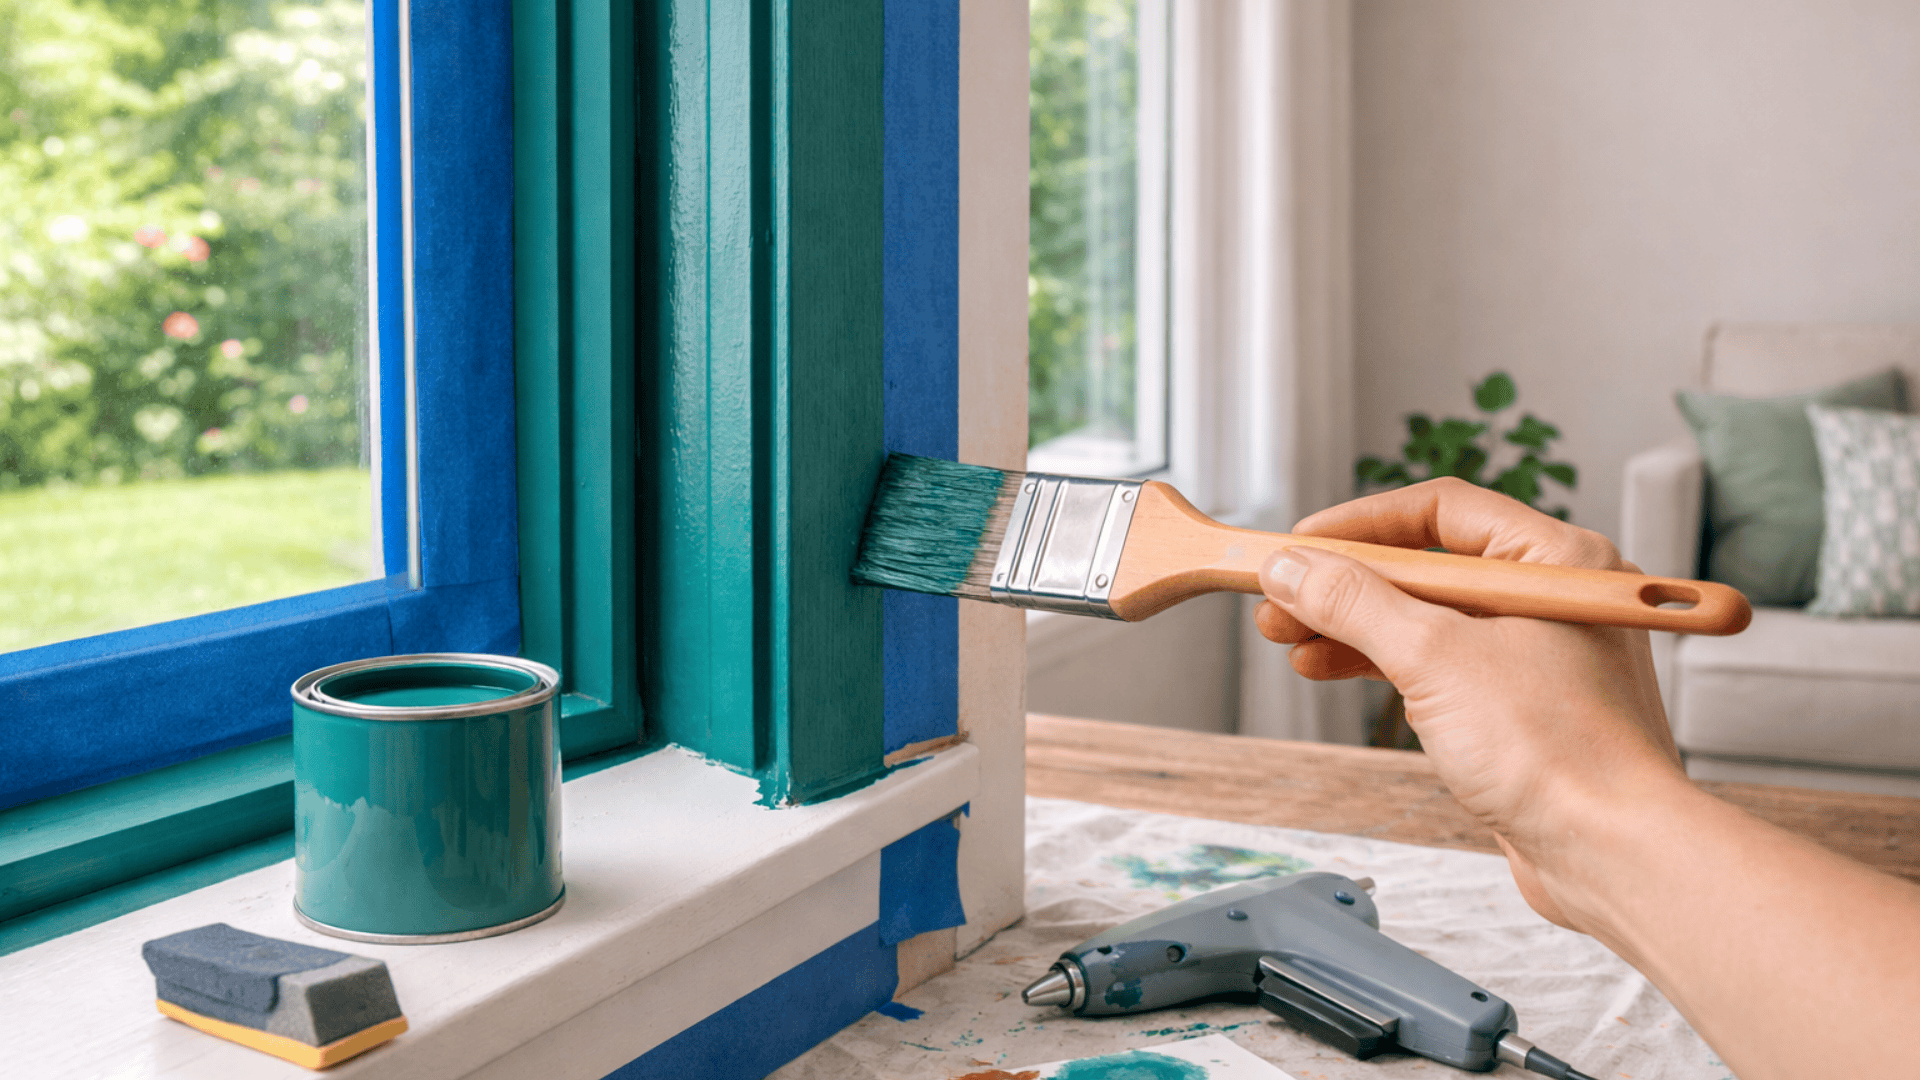
Windows frame your view. Why not make the frame itself look good? A fresh coat of paint brightens old windows. A bold color makes them pop against the wall.
What You Need:
- Sandpaper
- Primer
- Trim paint in your chosen color
- Angled brush
- Painter’s tape
How to Do It:
Tape off the glass and the surrounding wall. Sand the existing frame to remove loose paint and create grip. Wipe away dust. Apply primer if the wood is bare or stained.
Use an angled brush for control around corners. Apply paint in thin, even strokes. Follow the wood grain. Two coats give the best finish. Remove tape before the final coat dries completely.
Pro Tip: Black window frames look modern and dramatic. White keeps things classic and clean.
Skill Level: Beginner to Intermediate
Time Required: Half a day
21. Painted Ceiling Medallion
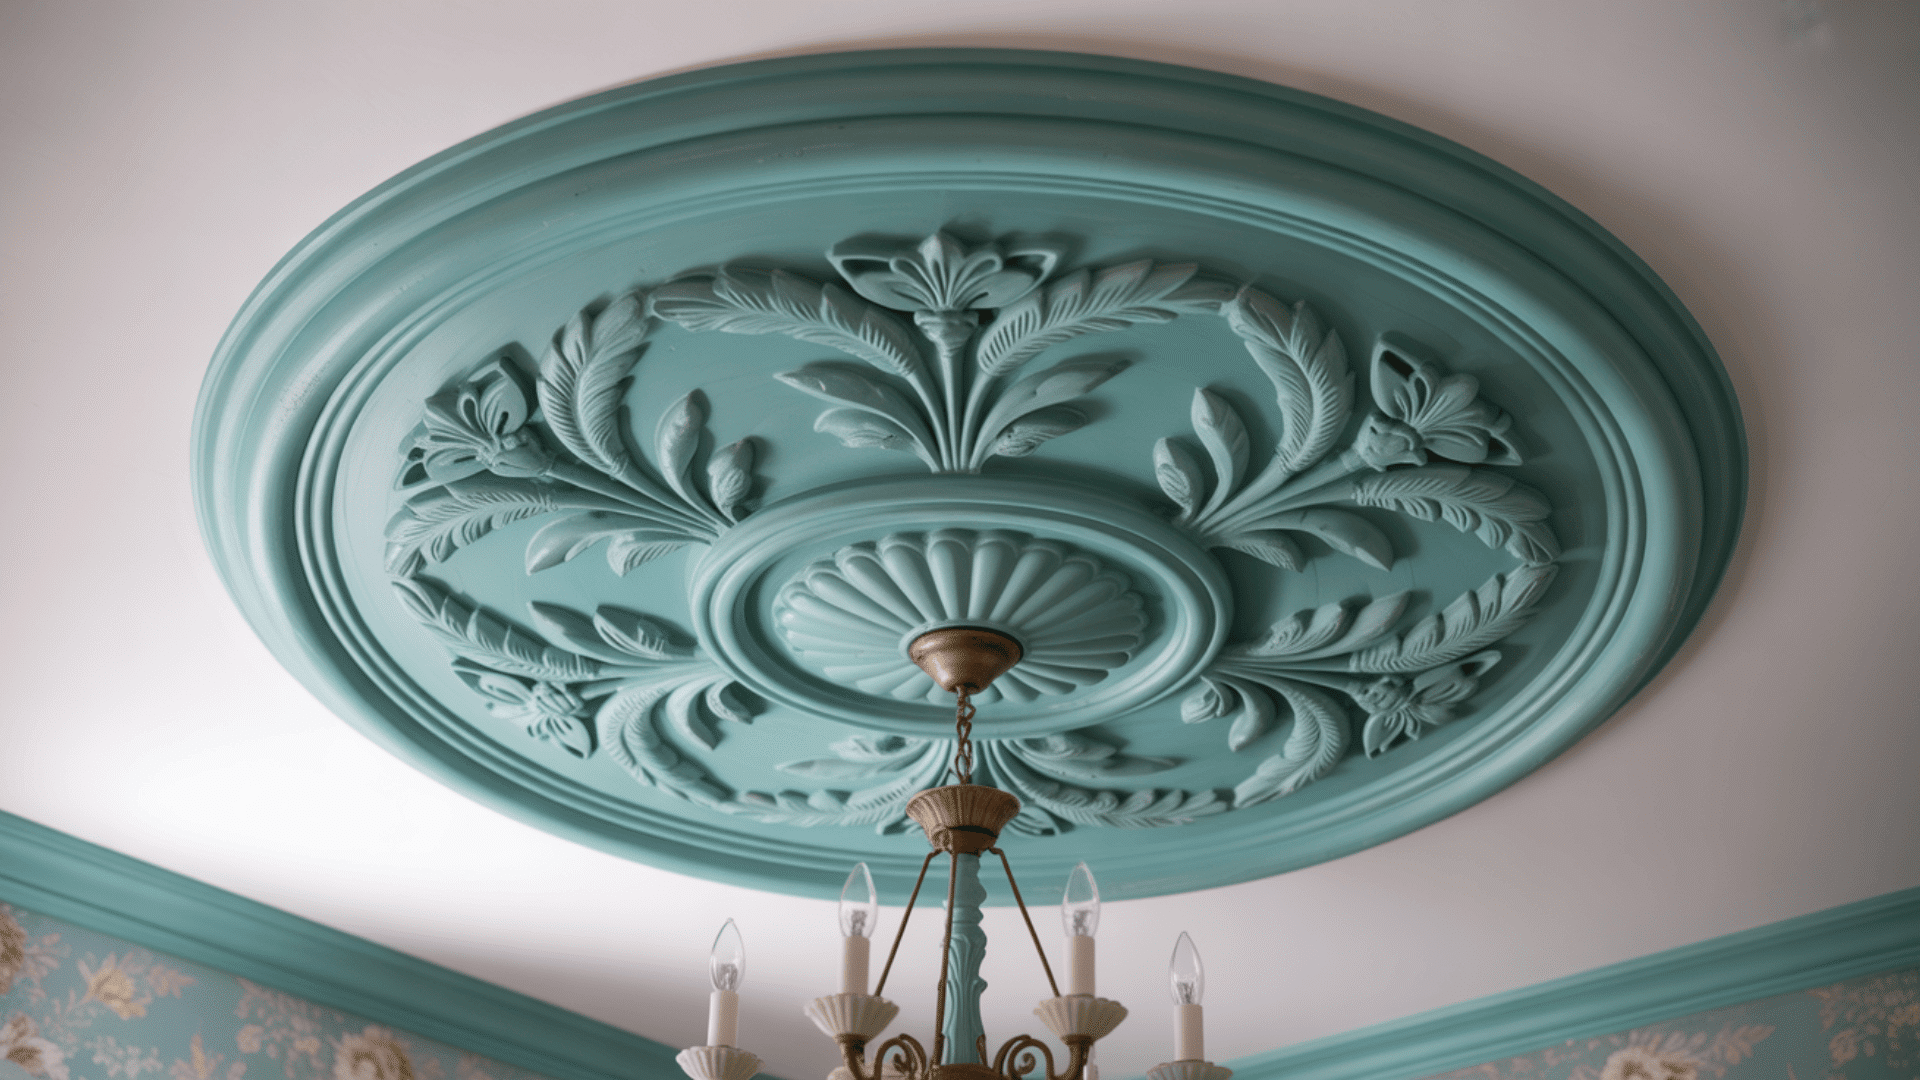
Ceiling medallions hang around light fixtures. Most stay plain white. Painting yours adds unexpected detail overhead. Guests will look up and stay looking.
What You Need:
- Ceiling medallion (new or existing)
- Acrylic paint
- Small detail brushes
- Metallic paint (optional)
How to Do It:
If your medallion is already installed, tape around it carefully. Cover the light fixture. If painting before installation, lay it flat on a protected surface.
Pick colors that complement your room. Paint the base one shade. Use a contrasting color or metallic paint for raised details. A small brush helps reach grooves and curves. Let each layer dry before adding the next.
Pro Tip: Gold or bronze on the raised details creates a vintage look instantly.
Skill Level: Beginner
Time Required: One to two hours
22. Gradient Bookshelf Backing
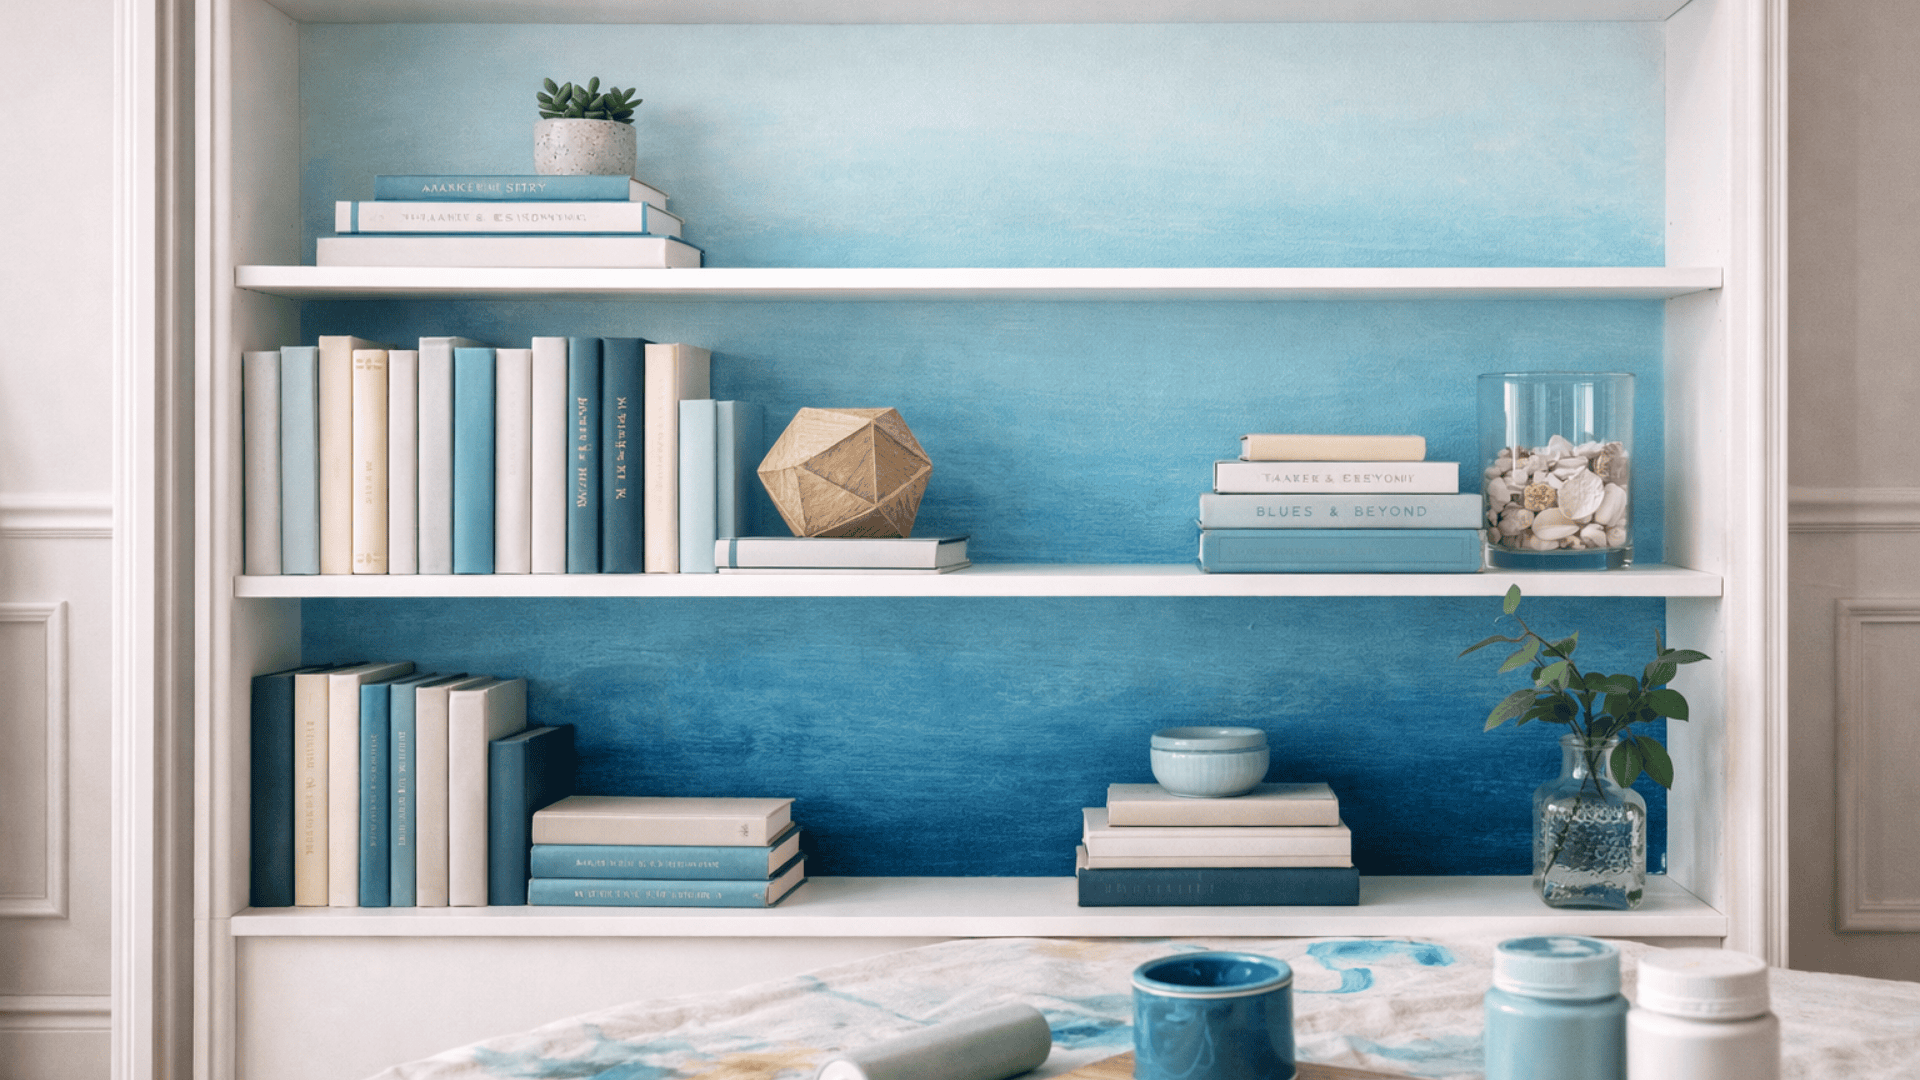
Most bookshelves have plain backs. Painting a gradient behind your books adds depth and color. Books seem to float against the fading shades.
What You Need:
- Bookshelf with solid backing
- Three shades of one color (light, medium, dark)
- Foam roller
- Blending brush
How to Do It:
Remove everything from your shelf. Take out adjustable shelves if possible. Sand the backing lightly and wipe clean.
Start with your darkest shade at the bottom. Roll it across the lowest section. Apply the medium shade in the middle. Finish with the lightest at the top. While the paint is wet, blend where colors meet. Use a dry brush in soft horizontal strokes. Let it dry before replacing shelves and books.
Pro Tip: Blues and greens create a calming effect. Sunset shades like orange to pink feel warm and bold.
Skill Level: Intermediate
Time Required: Half a day
23. Painted Floor Cloth
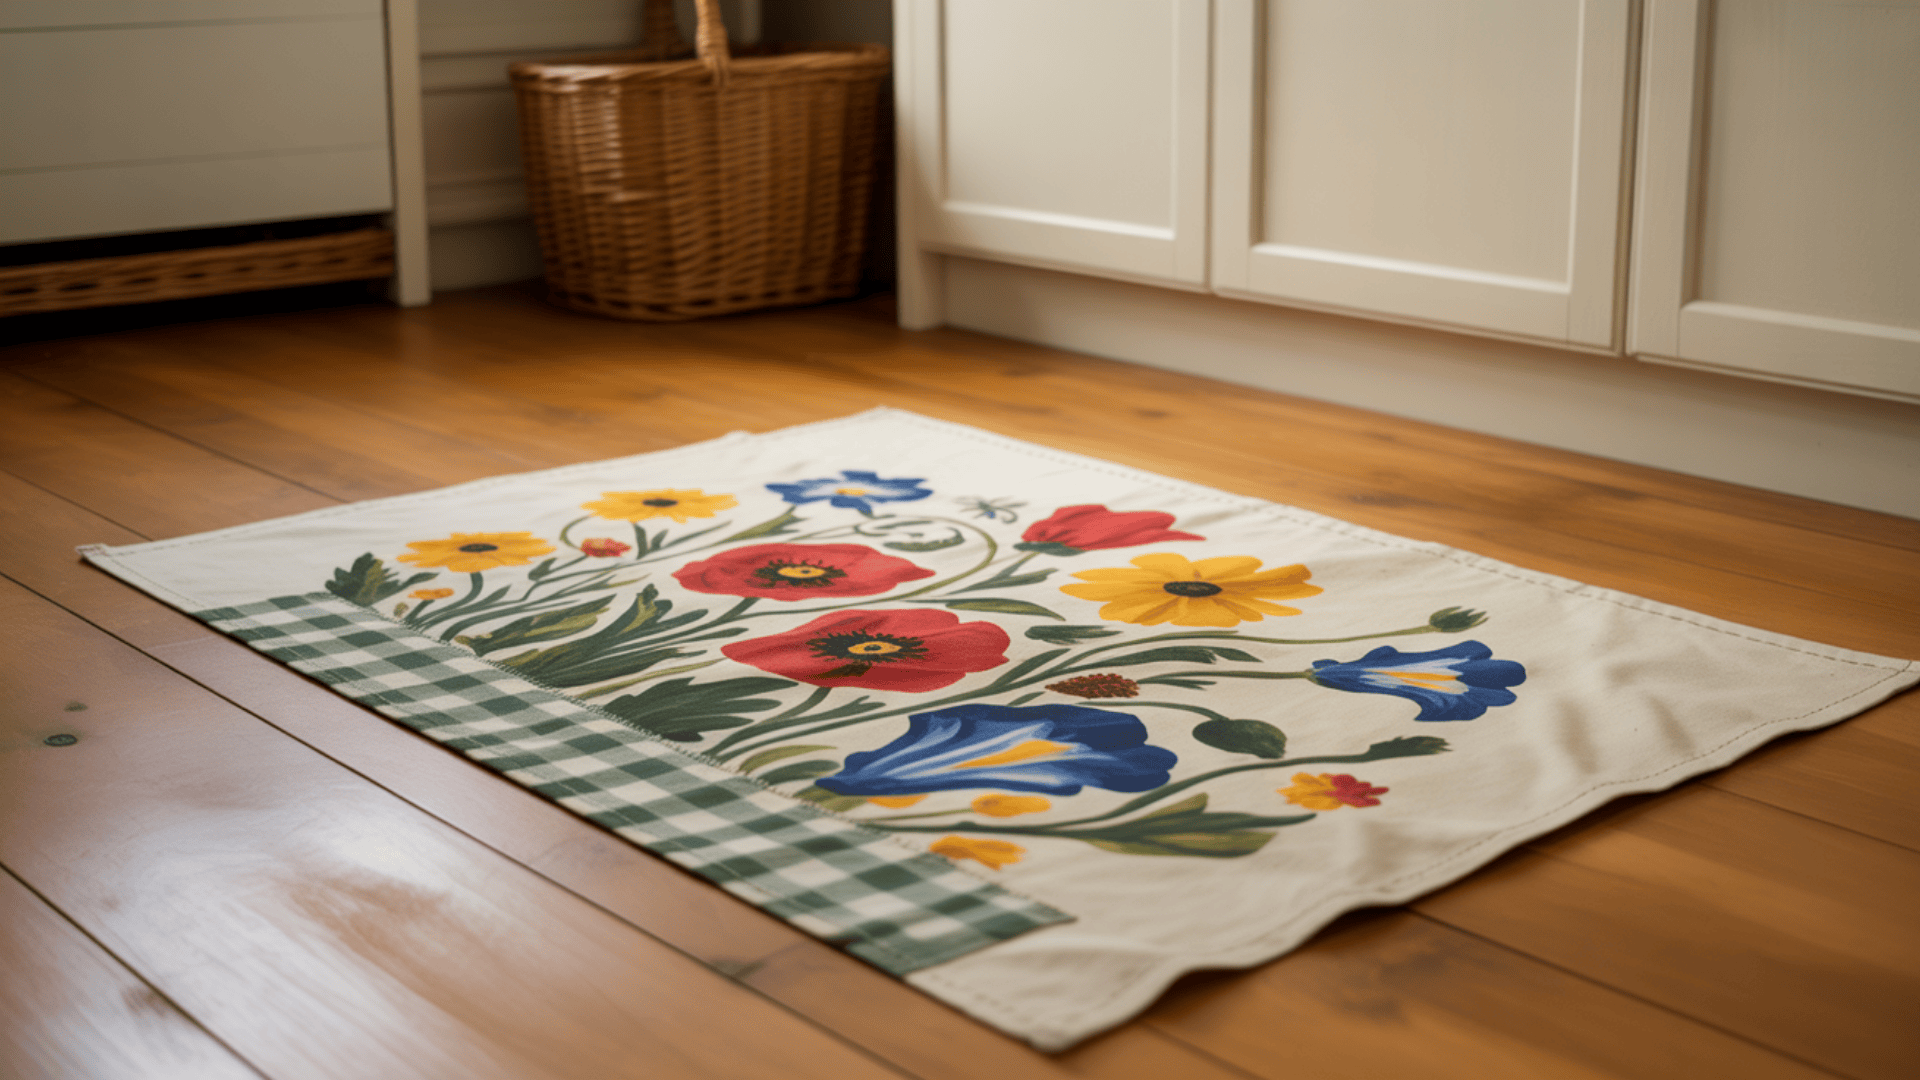
Canvas floor cloths work like rugs but cost less. You paint your own design. They wipe clean and hold up well in kitchens and entryways.
What You Need:
- Canvas drop cloth
- Gesso or primer
- Acrylic paint
- Clear polyurethane sealer
How to Do It:
Cut your canvas to size. Fold edges under and iron flat. You can glue or sew the hem. Apply two coats of gesso to both sides. This seals the fabric and creates a smooth painting surface.
Sketch your design lightly with a pencil. Paint with acrylics. Try stripes, checkers, florals, or freeform shapes. Let dry fully. Apply several coats of polyurethane on top. This protects against foot traffic and spills.
Pro Tip: Keep patterns simple. Busy designs get lost underfoot and show dirt faster.
Skill Level: Intermediate
Time Required: One to two days
24. Painted Terracotta Tiles
Old terracotta tiles look dated. Paint refreshes them without a full replacement. This works for floors, backsplashes, or outdoor patios.
What You Need:
- Terracotta tiles
- Tile primer
- Tile or porch paint
- Painter’s tape
- Clear sealer
How to Do It:
Clean tiles thoroughly. Remove grease, dirt, and old wax. Let dry. Apply tile primer with a roller. This helps paint stick to the slick surface.
Choose your pattern. Solid colors update the look fast. Checkerboard patterns add classic charm. Tape off your design. Paint two thin coats. Let each dry before adding the next. Seal with a clear topcoat rated for floors or outdoor use.
Pro Tip: Test a small hidden area first. Some old tiles react differently to paint and primer.
Skill Level: Intermediate
Time Required: One weekend
25. Painted Mirror Frame

Plain mirrors blend into walls. A painted frame makes them stand out. Thrift stores sell old mirrors cheaply. A quick coat of paint gives them new life.
What You Need:
- Mirror with frame
- Painter’s tape
- Sandpaper
- Primer and paint
- Foam brush
How to Do It:
Cover the mirror glass with tape. Press edges down firmly to block paint seepage. Sand the frame lightly. This helps paint grip, especially on glossy finishes.
Apply primer first. Let dry. Then paint with your chosen color. Two thin coats work better than one thick one. For distressed looks, sand the edges after drying. Remove tape carefully once finished.
Pro Tip: Metallic gold or copper paint turns basic frames into statement pieces fast.
Skill Level: Beginner
Time Required: Two to three hours
26. Painted Concrete Planters

Concrete planters have that industrial edge. Paint softens them or makes them bolder. They work indoors on shelves or outside on patios.
What You Need:
- Concrete planters
- Acrylic or outdoor paint
- Foam brush
- Painter’s tape
- Clear sealer
How to Do It:
Clean your planter and let it dry overnight. Concrete holds moisture. Painting wet concrete causes peeling later. Tape off sections for patterns. Dip effects, geometric shapes, and color blocks all work well.
Apply paint in thin layers. Concrete soaks up the first coat. Add a second for solid coverage. Once dry, seal with a clear outdoor sealant if using outside. This protects against rain and sun.
Pro Tip: Leave some raw concrete showing. The mix of painted and natural surfaces looks intentional and modern.
Skill Level: Beginner
Time Required: One to two hours
27. Painted Pegboard Organizer
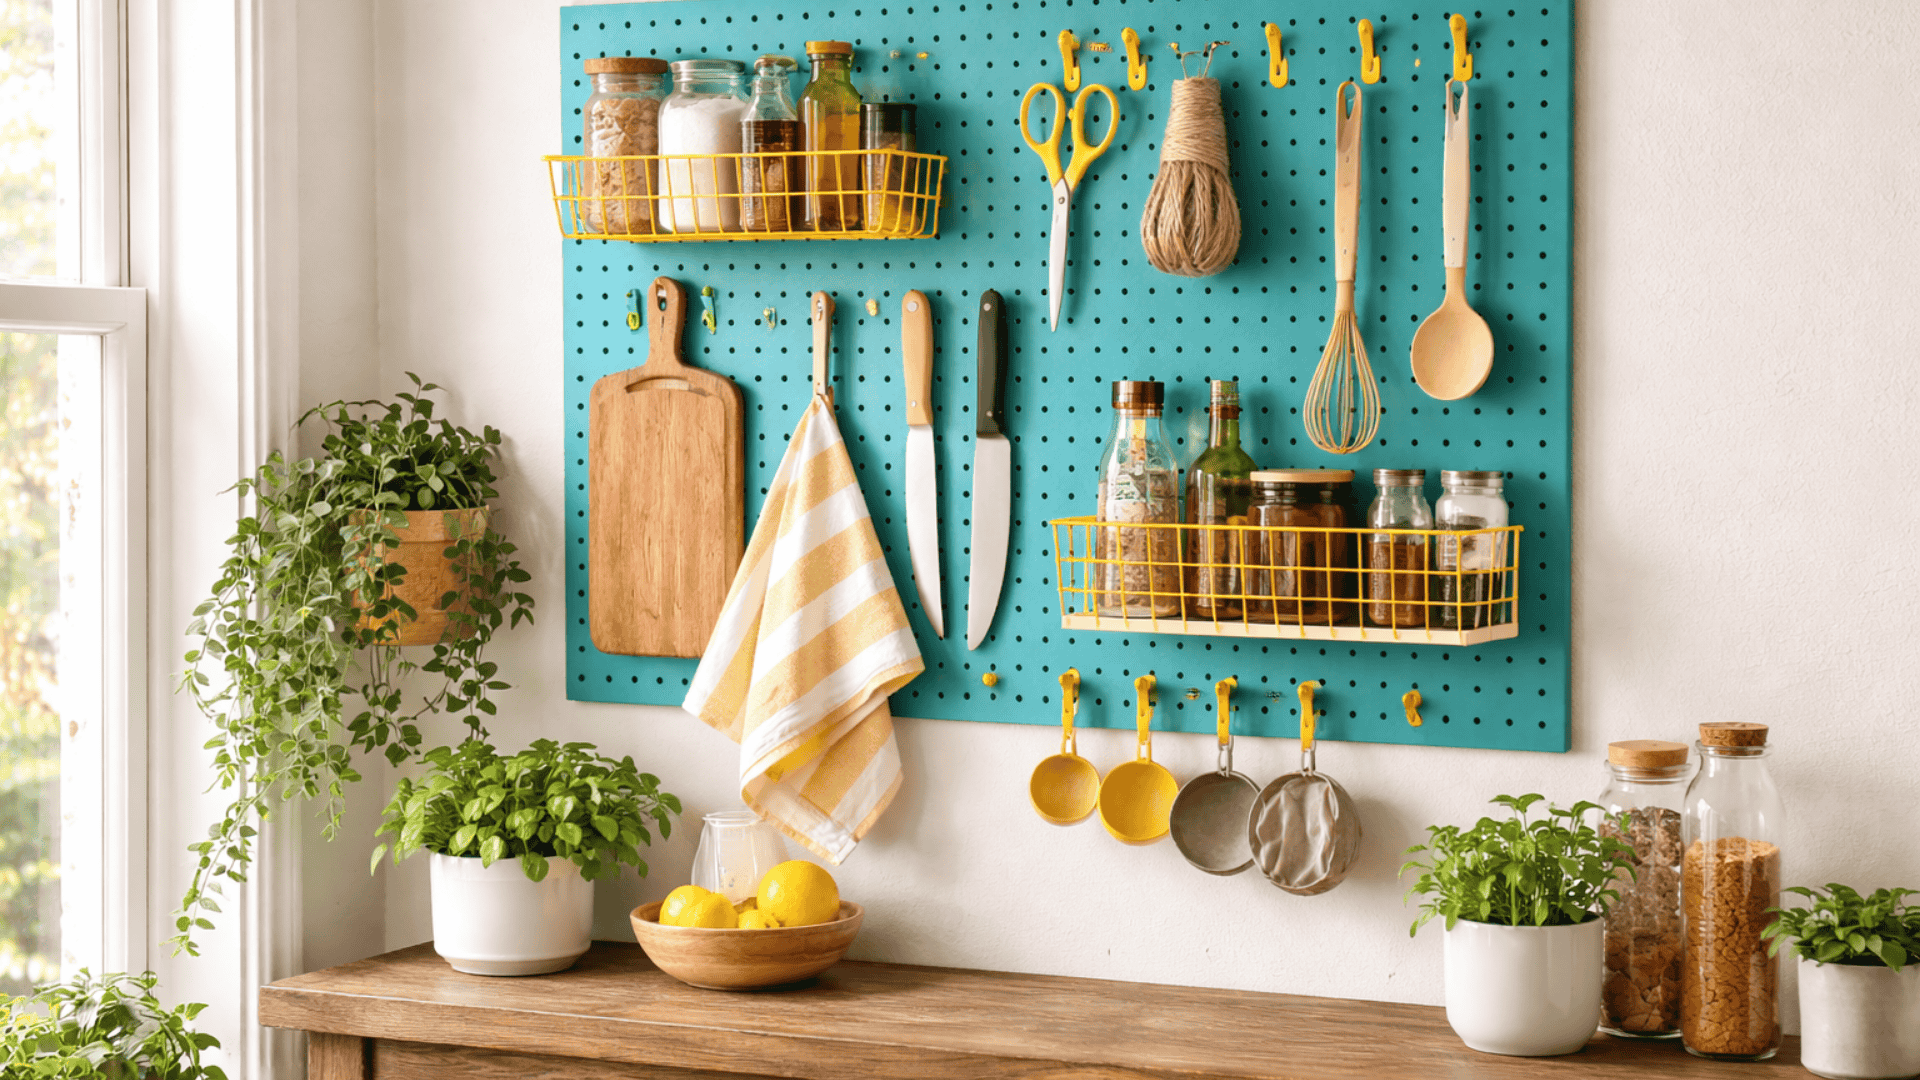
Pegboards keep tools and supplies visible. They work in garages, craft rooms, and kitchens. Painting yours adds color to a functional piece.
What You Need:
- Pegboard
- Spray paint or roller paint
- Primer
- Mounting hardware
How to Do It:
Lay your pegboard flat. Apply primer first. This helps paint stick and prevents chipping. Once the primer dries, apply your paint color. Spray paint covers faster and reaches holes easily. Roller paint works too, but needs more coats.
Let dry completely before mounting. Hang with spacers behind it. Pegs need room to fit through the holes. Organize your hooks and baskets. Step back and admire your colorful wall storage.
Pro Tip: Paint pegs and accessories a contrasting color. It creates visual interest and helps items stand out.
Skill Level: Beginner
Time Required: Two to three hours
28. Painted Outlet and Switch Covers
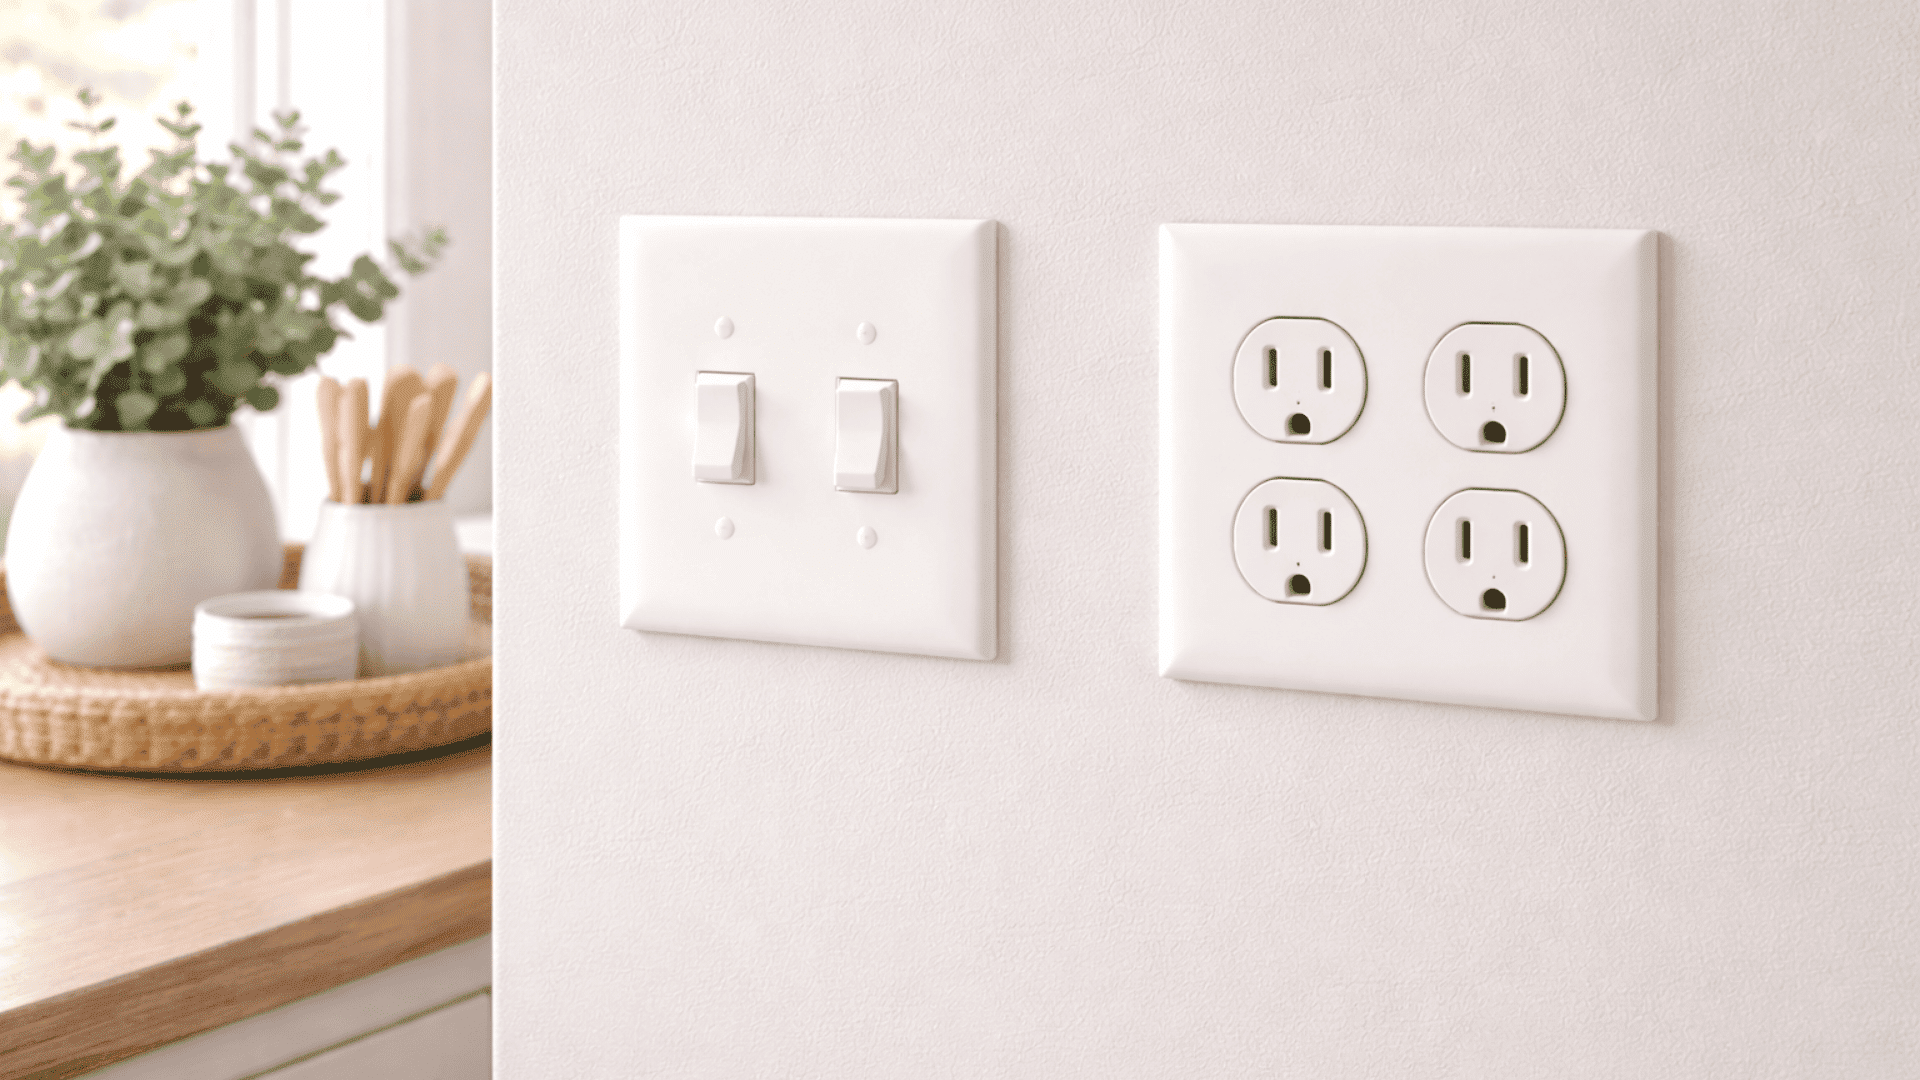
Outlet covers break up the wall colors. Painting them helps them blend in. Or paint them a contrasting shade to become tiny accent pieces.
What You Need:
- Plastic outlet and switch covers
- Spray paint or acrylic paint
- Fine-grit sandpaper
- Clear sealer
How to Do It:
Remove covers from the wall. Sand lightly to help paint stick to plastic. Wipe clean. Lay flat on a protected surface.
Spray paint gives the smoothest finish. Hold the can eight inches away. Apply several light coats. Let dry between each. For brush painting, use thin layers to avoid drips. Once fully dry, seal with a clear coat. This protects against finger smudges and wear.
Pro Tip: Match your wall color exactly for covers that disappear. Or go bold with metallics or patterns.
Skill Level: Beginner
Time Required: One hour
29. Painted Canvas Tote Bag

Plain canvas totes carry groceries. Painted ones carry style too. Custom bags make great gifts. They also help you spot yours in a crowd.
What You Need:
- Canvas tote bag
- Fabric paint
- Foam brushes or stencils
- Cardboard insert
- Iron for heat setting
How to Do It:
Wash and dry your tote first. This removes any coating that blocks paint. Slip cardboard inside to prevent bleed-through. Plan your design. Simple shapes, words, or abstract patterns all work.
Paint with thin layers. Fabric drinks up color fast. Let each layer dry before adding more. Once finished, wait a full day. Then heat set with an iron. Follow your paint’s instructions. This makes the design permanent and washable.
Pro Tip: Place your design off-center or at the bottom for a more interesting look than a centered logo.
Skill Level: Beginner
Time Required: One to two hours
30. Painted Brick Fireplace
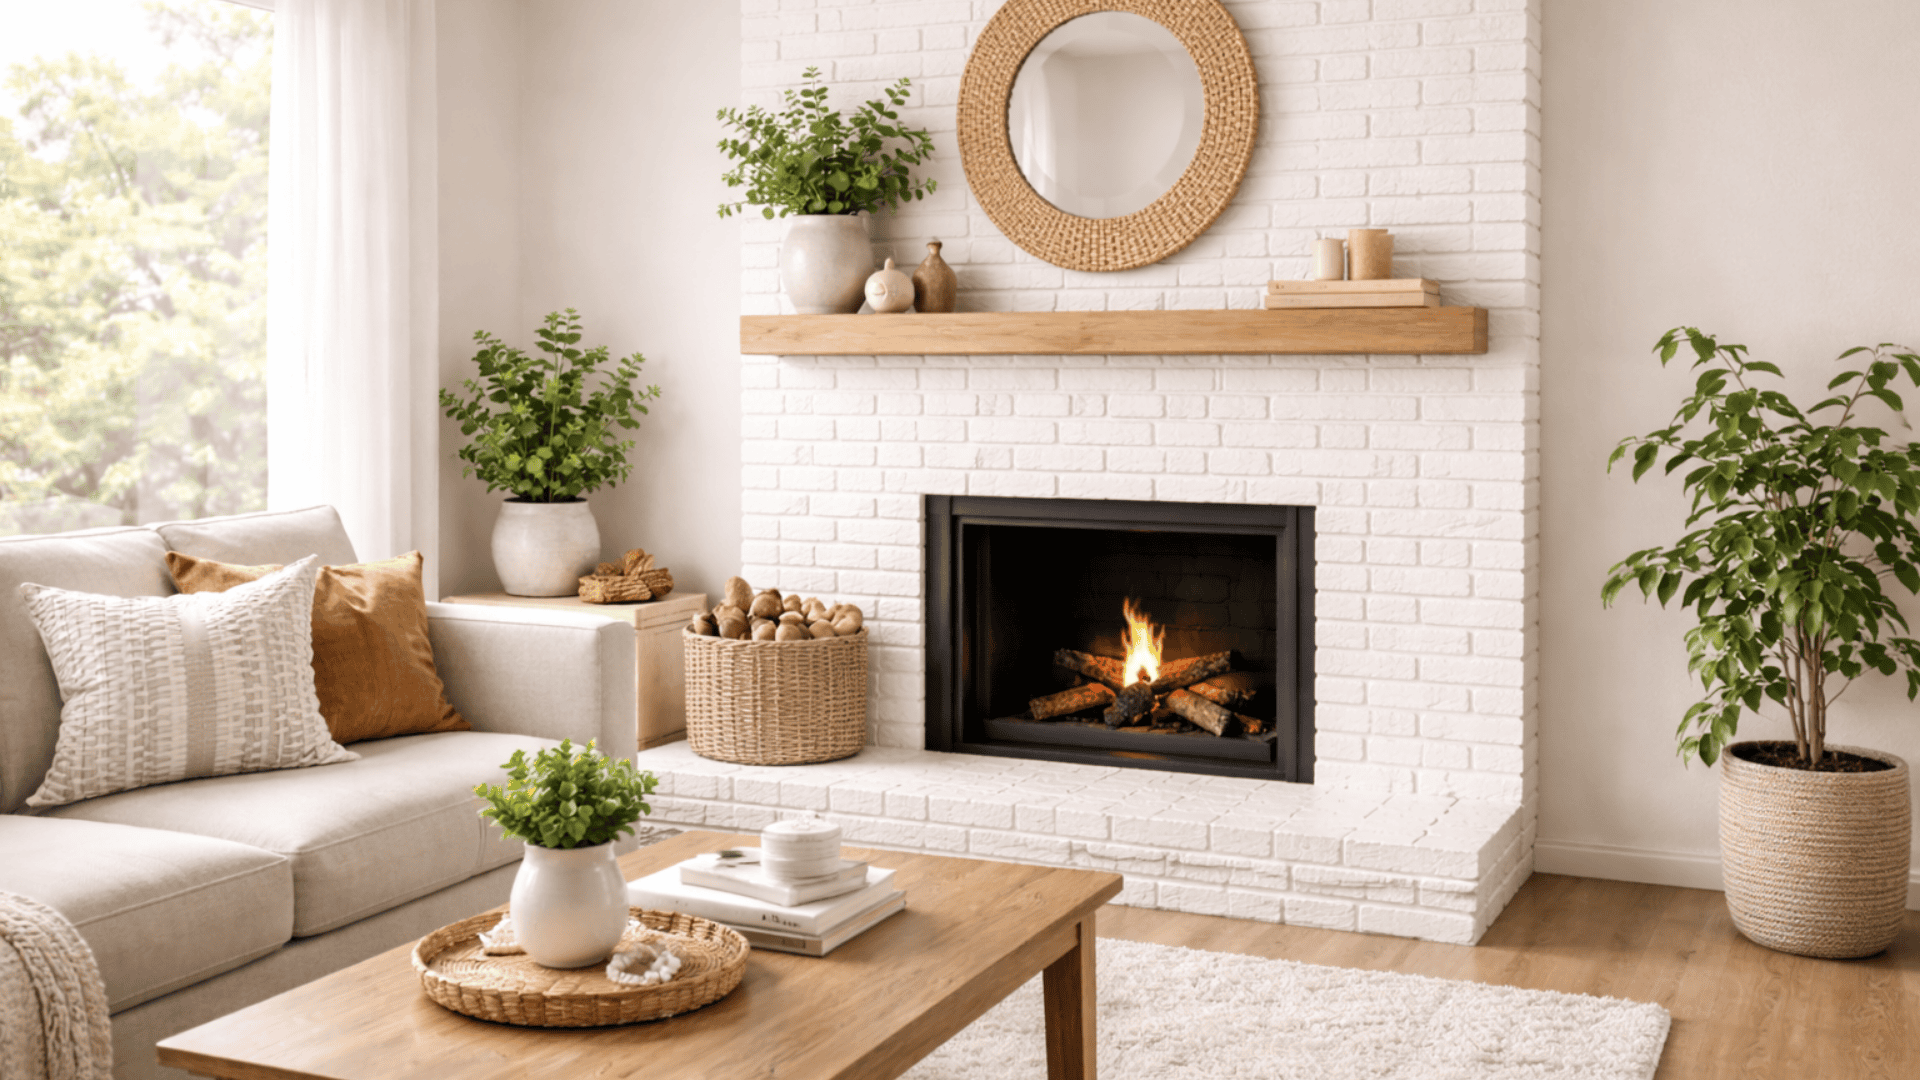
Brick fireplaces feel dated in some homes. A coat of paint modernizes them instantly. White opens up the room. Black adds drama. Any color changes the mood.
What You Need:
- Brick cleaner
- Primer for masonry
- Latex paint
- Thick nap roller
- Angled brush for grout lines
How to Do It:
Clean your brick thoroughly. Scrub off soot, dust, and grime. Let dry for a full day. Apply masonry primer. This seals the porous brick and helps paint stick.
Use a thick nap roller to cover large areas. Brick texture needs extra paint. Press into crevices. Use an angled brush to reach grout lines and corners. Apply two coats minimum. Let each dry overnight before adding the next.
Pro Tip: German schmear technique uses thinned paint or mortar for a washed, old-world look instead of solid color.
Skill Level: Intermediate
Time Required: One weekend
31. Painted Wooden Hangers

Closets stay hidden. But that doesn’t mean they should be boring. Painted hangers add surprise color behind closed doors. They also make great gifts for new homeowners.
What You Need:
- Wooden hangers
- Acrylic or spray paint
- Sandpaper
- Painter’s tape (for patterns)
How to Do It:
Sand hangers lightly if they have a glossy finish. Wipe away dust. Hang them on a rod or lay flat for painting. Spray paint covers evenly and fast. Dip techniques work too. Dip just the ends for a modern two-tone look.
For patterns, use tape to create stripes or color blocks. Let each color dry before taping the next section. Rehang in your closet once fully cured.
Pro Tip: Paint all hangers in your closet the same color. It creates a clean, unified look when you open the doors.
Skill Level: Beginner
Time Required: One to two hours
32. Painted Canvas Shoes
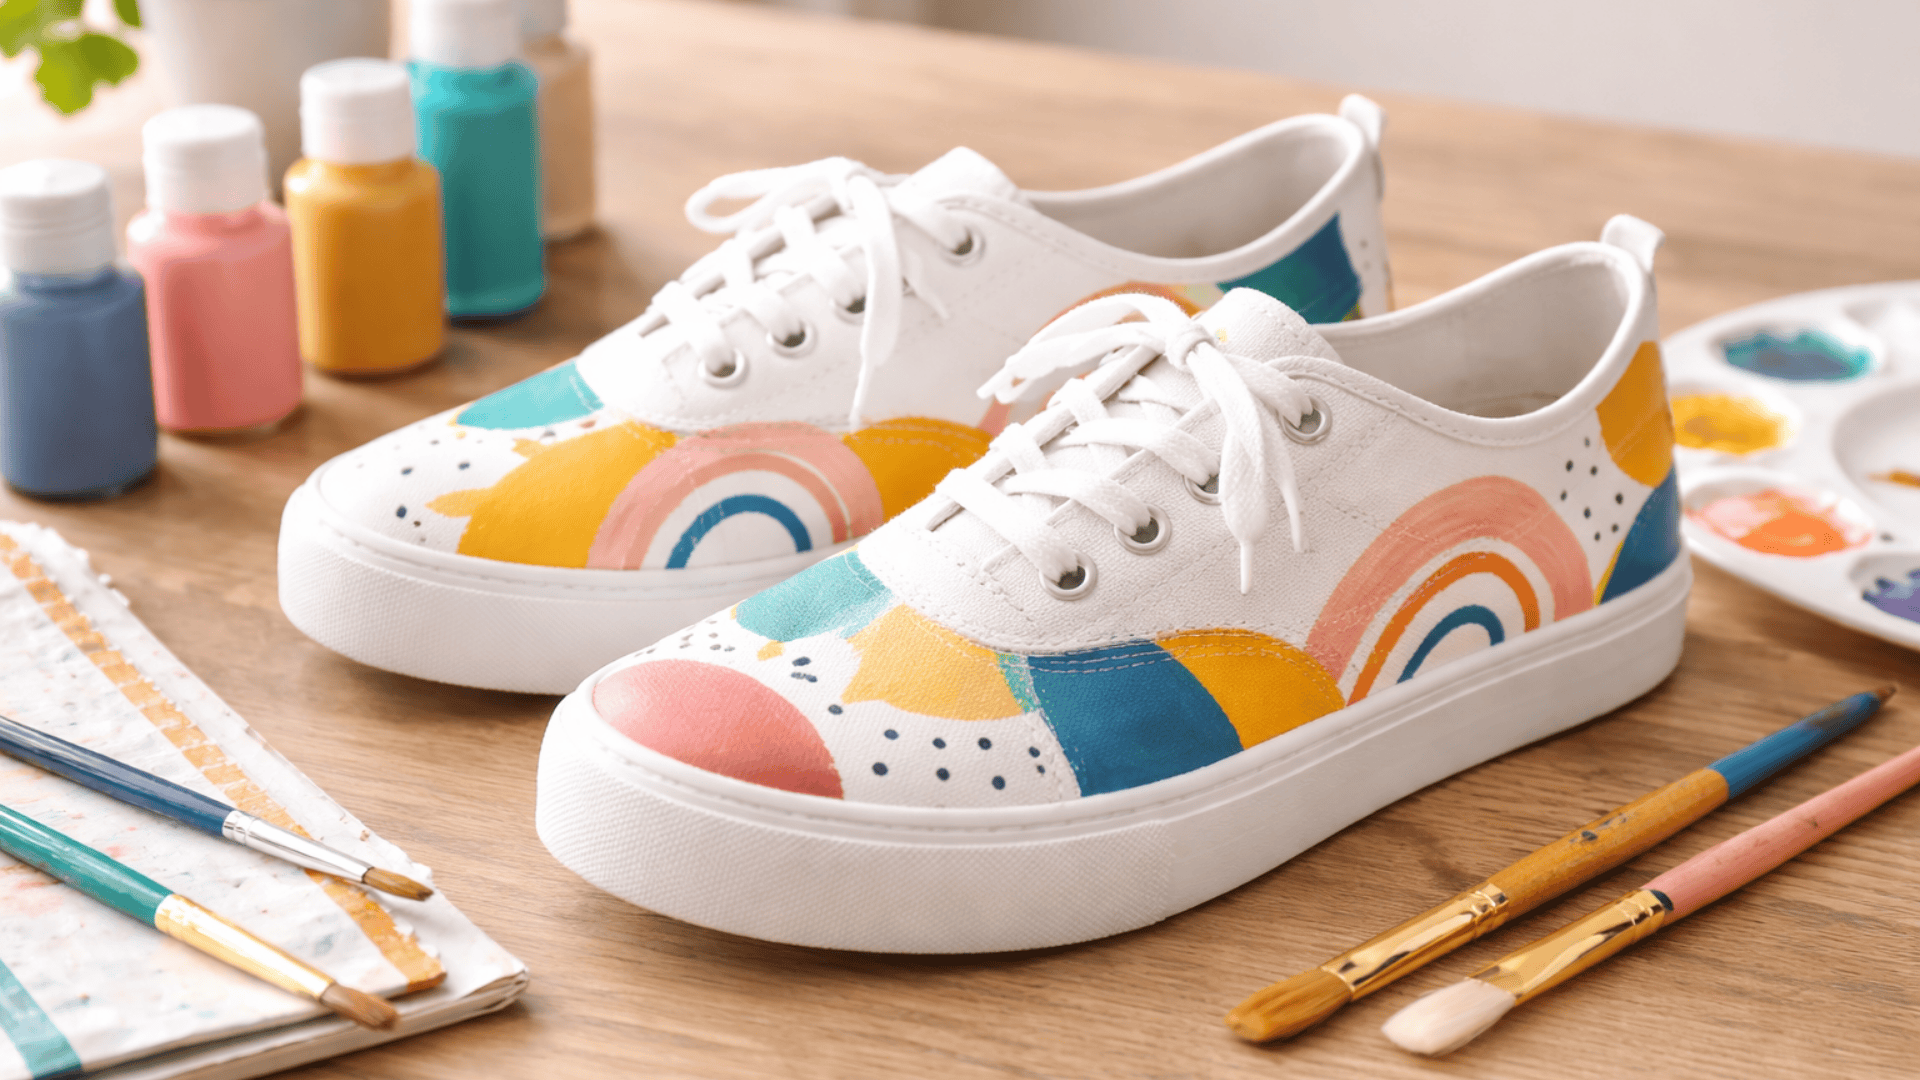
White canvas shoes beg for color. Paint lets you design your own kicks. Match them to an outfit. Create wearable art. Stand out from store-bought styles.
What You Need:
- Plain canvas shoes
- Fabric paint or acrylic paint mixed with fabric medium
- Small brushes
- Painter’s tape
- Waterproof sealant spray
How to Do It:
Remove laces. Stuff shoes with newspaper to create a firm painting surface. Wipe the canvas clean. Sketch your design lightly with a pencil if needed.
Paint in thin layers. Start with base colors. Add details once dry. Tape off sections for clean lines. Let dry overnight. Seal with waterproof spray to protect against rain and dirt. Replace laces once everything cures.
Pro Tip: Start with a simple design like stripes or color blocking. Detailed art on curved surfaces takes practice.
Skill Level: Beginner to Intermediate
Time Required: Three to four hours
Conclusion
Paint changes things. Not just walls and furniture. It changes how a room feels.
You don’t need perfect technique or expensive supplies. You need a free afternoon and a willingness to try. Some projects will surprise you. Others might flop. Both are fine.
Painted flops become base coats for the next attempt.
Start small if big feels scary. A mason jar. A plant pot. A single canvas. One finished project leads to another. Before you know it, you’re eyeing that accent wall.
Your home should look like you live in it. Full of your choices. Your colors. Your happy accidents.
So grab a brush. Pick a project. Your walls are waiting.